


Art Docent Program
Everett Public Schools
Table of Contents
Section 1: Program Overview . . . . . . . . 1
Section 2: Getting Started . . . . . . . . . . . 3
Section 3: Visual Arts Curriculum . . . 22
Kindergarten . . . . . 32
Grade 1 . . . . . . . . . 40
Grade 2 . . . . . . . . . 48
Grade 3 . . . . . . . . . 57
Grade 4 . . . . . . . . . 68
Grade 5 . . . . . . . . . 77
Section 4: Teaching the Visual Arts . . 88
Section 5: Resources and Forms . . . . 119
- 1 -
Section 1: Program Overview
“If we hope for our children that
they will become full human
beings and that they will move
towards actualizing the
potentialities that they have, then,
as nearly as I can make out, the
only kind of education in
existence today that has any faint
inkling of such goals is art
education.”
-Abraham Maslow
- 2 -
Art Docent Program
Everett Public Schools
Goals of the Program
The main goal of the Art Docent Program is:
To introduce and familiarize elementary school children with art,
great artists, and art masterpieces, by:
Encouraging them to become familiar with famous art
masterpieces, artists and art history,
Helping them develop knowledge and acceptance for
differences among cultures, artists, and periods of history
through art,
Developing their ability to understand and speak the
language of art using art vocabulary,
Applying their knowledge of art in their own creative
endeavors,
Establishing and supporting the legitimacy of art as a critical
part of the basic curriculum.
And finally…..
Feeling comfortable with art and
ENJOYING
it!
- 3 -
Everett Public Schools
JOB TITLE:
Art Docent
REPORTING TO:
Art Docent Coordinator
ORGANIZATION:
School Site
HOURS OF WORK:
Flexible, as determined by supervisor
CONTACT:
Allison Larsen, Humanities Curriculum Specialist (425) 385-4063
JOB PURPOSE:
To introduce and share with elementary school children art processes, great artists and art masterpieces.
MAIN RESPONSIBILITIES:
?
Visit a classroom monthly (October – May) to present artwork, and possibly an art lesson/activity,
for the students in the class.
?
Work with the Docent Coordinator to locate, checkout and return materials for the presentation
according to the guidelines established at the school.
?
Work with the classroom teacher in developing a schedule of presentations for the year that
complements classroom instruction and the teacher’s objectives and schedule.
?
Do some basic research on the masterpiece/artist or style of art being presented before the
presentation.
?
Attend the docent trainings offered by the district, and docent meetings at your school as held by
the docent coordinator.
?
Be prompt and reliable about your presentation schedule. If you are unable to make a scheduled
session, give the teacher as much advance notice as possible, so that they can plan alternative
activities.
KEY SKILLS:
E (essential) I (important) U (useful)
Teamwork
E
Ability to work cooperatively with all colleagues
Time Management
E
Demonstrates commitment to agreed schedules, yet can be
flexible as the need requires
Planning & organizing
E
Accurate administration records used to ensure all activities run
with minimum error or disruption
Job knowledge
U
Demonstrates an understanding of art history and has some
experience talking to groups
Communication
I
Demonstrates clear and concise verbal/written skills. Utilizes
all methods of communicating i.e. telephone, e-mail, web, etc.
TRAINING:
?
On-the-job training on the role of an Art Docent.
?
Off-the-job training in liaison with the school district to increase art history knowledge.
BENEFITS:
?
A greater appreciation and understanding of art, and how it can contribute to the success of a
student’s academic career.
?
Increased confidence, communication skills and knowledge of art as well as a chance to work with
children and develop networking opportunities.
- 4 -
Everett Public Schools
JOB TITLE:
Art Docent Coordinator
REPORTING TO:
Art Docent Program Coordinator
ORGANIZATION:
School Site
HOURS OF WORK:
Flexible, as determined by supervisor
CONTACT:
Allison Larsen, Humanities Curriculum Specialist (425) 385-4063
JOB PURPOSE:
The Art Docent Coordinator (ADC) plays a critical role in a school’s volunteer program. The ADC acts as
the liaison between the art docents and Everett School District. Demonstrating administration and
communication skills, the ADC ensures that suitable volunteer docents are recruited, trained and placed
within the school, to give students exposure to great artists and art masterpieces and find success in school.
MAIN RESPONSIBILITIES:
?
Work together with school principal to establish the need for volunteer docents within the school.
?
Assist in the recruitment and placement of suitable volunteers utilizing PTAs, teachers, parents, etc.
?
Help provide orientation and training opportunities to new and established art docents in liaison
with the school district.
?
Oversee the art materials for the docent program and ensure that suitable resources are available
when needed.
?
Provide regular feedback to the curriculum specialist on the art docent program within the school.
?
Share information and knowledge relating to the art program/materials/lessons with all docents
?
Maintain an accurate database on all art docent activity.
?
Actively promote the school’s docent program via newsletters, parent events etc.
?
Work with district to provide regular communication, recognition and appreciation to docents.
KEY SKILLS:
E (essential) I (important) U (useful)
Teamwork
E
Ability to work cooperatively with all colleagues
Time Management
E
Demonstrates commitment to agreed schedules, yet can be
flexible as the need requires
Planning & organizing
E
Accurate administration records used to ensure all activities run
with minimum error or disruption
Job knowledge
U
Demonstrates an understanding of art history and has some
experience talking to groups
Communication
I
Demonstrates clear and concise verbal/written skills. Utilizes
all methods of communicating i.e. telephone, e-mail, web, etc.
TRAINING:
?
On-the-job training on the role of an Art Docent Coordinator.
?
Off-the-job training in liaison with the school district to increase art history knowledge.
BENEFITS:
?
A greater appreciation and understanding of art, and how it can contribute to the success of a
student’s academic career.
?
Increased confidence, communication skills and knowledge of art as well as a chance to work with
children and develop networking opportunities.
- 5 -
Art Docent Program
Everett Public Schools
Other Roles
Partnering Teacher:
The Partnering Teacher is an integral part of a successful art
docent experience. The art docent is a volunteer in the teacher’s
classroom; therefore, building a positive relationship is necessary.
The partnering teacher assists the art docent to plan appropriate
art lessons and provides classroom management that creates a
successful lesson.
School Principal:
The School Principal can be an important supporter of the art
docent program. The principal can communicate information,
help art docents connect with teachers, and help solve problems.
Back to top
School PTA:
While the PTA’s role varies by school, the PTA can serve as an
important organization to connect with volunteers, organize art
shows, and provide supplemental funding for the art docent
program. Often Art Docent volunteers are also active members
of the PTA.
District Art Docent Program Coordinator:
Everett Public Schools also provides a district coordinator for the
art docent program. The coordinator gives information about the
program, coordinates district art shows, and works with the
School Art Docent Coordinators to publicize training events and
connect Art Docents across our school district.
- 6 -
Art Docent Program
Everett Public Schools
Teacher Information
?
An Art Docent is a parent or other adult from the community who has been
trained to give a 15-20 minute presentation on an Art masterpiece, and to follow
this up with an art activity, if desired.
?
Hosting a parent docent in your classroom is voluntary on your part
. If you do not
feel comfortable hosting this program, please decline the invitation by contacting the
docent coordinator at your school.
?
Know who your docent coordinator is and how to contact him/her:
There is a
docent coordinator at your school who is in charge of helping recruit docents and for
keeping track of shared materials used in the program. They also function as a
communications liaison for the program within your school and the district.
?
Help your classroom’s docent plan their presentations
: Docents are asked to meet
with you, the cooperating teacher, to plan their presentations for the year. Planning
forms are included in this guide. Fill them out together so each of you has copy.
?
Bring ideas to the planning session.
Presentations can be done around specific art
vocabulary and concepts, such as art elements like line and shape. They can also be
done areas of curricular focus, such as historical periods, specific artists, subject matter,
themes such as seasons, weather, etc. It is helpful to the parent if you have some ideas
about what you would like to have presented to your students.
?
Docents can use the ‘Adventures in Art’ curriculum/texts to plan and prepare
their presentations.
The docent coordinator at your school has copies of Teacher’s
Editions to check out, if the docent wants to take these home to study before a
presentation. Work with the docent to make the best use of this curriculum resource.
?
Retain ultimate ownership over the Docent Handbook
. This guide has a number of
resources available for anyone teaching art, included the recommended 20 core lessons
in the ‘Adventures in Art’ curriculum for each grade level. While this is primarily a
resource developed for the Docent Parent, consider it a resource for your own use in
teaching art in the classroom. Make sure that it is returned to you by the end of the
school year, and that it lives primarily in your classroom when not being used by the
docent.
- 7 -
?
Try to provide space for art prints to hang in your classroom:
Once the docent has
presented an art print to your class, it is helpful to let the print hang in the classroom,
along with related vocabulary words, for the month. If the presentation included art
activities, you might also want to provide space for student work to be displayed as
well.
?
Have students wear name tags for the presentation
. Prepare students for the
presentation by emphasizing that art and art appreciation is an important part of their
education. Have them wear nametags so that docent can become familiar with their
names.
?
Help the docent locate and prepare the art materials needed, if an art activity is
planned.
Work with the docent before the presentation so that materials are assembled
and ready to go before
the presentation.
?
Remain in the classroom during the docent’s presentation, and retain ownership
of classroom management concerns
. Make sure that the parent is aware of behavior
standards in your classroom and typical interventions you might make for disruptive
students. Follow through to make appropriate interventions if students misbehave
during the docent’s presentation. Be clear with the docent from the outset that they are
not responsible for managing student behavior, but that you are open to any concerns
they may have.
?
Be sure the Docent Parent knows how to contact you if they are not able to give a
scheduled presentation
. If a docent is unable to make a scheduled presentation, be
sure that they know how to contact you so that you can plan accordingly.
?
Use the docent experience to expand your own knowledge about teaching Visual
Art
. Occasionally, docent volunteers will have extensive background in art, and can be
an important resource in expanding your own abilities to teach within this discipline;
particularly if you don’t have much background yourself. Even if the docent doesn’t
have much art experience, this can be a shared learning experience for everyone. Using
the ‘Adventures in Art’ curriculum can help you design successful art learning
activities. Art is all about learning to take risks—the more you try things, the more you
will know. Keep your sense of humor and enjoy the process
!
- 8 -
Section 2: Getting Started
- 9 -
Art Docent Program
Everett Public Schools
Getting Started
Each Art Docent should plan to present a monthly art lesson. Each lesson should last about 1 hour
and include the following basic elements:
?
A presentation about a Master Artist (5-10 minutes).
?
1 or 2 key visual arts vocabulary words.
?
A demonstration and practice of a visual arts skill.
?
A hands-on project where students have the opportunity to use their new skill.
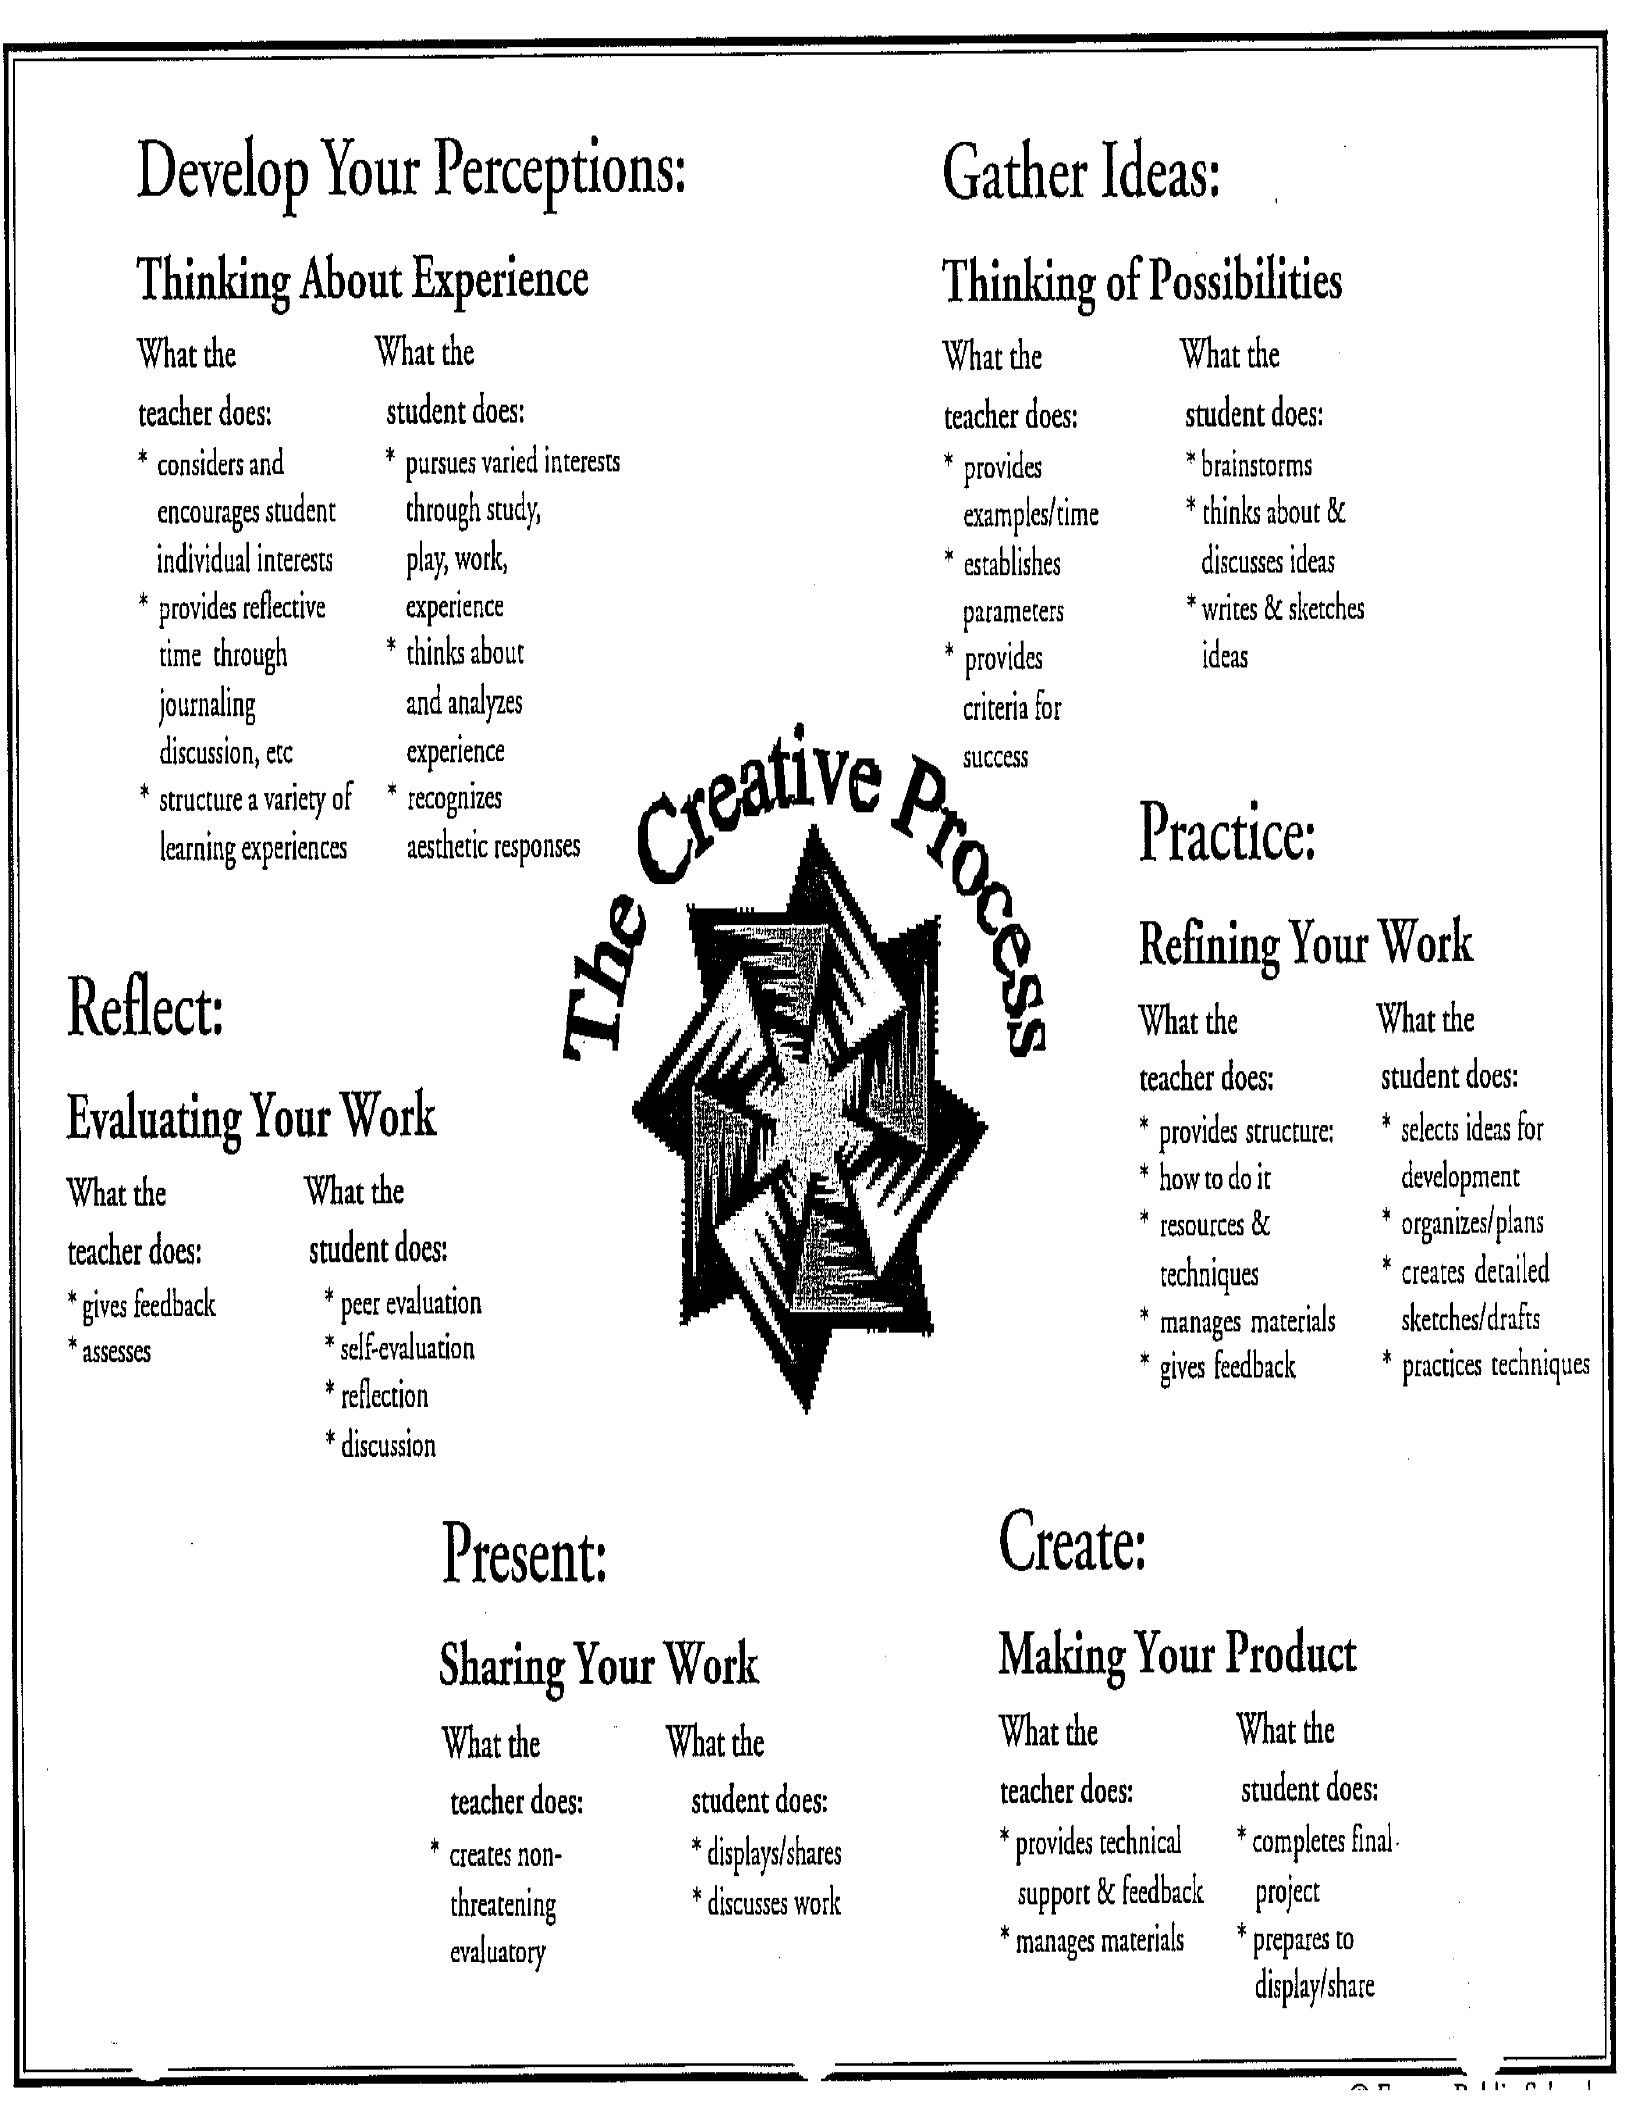
An important part of learning in the visual arts is the Creative Process. During this process,
students think about their experiences, gather ideas to express through their art work, practice art
skills, and create, present and evaluate their art work.
As the school year progresses, the Art Docent can build on skills students learn in prior lessons.
The Art Docent and Partnering Teacher can work together to determine the appropriate amount of
time needed for each lesson, how to integrate the lesson with other curriculum, and how to follow-
up on the lesson between Art Docent visits.
Carefully planning a lesson is essential to making it successful. The following documents are
guides that Art Docents and Partnering Teachers can use to get started.
?
Teacher/Docent Planning Calendar
?
Lesson Planning Form
?
Guidelines for Presenting in the Classroom
?
Presentation Format and Techniques
?
Sample Questions
?
Partnering Teachers: Supporting Your Art Docent Volunteer
?
Guidelines for Displaying Student Artwork
- 10 -
- 11 -
Art Docent Program
Everett Public Schools
Art Docent /Teacher Planning Form
Docent Names(s)/ Phone
:
_______________________________________________________________________
Docent Coordinator:
_____________________________________________________
Phone/ email:
__________________________________________________________
Teacher name:
__________________________________________________________
Phone/email:
___________________________________________________________
Classroom display space available for prints/ student artwork? Yes____ No_____
PRESENTATION SCHEDULE:
OCTOBER:
Print to be presented:______________________________________________________
Optional art activity follow-up: _____________________________________________
Date of Presentation: ______________________________________ Time:__________
NOVEMBER:
Print to be presented:______________________________________________________
Optional art activity follow-up: _____________________________________________
Date of Presentation: ______________________________________ Time:__________
DECEMBER:
Print to be presented:______________________________________________________
Optional art activity follow-up: _____________________________________________
Date of Presentation: ______________________________________ Time:__________
JANUARY:
Print to be presented:______________________________________________________
Optional art activity follow-up: _____________________________________________
Date of Presentation: ______________________________________ Time:__________
- 12 -
FEBRUARY:
Print to be presented:______________________________________________________
Optional art activity follow-up: _____________________________________________
Date of Presentation: ______________________________________ Time:__________
MARCH:
Print to be presented:______________________________________________________
Optional art activity follow-up: _____________________________________________
Date of Presentation: ______________________________________ Time:__________
APRIL:
Print to be presented:______________________________________________________
Optional art activity follow-up: _____________________________________________
Date of Presentation: ______________________________________ Time:__________
MAY:
Print to be presented:______________________________________________________
Optional art activity follow-up: _____________________________________________
Date of Presentation: ______________________________________ Time:__________
Notes:
District Art Docent Program Coordinator: Allison Larsen
(425) 385-4063 / email: alarsen@everettsd.org
- 13 -
Art Docent Program
Everett Public Schools
Art Docent Lesson Planning Form
Date: _________________
Docent Presentation Given by: ________________________________________
Objective: ______________________________________________________________________
Reproduction Title
Master Artist
Reproduction #
Adventures in Art Lesson
Description of Project:
Materials Needed:
Vocabulary Words:
_________________________________
____________________________________
_________________________________
____________________________________
- 14 -
Art Docent Program
Everett Public Schools
Guidelines for Presenting in the Classroom
Plan your presentation:
?
Meet with the teacher to plan your presentations at the beginning of the year
. Ask
what is studied in the classroom, and see if you can connect it with an art print. Use the
Adventures in Art curriculum materials, if desired.
?
Plan your presentation to fit within the time allotted by the teacher:
Use the teacher as
a resource to help decide what is realistic to do in the time allowed. Arrange ahead of time
for display space to leave the print up in the classroom for display if possible.
?
Research the print you are presenting
so you know something about the work and the
artist before you present it. There are resources in the reference section of the docent
handbook to help you find the background information you need.
?
If you are doing an art activity as part of your presentation, coordinate with the
teacher ahead of time to have the materials ready.
Make sure the activity is reinforcing
some of the skills and knowledge presented through the print.
Present the Information:
?
Make sure everyone can see and hear well
. Have the kids move up and sit on the floor
around the print if necessary.
?
Introduce yourself
and be enthusiastic! Maintain eye contact with your audience
throughout the presentation.
?
Provide information about the artwork that is interesting for young children
. Rather
than facts about the artist, focus on anecdotal stories or tidbits about the artist’s life or
technique/style. If you can, bring props or things that help illustrate something about the
work, such as artist’s tools, clothing or music of the period, pictures or slides.
?
Select some art words or concepts that are related to the print, and use them in your
presentation.
If you leave the print on display in the classroom, print the art words that are
related to it and leave them on display, also.
?
Your job is to help kids find “a way in” to the artwork
. Let the children discover the
work by asking open-ended questions. The children will interpret it through the questions
you ask and the information you give them. You shouldn’t be the one doing all the talking.
- 15 -
?
If you do not know something, say so
. Allow the children to formulate their own answers
to questions that arise.
?
Try to avoid telling a child their answer is wrong
. Everyone sees art through a different
lens. Encourage them to share their observations, and emphasize that everyone’s feelings
and thoughts are important. A useful phrase is “Well, I never thought of it that way!”
?
The teacher will stay in the classroom during your presentation
. For the sake of
consistency, allow them to handle any discipline problems that may arise.
Wrap it up:
?
When the presentation is over, compliment and give recognition to the children
for
their behavior/ observations, and/or work, as appropriate. Let the children know that you
enjoyed your visit to the classroom, and are looking forward to coming back.
?
Help the teacher with classroom clean-up
, if appropriate.
?
Hang the art print in the classroom
, if possible, along with any art vocabulary words you
may have presented. If a related art activity was done, display student work, as space
permits.
?
Thank the teacher
for their help and cooperation.
Keep your sense of humor, relax and enjoy yourself!
- 16 -
Art Docent Program
Everett Public Schools
A Presentation Format:
The Feldman Model
The following model was developed by Edmund Feldman, University Professor and influential Art
Educator, as a format for helping children to find meaning in artwork. This format is used almost
universally by art teachers and in art textbooks, as a strategy for talking about art with children. It
encourages children to look closely at an artwork and to interpret it based on what they see. It is a
model, which provides stepping stones for critical thinking and also encourages children to use art
vocabulary. The model follows four general steps:
?
Begin by DESCRIBING the work: The essential question here is ‘What do you see?’
A description could include an inventory of things like the medium used, the size of the work,
the subject matter and placement, and the details of how the subject matter is presented to the
viewer. Art historical data related to the artist and the work could be included.
?
ANALYZE how the artist structured the work: The essential question here is ‘How is this work
organized?’
Kids should be working towards identifying the main art elements and principles used in the
work (see the art vocabulary section of handbook), and how the artist organized them to
achieve certain effects, or feelings, and possibly, how they relate to a particular style of art.
?
INTERPRET the work: The essential question here is ‘What is the artist trying to tell us?’
Kids should be encouraged to identify the ‘feeling’ or ‘mood’ of the work, and any visual
symbols the artist has chosen to include. Furthermore, you want them to look at how the artist
achieved any expressive content in the work and what the ‘message’ might be behind the
symbols used. Who was the audience for the work and what do you think was the artist’s
purpose in creating it?
?
EVALUATE the work: The essential question here is ‘ Is this a successful work of art, and why or
why not?’
What makes it good or bad? Does the artwork communicate a message well? Is it technically
a good piece of work? Does it tell us something about the life and times in which the artist
lived? What is a good criterion for judging artwork?
- 17 -
Art Docent Program
Everett Public Schools
Presentation Techniques
?
Students will remember the pictures more if they participate in the discussion each time. Some
skillful questioning will afford them the opportunity to do so. The following are some
suggestions and guidelines for questioning. Good questioning can also be considered a
strategy to extend student thinking.
?
Avoid questions with only one right answer
?
Call on students randomly, not just those with raised hands
?
Utilize think-pair-share, two minutes of individual think time, two minutes discussion with a
partner, then open up the class discussion.
?
Ask follow-ups. Why? Do you agree? Can you elaborate? Tell me more, can you give an
example?
?
Do not use questions that are too vague and open-ended, for example “what do you think of
this picture?” Instead, having been told by a child that a particular painting gives them a
spooky feeling, a good follow-up question might be to ask the group to find all the things in the
picture that created the spooky feeling.
?
Ask for a summary to promote active listening, “Could you please summarize John’s point?”
?
Survey the class, “How many people agree with the artist?” (thumbs up, thumbs down)
?
Allow for student calling, “Richard will you please call on someone else to respond?”
?
Challenge the responses by requiring students to defend their reasoning against different points
of view
?
Ask students to reflect on their thinking,
?
“Describe how you arrived at your answer.”
?
Consider letting the students develop their own questions.
?
Compliment students for their answers after your presentation.
- 18 -
Art Docent Program
Everett Public Schools
Sample Questions
Use these questions as a guide in preparing your presentation. Remember to ask ‘open’ questions i.e.
questions that cannot be answered with simply a yes or no. Open questions usually begin with What?
When? Where? Why? Who? How….?
Questions relating to the subject matter:
1. What is the subject of the painting?
2. What aspect of the story is the artist trying to tell?
3. What kind of movement/activity can you see?
4. What might have happened just before this scene?
5. What do you think will happen next?
6. Who are the people in the print?
7. When do you think they would have lived?
8. How would you describe the location or setting?
Relating to the senses:
1. What sounds would you hear if you were inside this picture?
2. What might you smell?
3. How do you think the fruit tastes?
4. How would the clothes feel?
5. If this picture made music, what kind of music would you hear? Why?
Relating to Art Elements:
1. What art element is the artist using in this painting?
2. What kinds of shapes /lines/ textures/ etc did the artist use?
3. How would you describe the lines in the painting? Thick? Thin? Fuzzy? Curved?
4. How would you describe the different textures in the painting?
5. How did the artist show space (depth /distance) in this painting?
Relating to Art Principles:
1. What is the first thing you notice in this picture? (focal point/emphasis)
2. Does the painting feel heavier on one side than the other? (balance)
3. How often are colors repeated? (Repetition)
4. What else can you find in the picture that is repeated? (repetition)
5. What is the path the artist has created for your eye to move through this picture? (movement/
rhythm)
6. Has the artist deliberately made something in the picture bigger? Why? (proportion)
7. What has the artist done to make this picture interesting to look at? (variety)
- 19 -
Relating to color
1. What kinds of color did the artist use? Bright/Dull? Dark/ Light? Warm/Cool?
2. How do the colors contribute to the feeling or mood of the painting?
3. If the artist had used a different color how would it have changed the painting?
Questions for portraits
1. What do you do before you have your picture taken at school? Why?
2. Why do you have your picture taken?
3. Why do you think the person in the reproduction had their picture painted?
4. What do you think the artist wants you to know about this person?
5. What do the clothes in this picture tell you about the person? Rich? Poor?
6. Is there anything in this picture that tells you what this person likes to do?
7. Is there anything in this picture that tells you how this person made a living?
8. How do you think this person feels in this picture?
9. What makes you think they feel that way?
10. How would a painting of you be different from a photograph of you?
Questions for landscapes
1. If you could walk into this picture where would you start?
2. How does the landscape change as you walk?
3. Are there any people you might meet along the way?
4. What are they doing?
5. Are there any animals or birds you might see?
6. What kinds of things might you smell in this painting?
7. Is there a place near where you live that might smell the same?
8. What kind of day is it in this painting? What time of day, year? What tells you this?
9. How do you think you would feel if you were in this painting? Hungry? Cold? Tired?
10. Can you think of a place near where you live that reminds you of this painting? What one thing
about that place is similar to something in this painting?
General questions
1. If you could meet the artist, what questions would you ask about this painting?
2. What would you name this picture?
3. If you could own this painting, where would you hang it?
4. Why do you think the artist painted this picture?
8. If you could change one thing about this picture what would it be?
- 20 -
Art Docent Program
Everett Public Schools
Supporting Your Docent Volunteer
Back to top
Be Clear About Your Expectations:
?
Set parameters on the time you feel comfortable allotting to the Docent Program:
Ensure that the docent understands right from the start how much class time can be devoted
to this instruction, and work with them in a proactive way to help stay within your
guidelines. Art projects can always be taken home to be worked on, if there is not enough
class time available.
?
Be clear about who is doing the prep work for art activities
. Prepping materials for an
art activity is time consuming. If you don’t have the time, let your docent know this and
help them to plan accordingly.
?
Be sensitive to budget constraints.
Make sure you are both clear about who is providing
the materials for art projects. If special materials are not available through the PTA budget
or the school, try to work out an equitable way to pay for them without expecting the
docent to pick up this cost.
Back to top
Help Your Docent in their Presentation:
?
Be sensitive to the fact that many docent volunteers haven’t given group presentations
before
, and are nervous about doing so. Help them by providing encouragement and
support for their efforts.
?
Docents often feel frustrated
when they put a lot of time and energy into planning a
presentation and an activity for the classroom, and then the teacher gives them little or no
feedback on how it went, if it worked well, etc.
?
Give feedback, preferably in writing, on how they did.
A quick note at the end of a
presentation on what they did well, with one or two suggestions for improvements next
time, is helpful feedback. Make allowances for the fact that docents are novices in the
classroom, not professionals.
?
Feedback might include comments on:
?
Questioning strategies used
?
What helped kids to get engaged in the learning
?
What was learned
?
The relevance and age appropriateness of the material presented
?
How the docent recognized student contributions
?
Materials management strategies
Back to top
Thank them for their time and effort.
- 21 -
Art Docent Program
Everett Public Schools
Guidelines for Displaying Student Work
Children’s artwork is often precious to the child and their family. Always treat it respectfully. When
mounting artwork, preserve the integrity of the work so that it can be matted and/or framed for formal
displayed if desired by parents following the guidelines below:
Signing the Artwork:
Have the student artist always sign the artwork:
?
Edition Number
?
Title in quotation marks
?
Signature
?
Year
Displaying Two Dimensional Work
:
?
Avoid putting pinholes in the work or gluing name tags directly to an artwork.
?
Do not laminate the work (unless directed by an art contest to do so).
?
Center and mount work either horizontally or vertically be never diagonally. Leave an even
margin around the work on all sides.
?
Mount work on quality black or white paper/railroad board with past, glue sticks, or double
sided tape. Place a clean sheet of newsprint over the work and keep it steady while rubbing
firmly across it to ensure that it sticks evening to the mounting. White glue is not
recommended because it will cause the work to cockle. Do not use staples.
?
Hang artwork using Fun Tack or push pins. Attach the mounting to the wall, not the artwork.
?
Do not glue student names directly onto the work, only the mounting materials.
?
Art tags should include the full name of the artist, the title of the work, media, teacher and
grade level age. If being displayed outside of school, include the school name.
?
Do not display work publicly without parent permission.
?
Consider color copying or photographing student artwork if they want to take their work home
or you would like to keep the work as an example. Get copies made before preparing the work
for display.
Displaying Three Dimensional Work:
?
Pottery or sculpture can be set on square of neutral colored construction paper (black, white,
gray or brown) as ‘mats’ with tags attached to the mat.
?
Sculpture in the round can be formally mounted with varnished or painted wood scraps or
blocks.
- 22 -
Section 3:
Visual Arts Curriculum
- 23 -
Art Docent Program
Everett Public Schools
Visual Arts Curriculum and Learning Targets
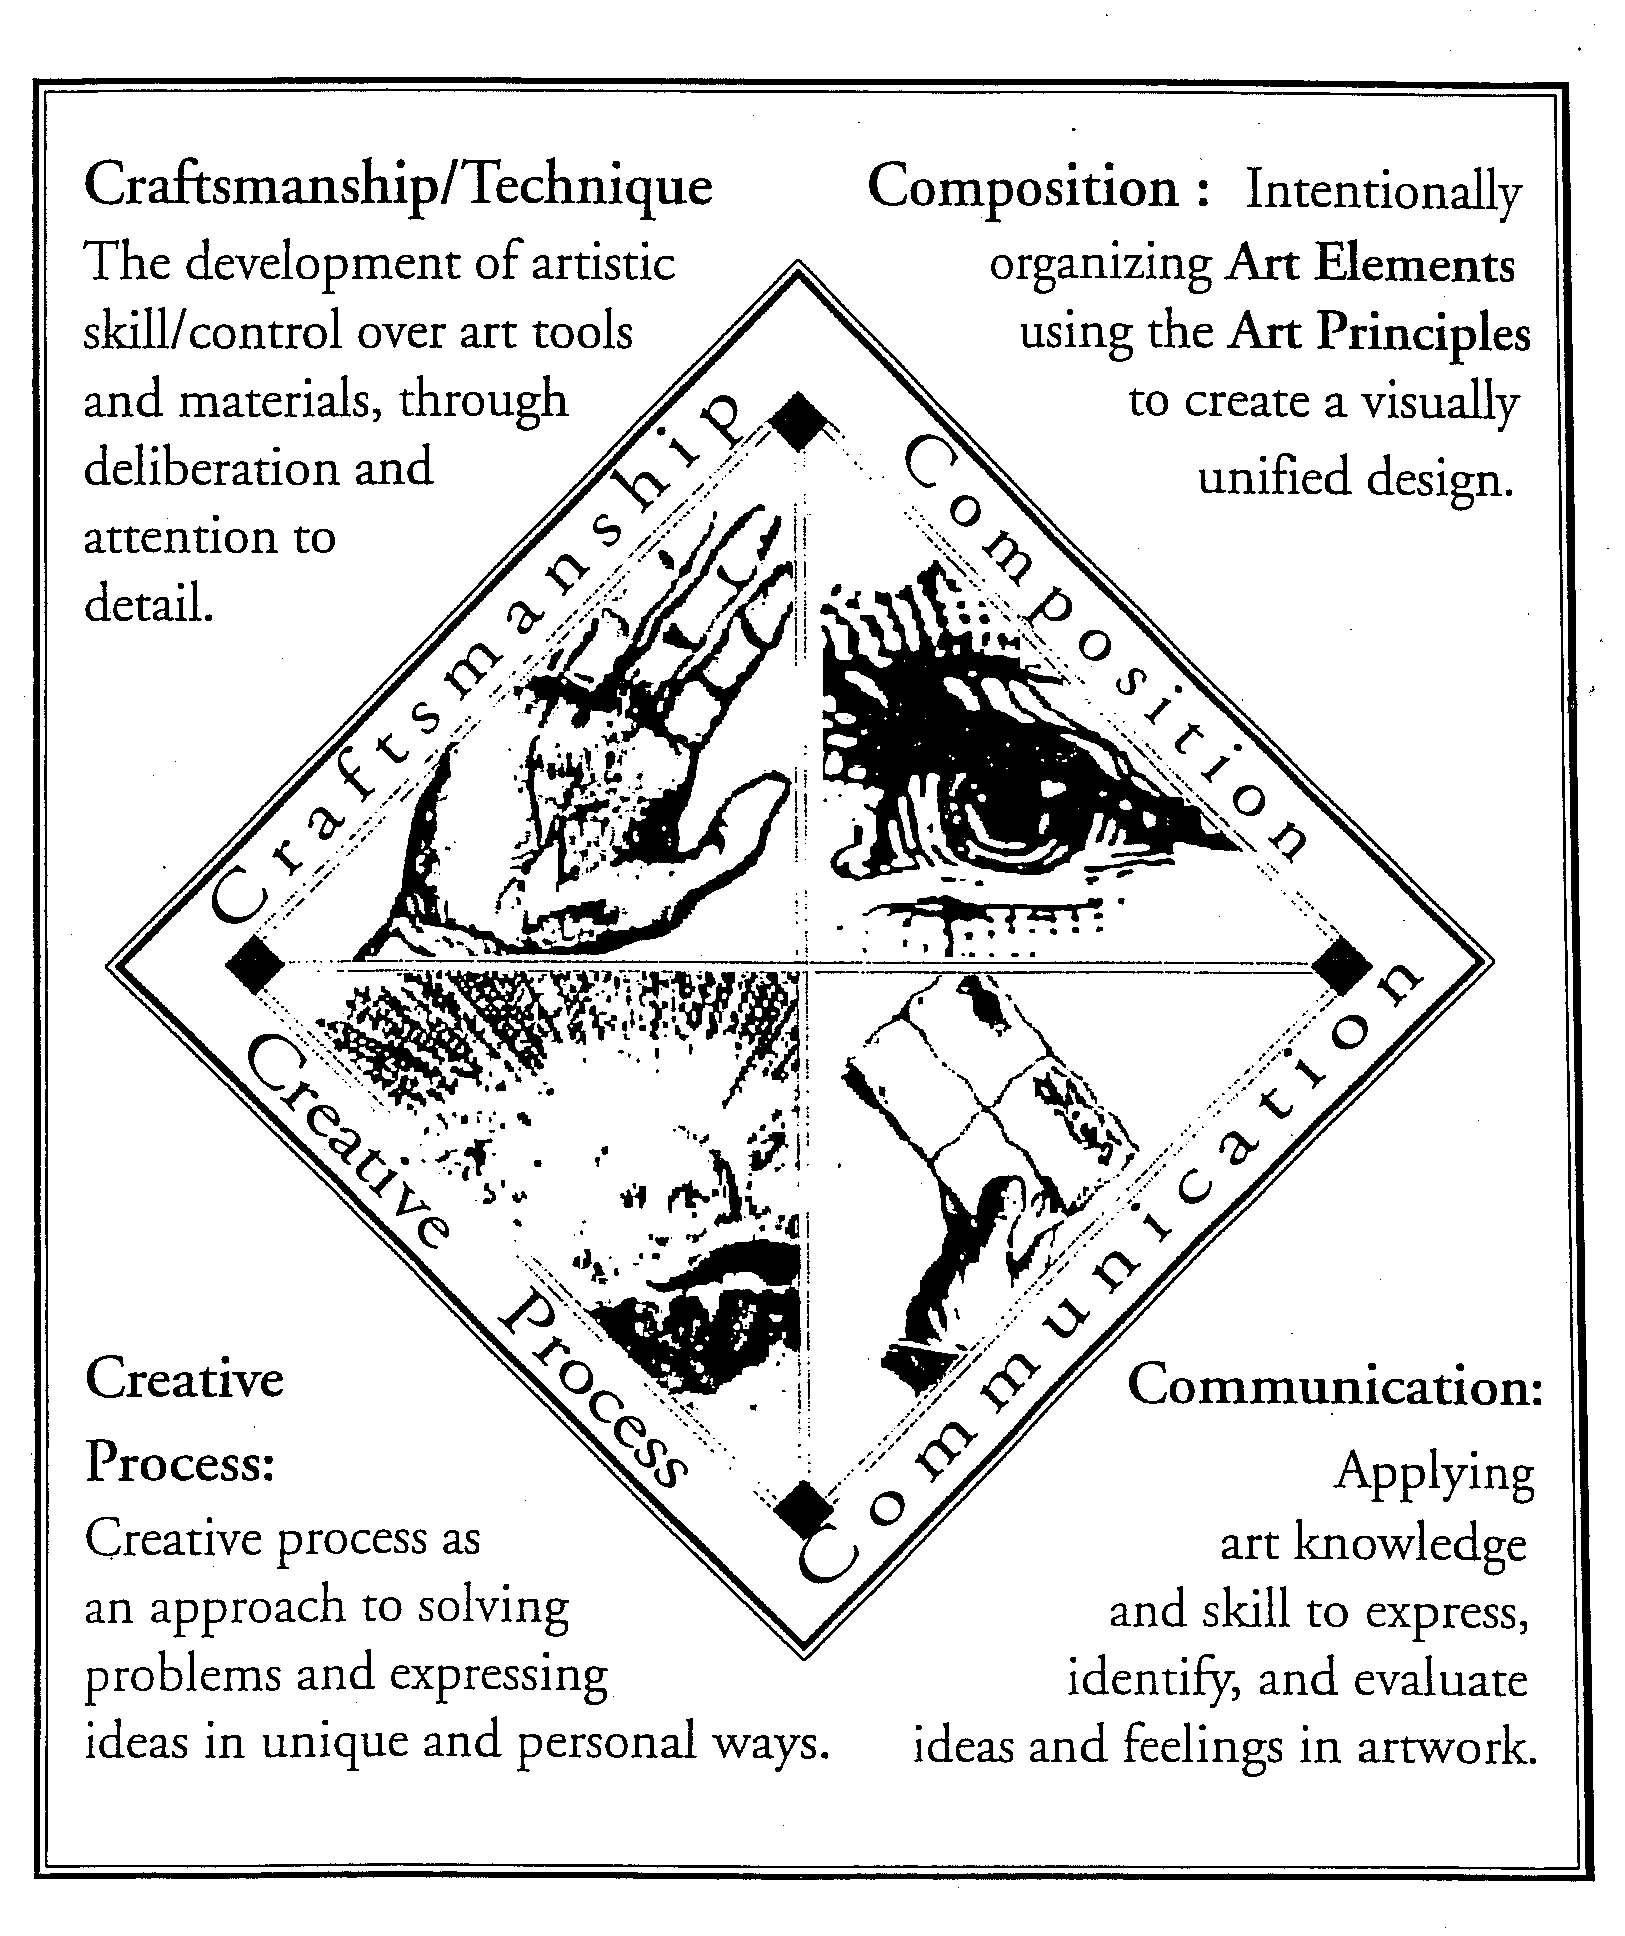
The Visual Arts in the Everett Public Schools focus on four
enduring understandings that we call the 4 C's of Visual Arts:
Craftsmanship, Composition, Communication and the Creative
Process. These four enduring understandings incorporate the
Washington State Essential Academic Learning Requirements in the
Visual Arts. Art Docents and Partnering Teachers should keep
these 4 C's in mind while planning Art Docent lessons.
The Everett Public Schools Adopted Visual Arts Curriculum is
Adventures in Art
by Davis Publications. Please review the
overview and the recommended core lessons from these materials.
Each elementary school building has an inventory of these
materials.
When planning visual arts instruction for elementary students, it is
important to understand the developmental stages of children in the
visual arts and the most important skills and knowledge students
need to learn at a particular grade level. The following documents
can help Partnering Teachers and Art Docents plan appropriate
lessons.
- 24 -
- 25 -
Art Docent Program
Everett Public Schools
Washington State:
Essential Academic Learning Requirements in the Arts*
1. The student understands and applies arts knowledge and skills.
To meet this standard, the student will:
1.1 Understand arts concepts and vocabulary
1.2 Develop arts skills and techniques
1.3 Understand and apply arts styles from various artists, cultures and times
1.4 Apply audience skills in a variety of arts settings and performances
2. The student demonstrates thinking skills using artistic processes.
To meet this standard, the student will:
2.1 Apply a
creative
process in the arts:
?
Conceptualizes the context or purpose
?
Gather information from diverse sources
?
Develop ideas and techniques
?
Organize arts elements, forms, and/or principles into a creative work
?
Reflect for the purpose of elaboration and self evaluation
?
Refine work based on feedback
?
Present work to others
2.2 Apply a
performance
process in the arts:
?
Identify audience and purpose
?
Select artistic work (repertoire) to perform
?
Analyze structure and background of work
?
Interpret by developing a personal interpretation of the work
?
Rehearse, adjust, and refine through evaluation and problem solving
?
Present work for others
?
Reflect and evaluate
2.3 Apply a
responding
process to an arts presentation:
?
Engage actively and purposefully
?
Describe what is seen and/or heard
?
Analyze how the elements are arranged and organized
?
Interpret based on descriptive properties
?
Evaluate using supportive evidence and criteria
3. The student communicates through the arts.
To meet this standard, the student will:
3.1 Use the arts to express and present ideas and feelings
3.2 Use the arts to communicate for a specific purpose
3.3 Develop personal aesthetic criteria to communicate artistic choices
- 26 -
4. The student makes connections within and across the arts to other disciplines, life,
cultures, and work.
To meet this standard, the student will:
4.1 Demonstrate and analyze the connections among the arts disciplines
4.2 Demonstrate and analyze the connections between the arts and other content areas
4.3 Understand how the arts impact lifelong choices
4.4 Understand that the arts shape and reflect culture and history
4.5 Demonstrate knowledge of arts careers and the knowledge of arts skills in the world of
work
EALR #2 -The Creative Process of Creating, Performing and Responding, (CPR) from the NAEP and adapted with
permission of Scott C. Shuler (c) 1993.
*The Arts are defined in the State of Washington to include Dance, Music, Theatre and Visual Arts.
- 27 -
Art Docent Program
Everett Public Schools
Using ‘Adventures in Art’
‘Adventures in Art’ is a commercial text series published by the Davis Publishing House for use in the
elementary classroom. Sets were purchased for use at all elementary schools in the district in 1998.
This text and the accompanying reproductions are available for you to use for your presentations in the
classroom.
Each grade level text contains approximately 60 lessons in Art. To help you and the teaching staff
choose which lesson to use, a committee of Art teachers in the district have identified 20 core lessons
at each grade level that exemplifies the best of what these texts have to offer. They cover two-
dimensional media areas such as drawing, painting, and papercrafts. Supplemental lessons are listed
for the best activities in three dimensional media, such as clay.
Core lessons are listed for each grade level in this section of the handbook. It begins with an overview
of all the identified core and supplemental lessons, and is followed by a more list for each grade level.
Each lesson in these texts is supplemented with poster sized reproductions.
Grades three- five have one set of student texts (30) for each grade level in the school. Grades one and
two have “Big Books,” a student text in a large format that the teacher uses in front of the class.
Kindergarten materials come in ‘kits’ with their own set of reproductions and teacher notes. There are
no texts or big books at this level. Work with the Kindergarten teacher to use these materials.
Teacher texts for grades 1-5 are available to check-out from the docent coordinator at your school if
you want to take them home.
Reproductions of artworks are annotated with notes on the back about the artist and the artwork. This
same information is published in a booklet that comes with the set of prints.
Do not check out the
artwork itself to study before your presentation
. Instead, ask your docent coordinator to check out
the booklet (or copy of it ) to use for study. Information about the prints and the artists are also
available on the Internet at www. Davis-art.com. There is one full set of prints for each grade level in
the school available for use. Contact your docent coordinator to check them out for use in the
classroom.
If your school already has Shorewood prints available for use, you will find that the Davis
prints will complement these nicely. The Davis materials are more culturally diverse than the
Shorewood prints, and contain more examples of work by women and contemporary artists. If
you want to use the Davis curriculum as a basis for your presentations, work with your
cooperating teacher to plan your lesson.
- 28 -
Art Docent Program
Everett Public Schools
Adventures in Art: Recommended Core Lessons
The Visual Art ‘core lessons’ are a sequence of lessons from the Davis Publications ‘Adventures in
Art’ text that are recommended by the district’s Visual Arts Curriculum Committee*. These lessons
were selected from the 60 or so lessons contained in each grade level text for their correlation to the
district scope and sequence for Art, and as being the most user-friendly for teachers with little art
background.
The lessons selected were either drawing, painting or papercraft lessons, with a few exceptions, at
each grade level. Core lessons are listed in their recommended sequence. If teachers attempt all the
core lessons over the course of the year, it means that one art lesson would be presented approximately
every two weeks in the elementary classroom. Supplemental lessons listed cover three dimensional
mediums, such as clay, and include other lessons that were deemed noteworthy for those who would
like to try them.
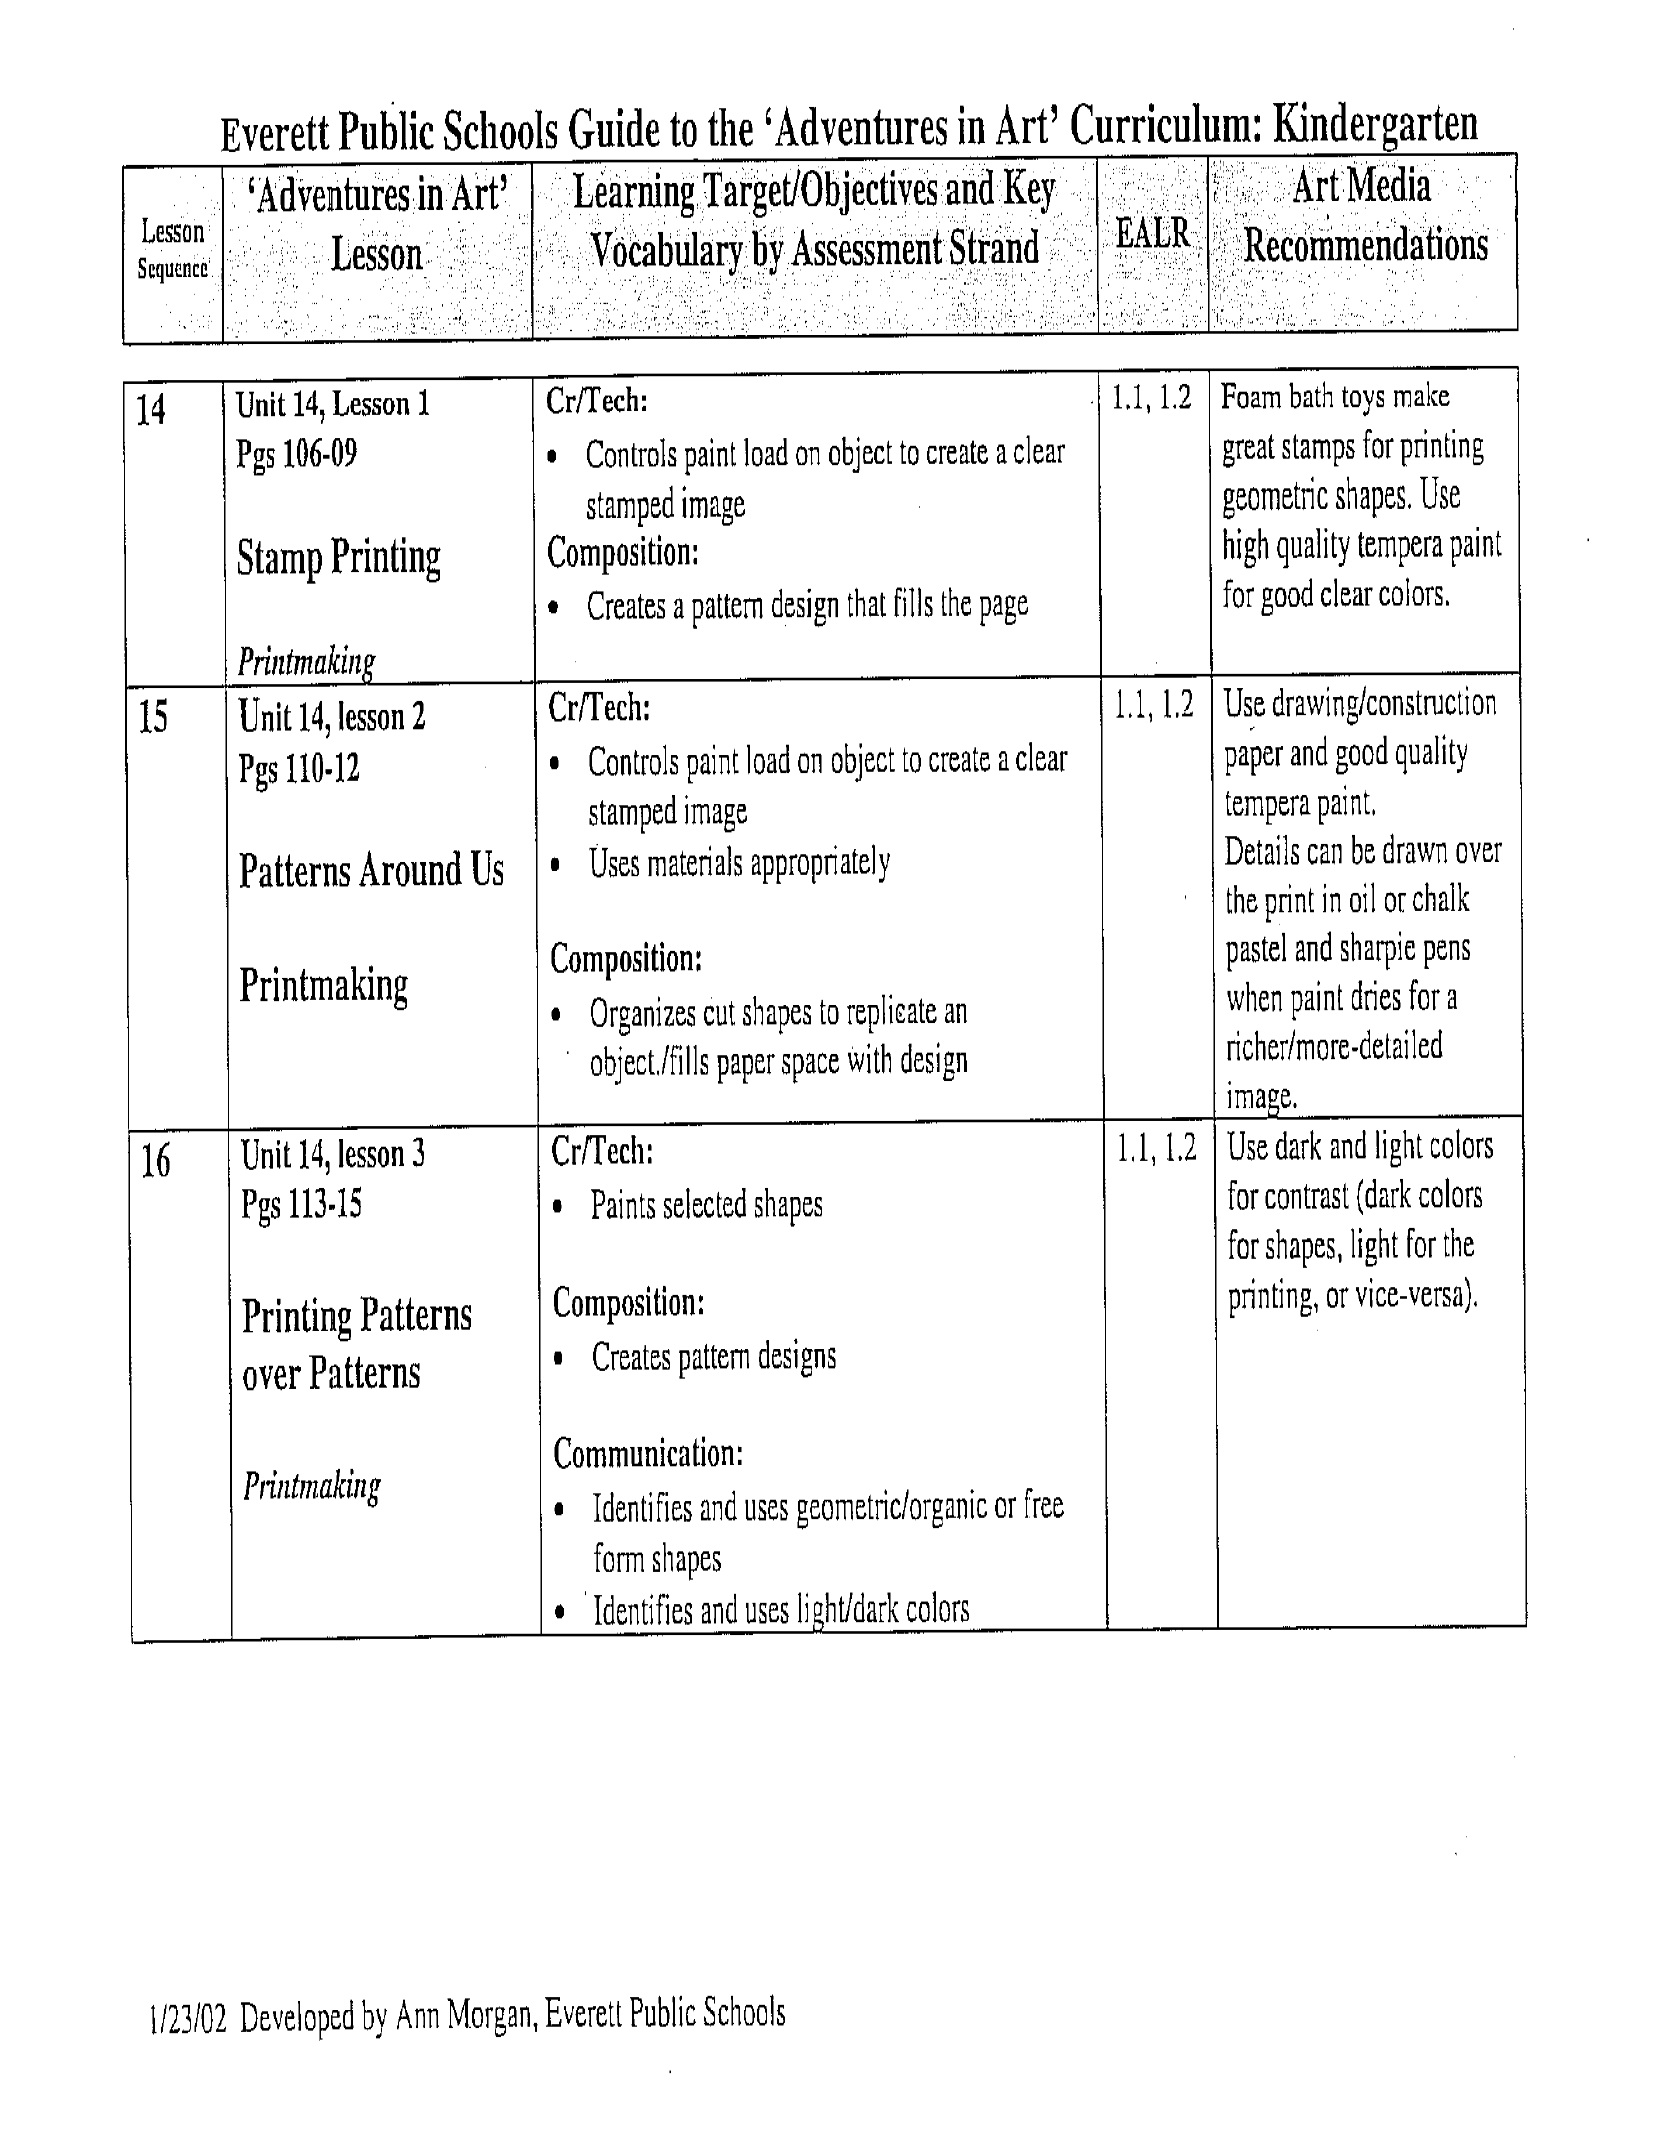
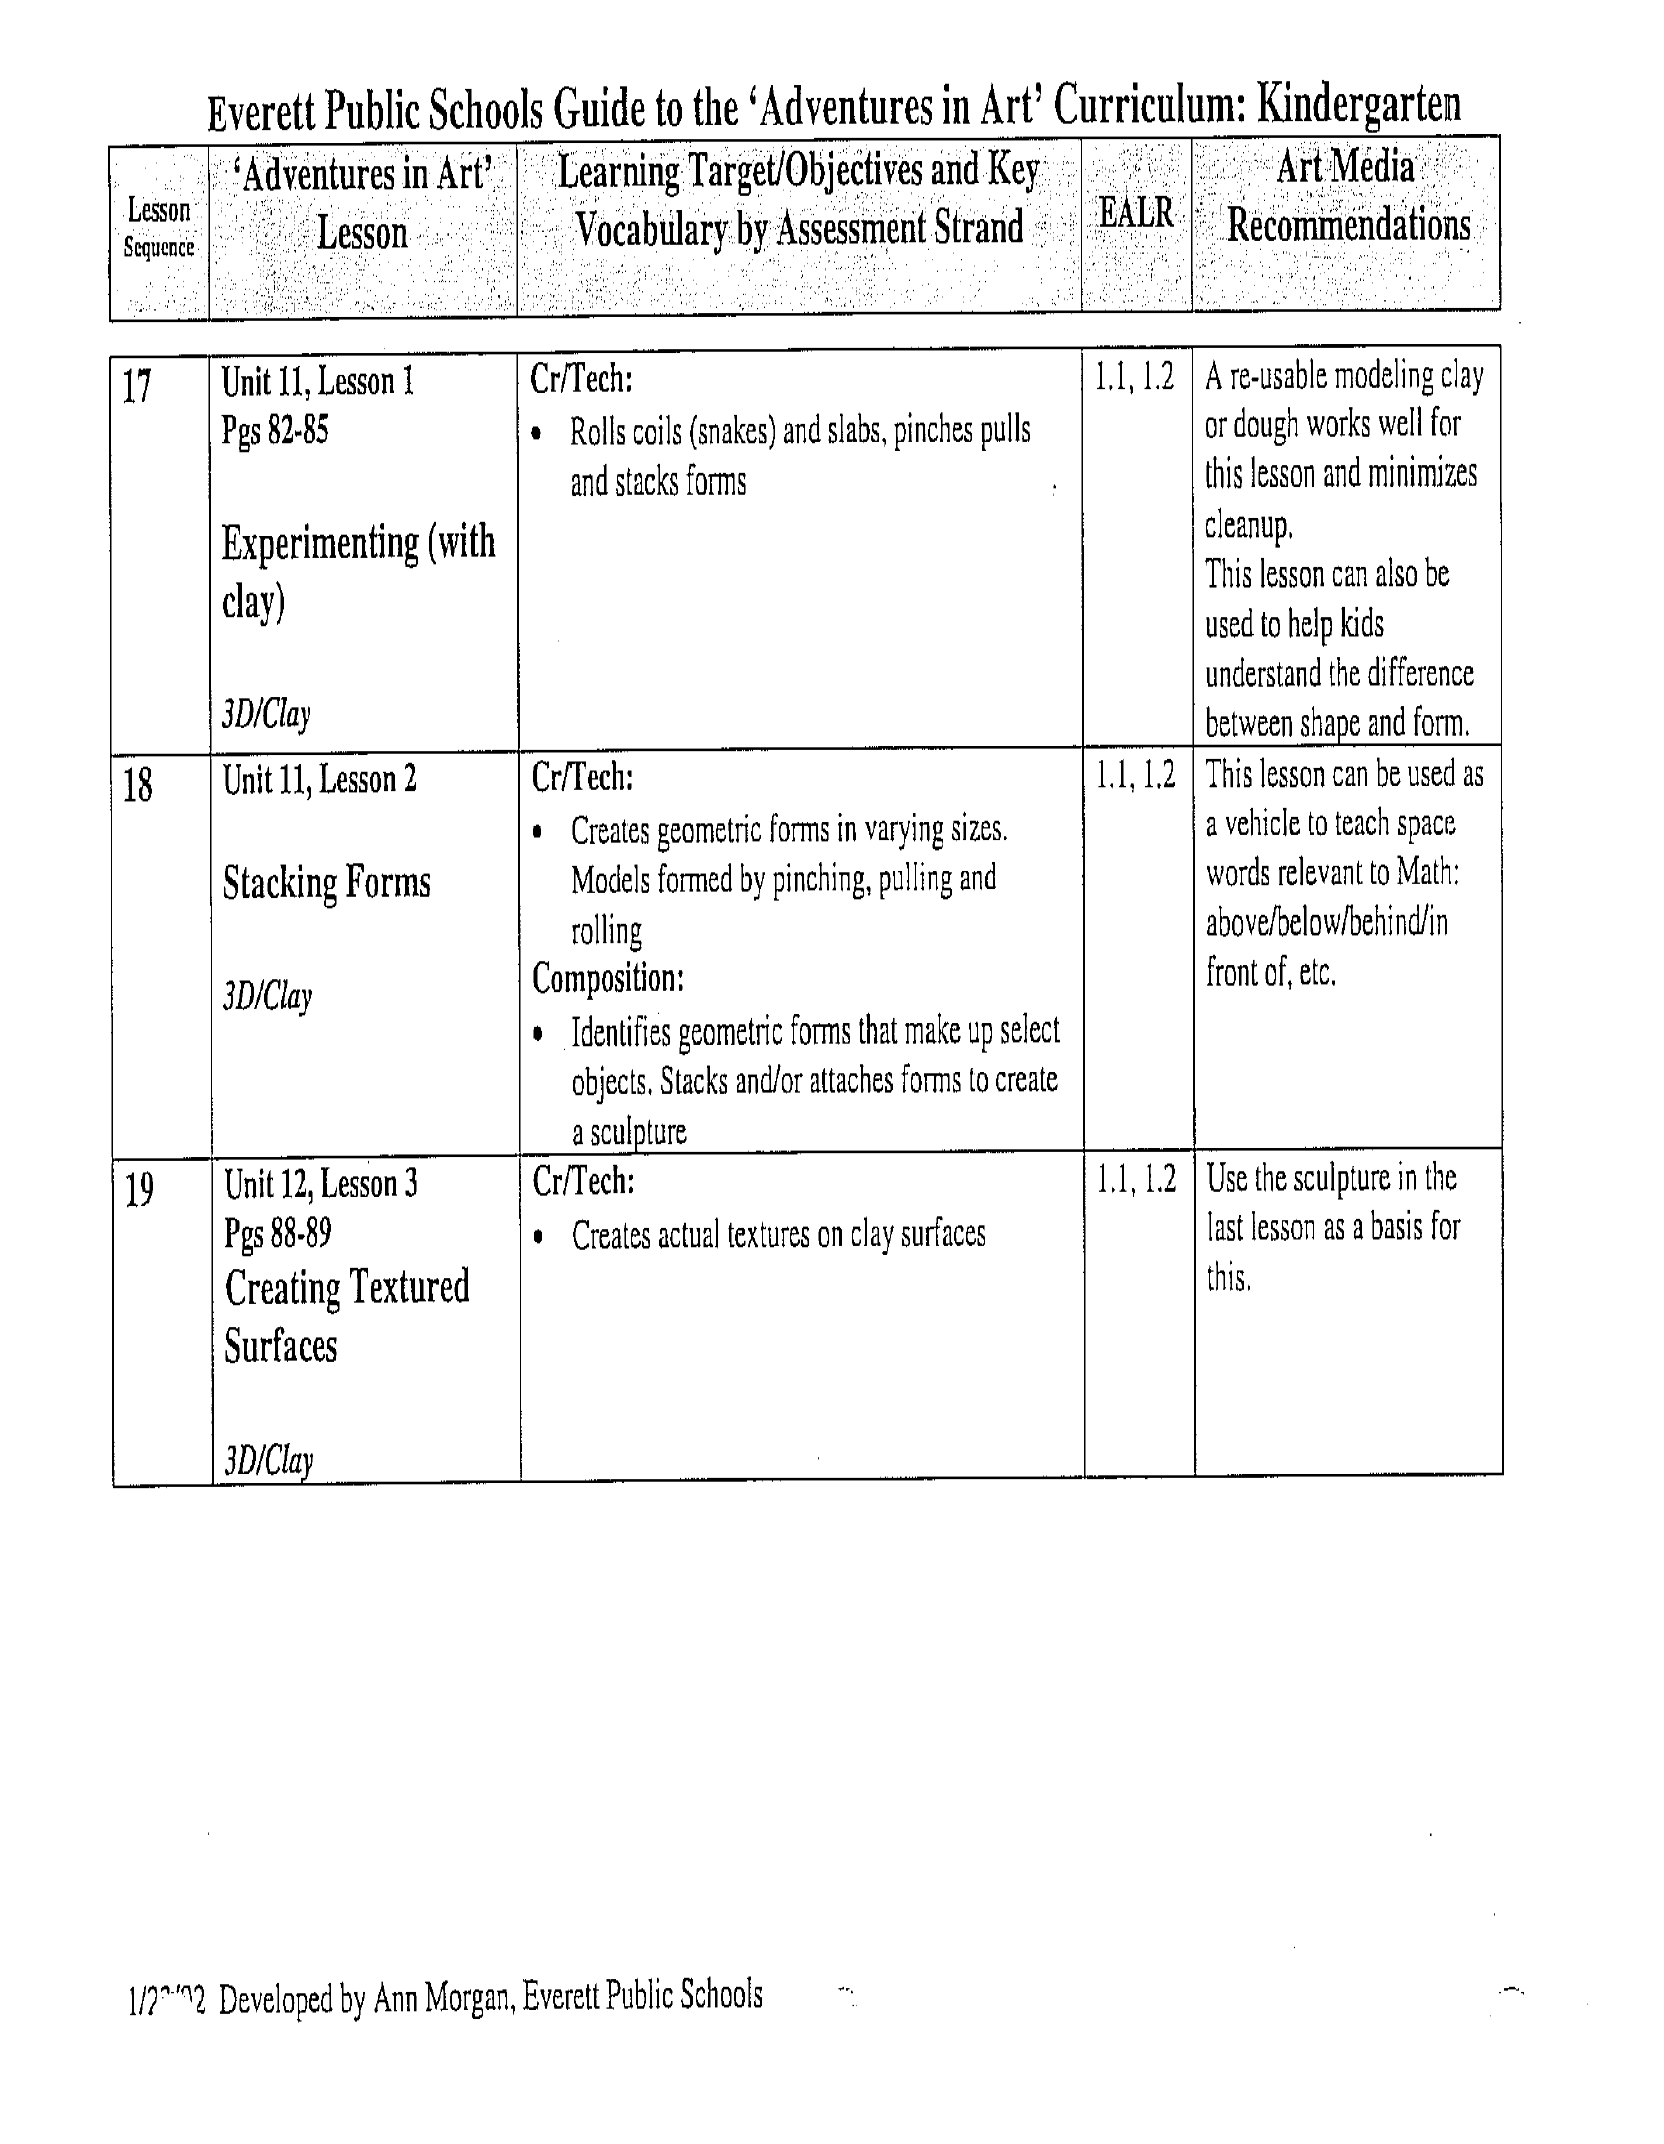
Kindergarten:
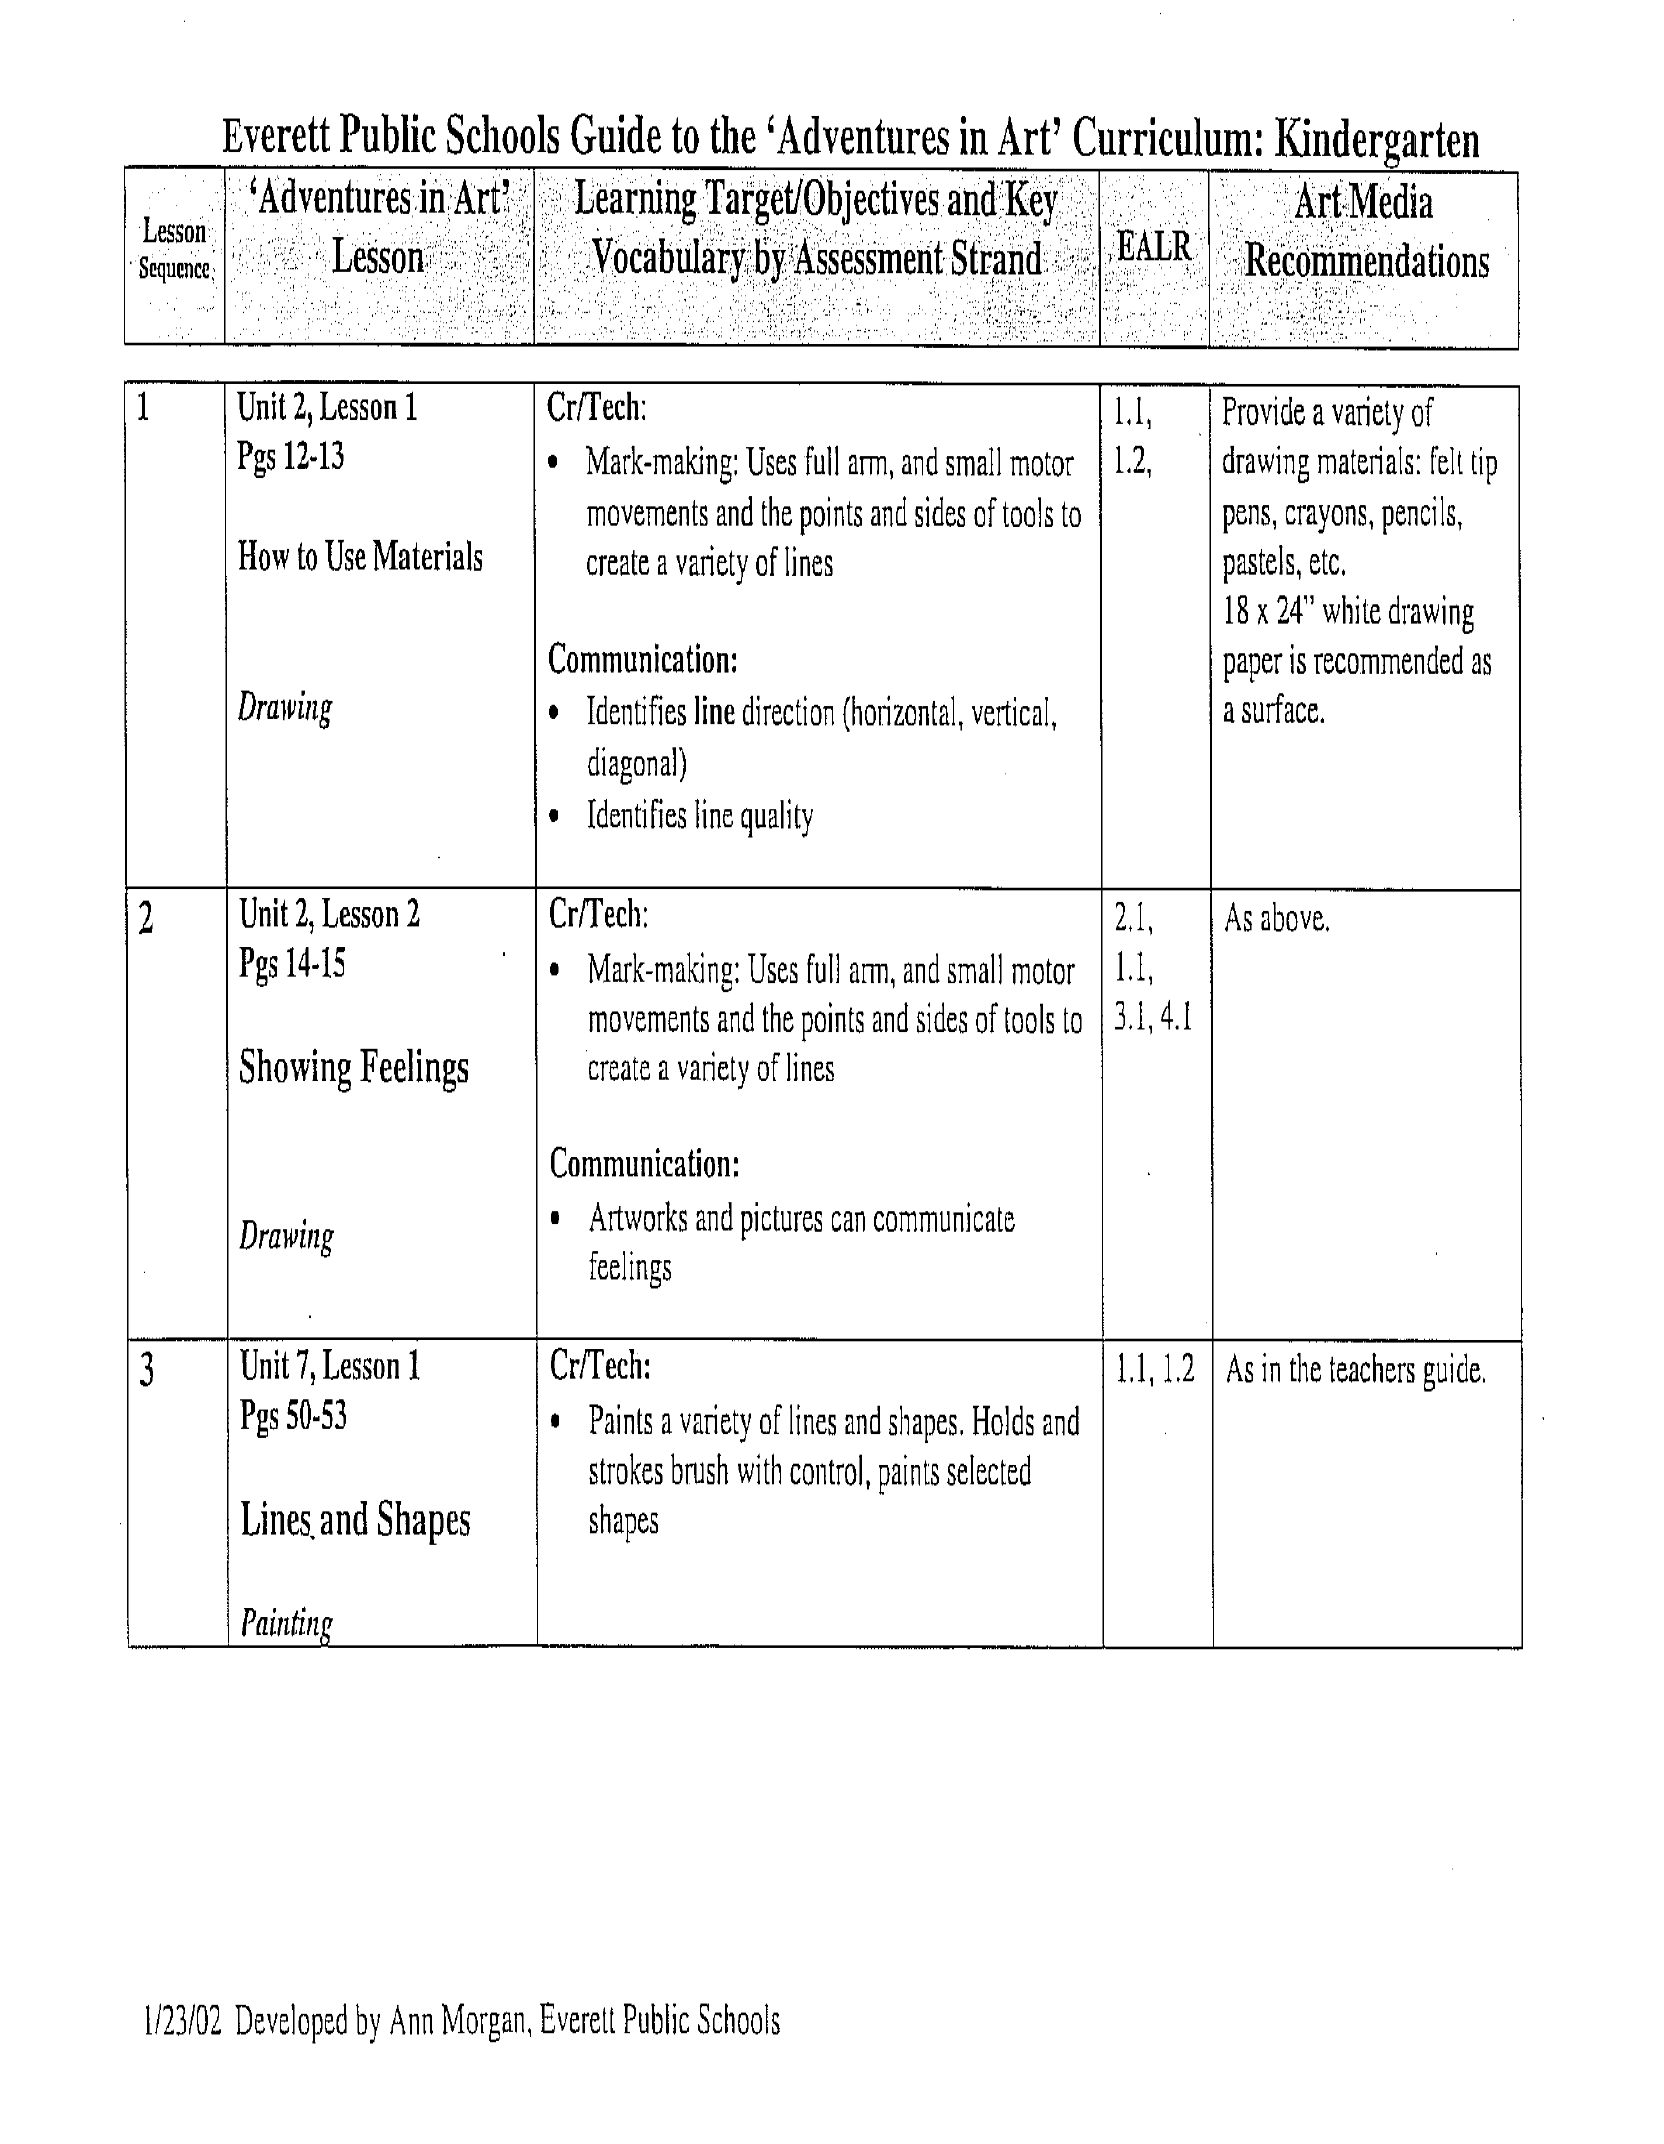
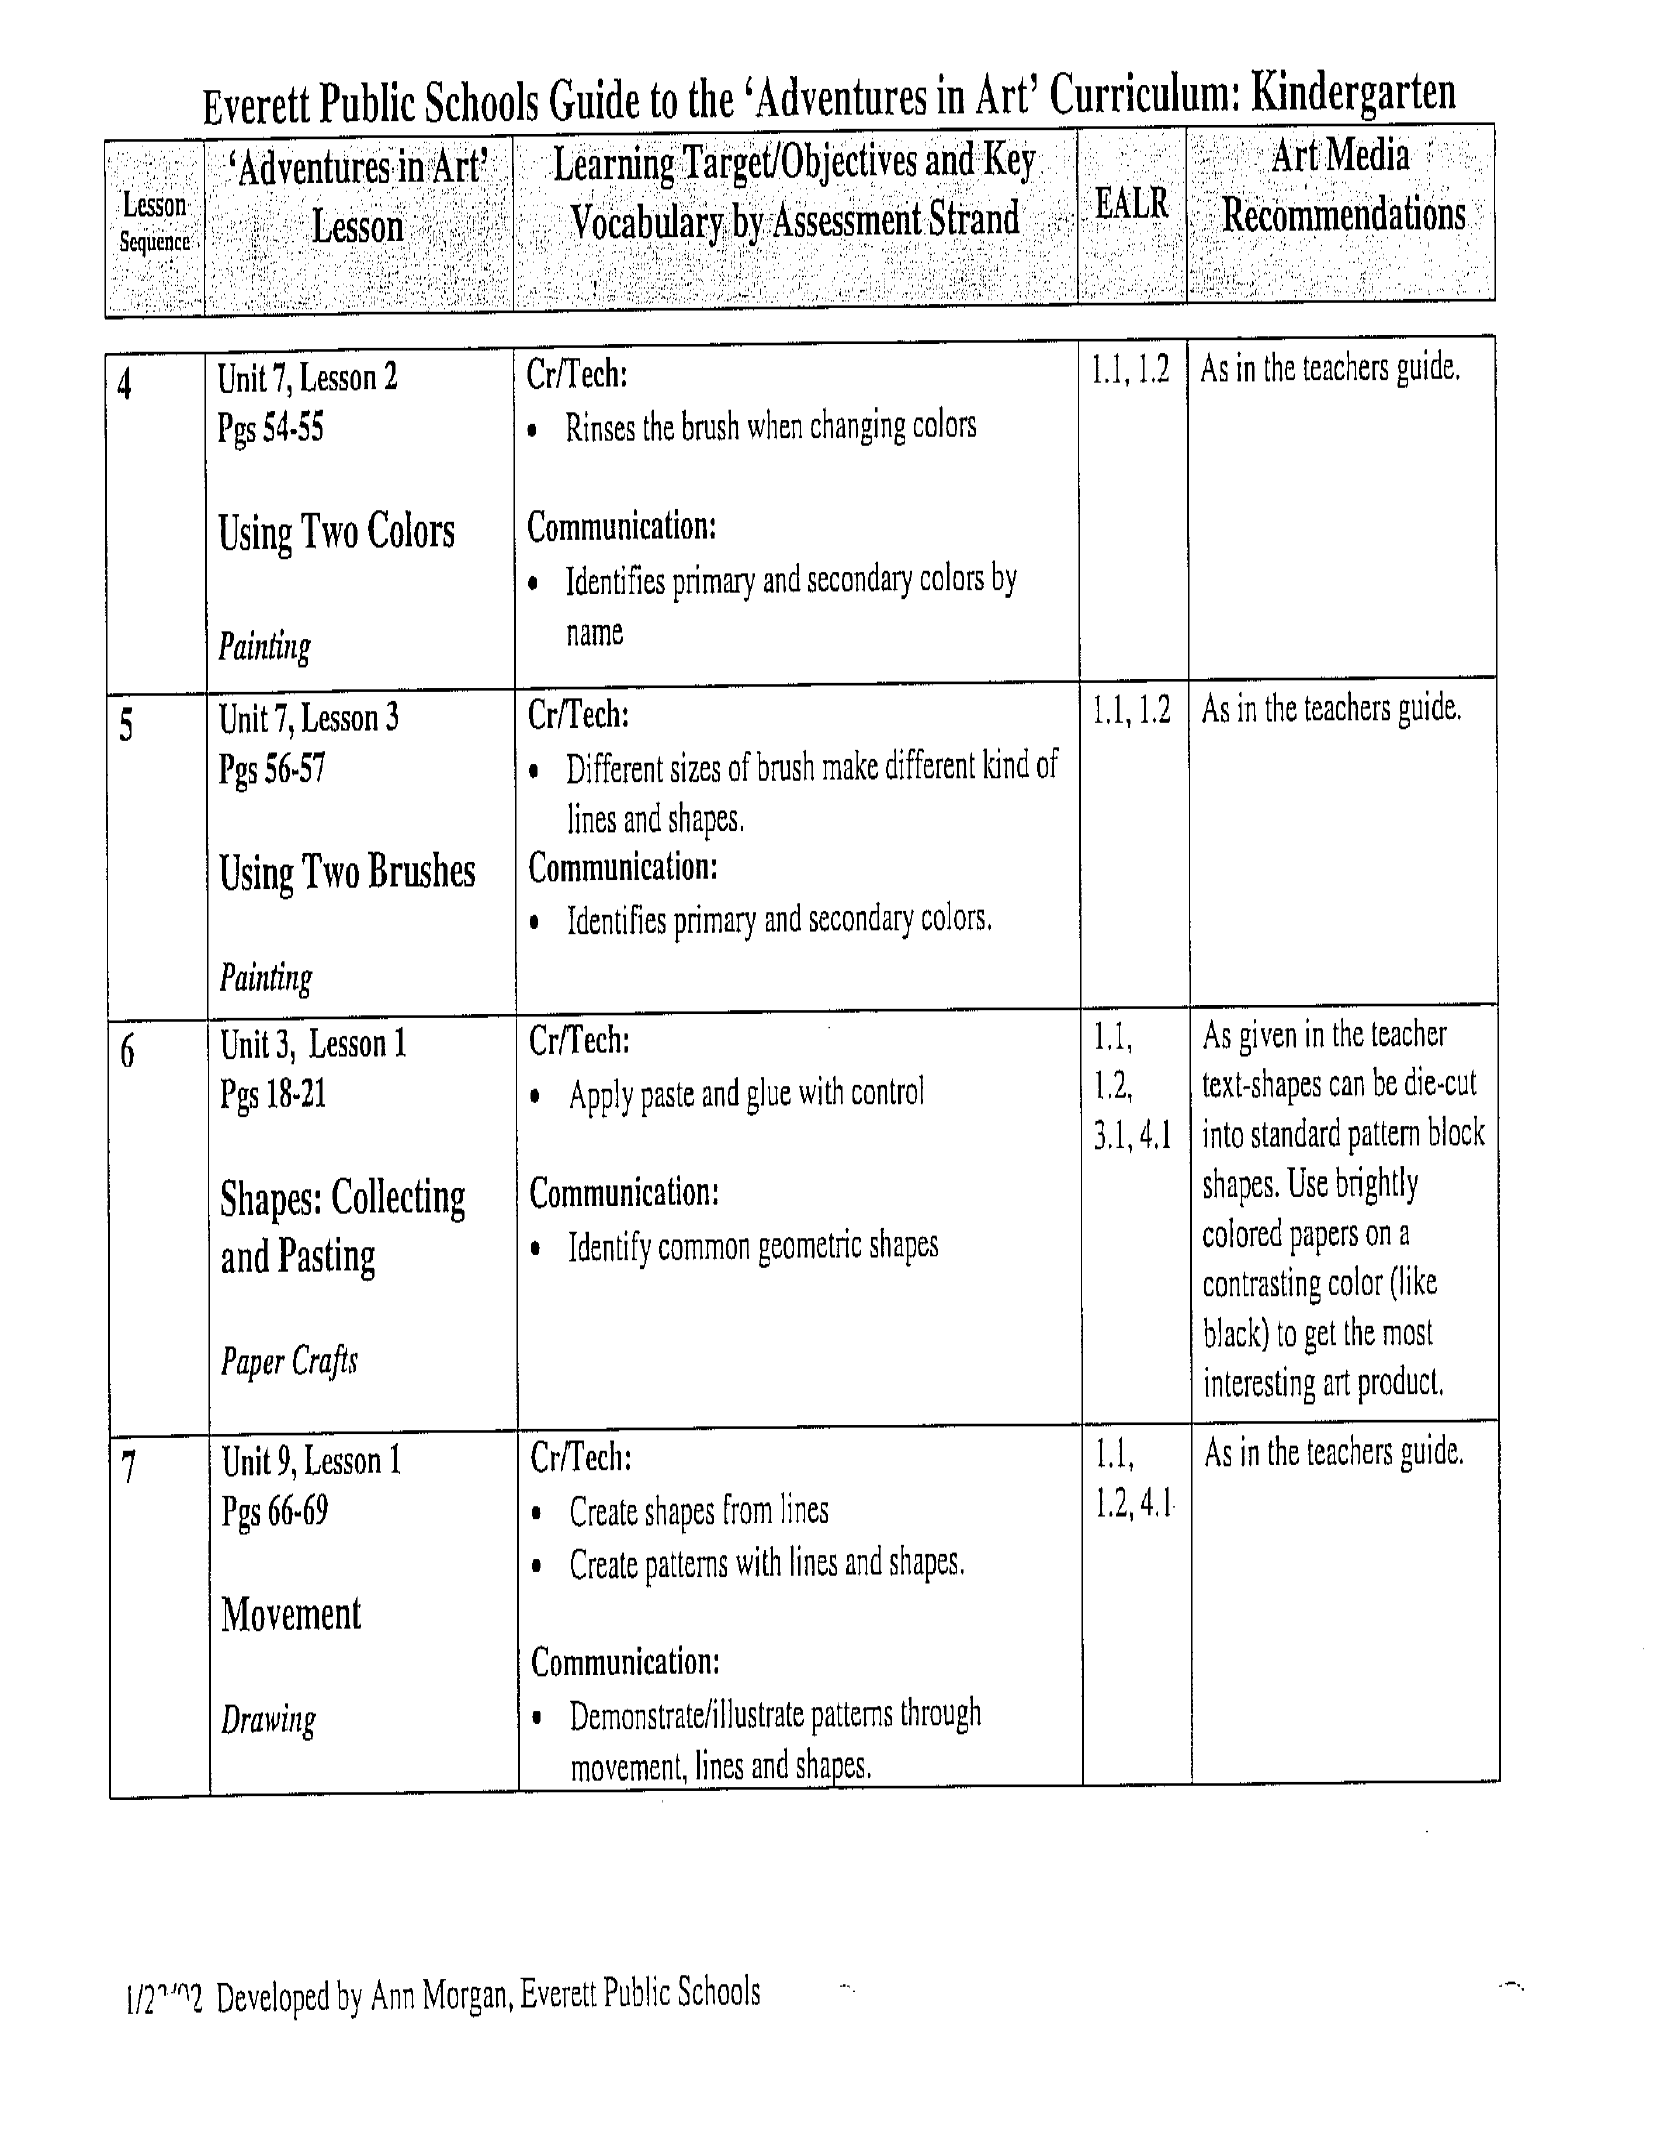
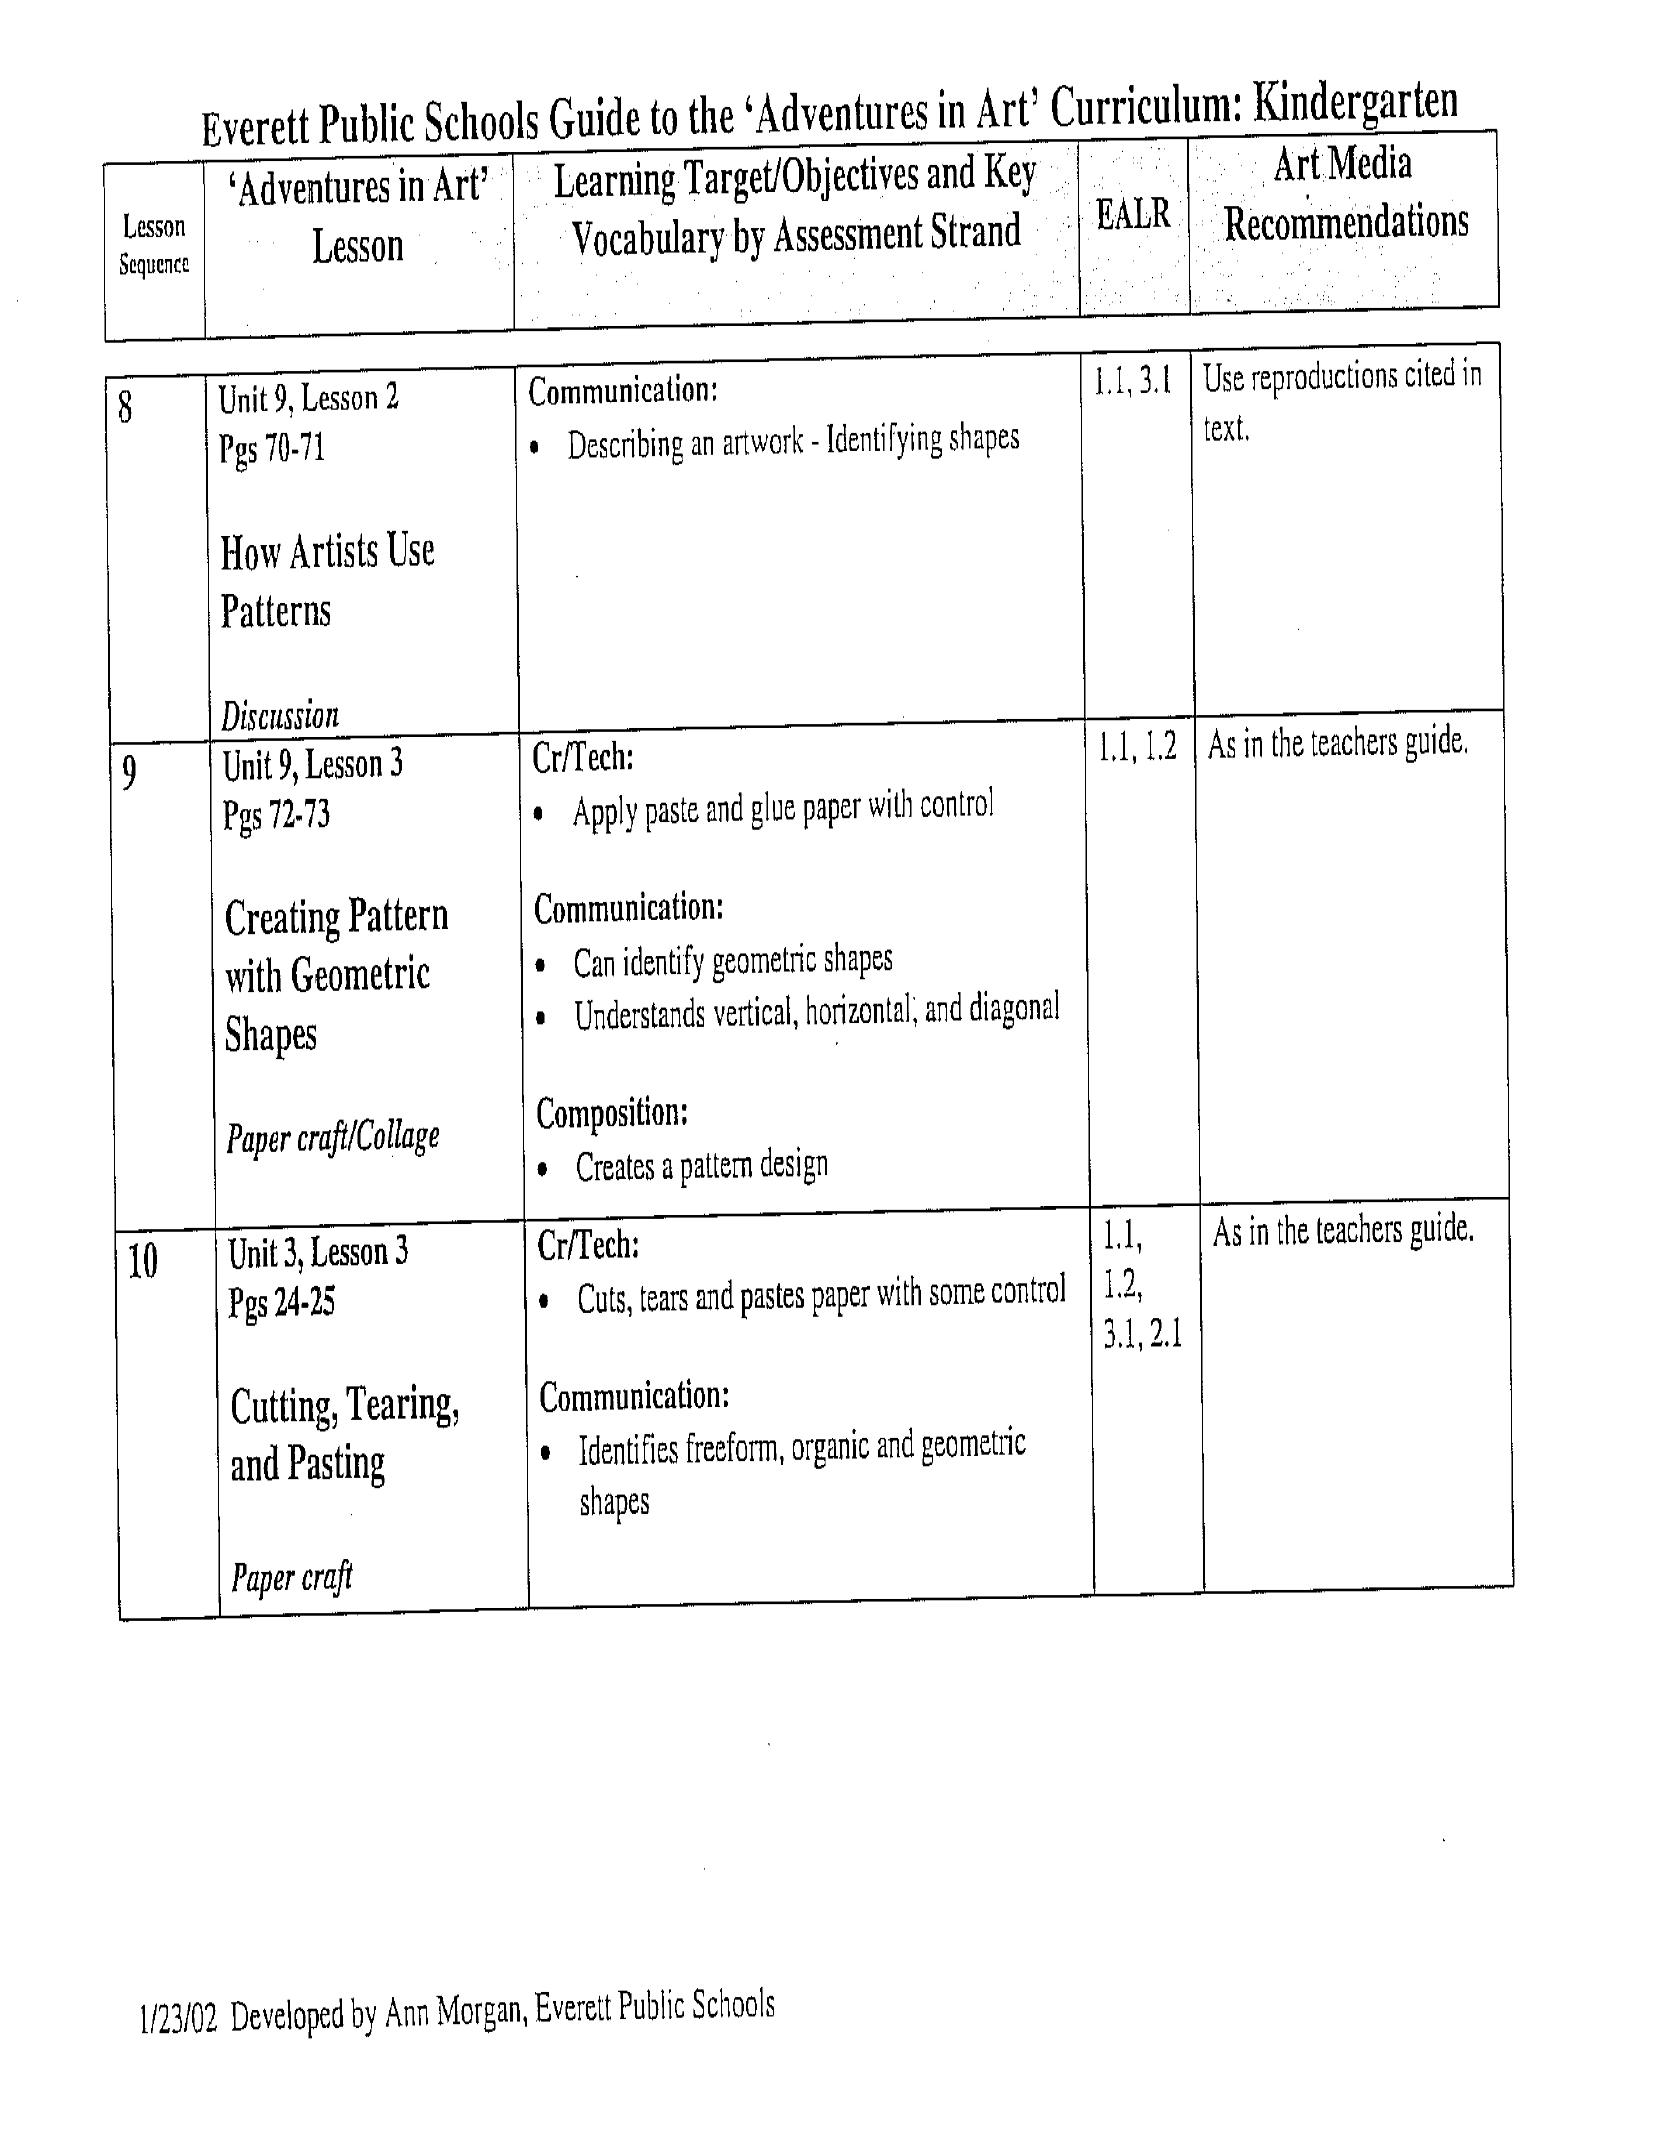
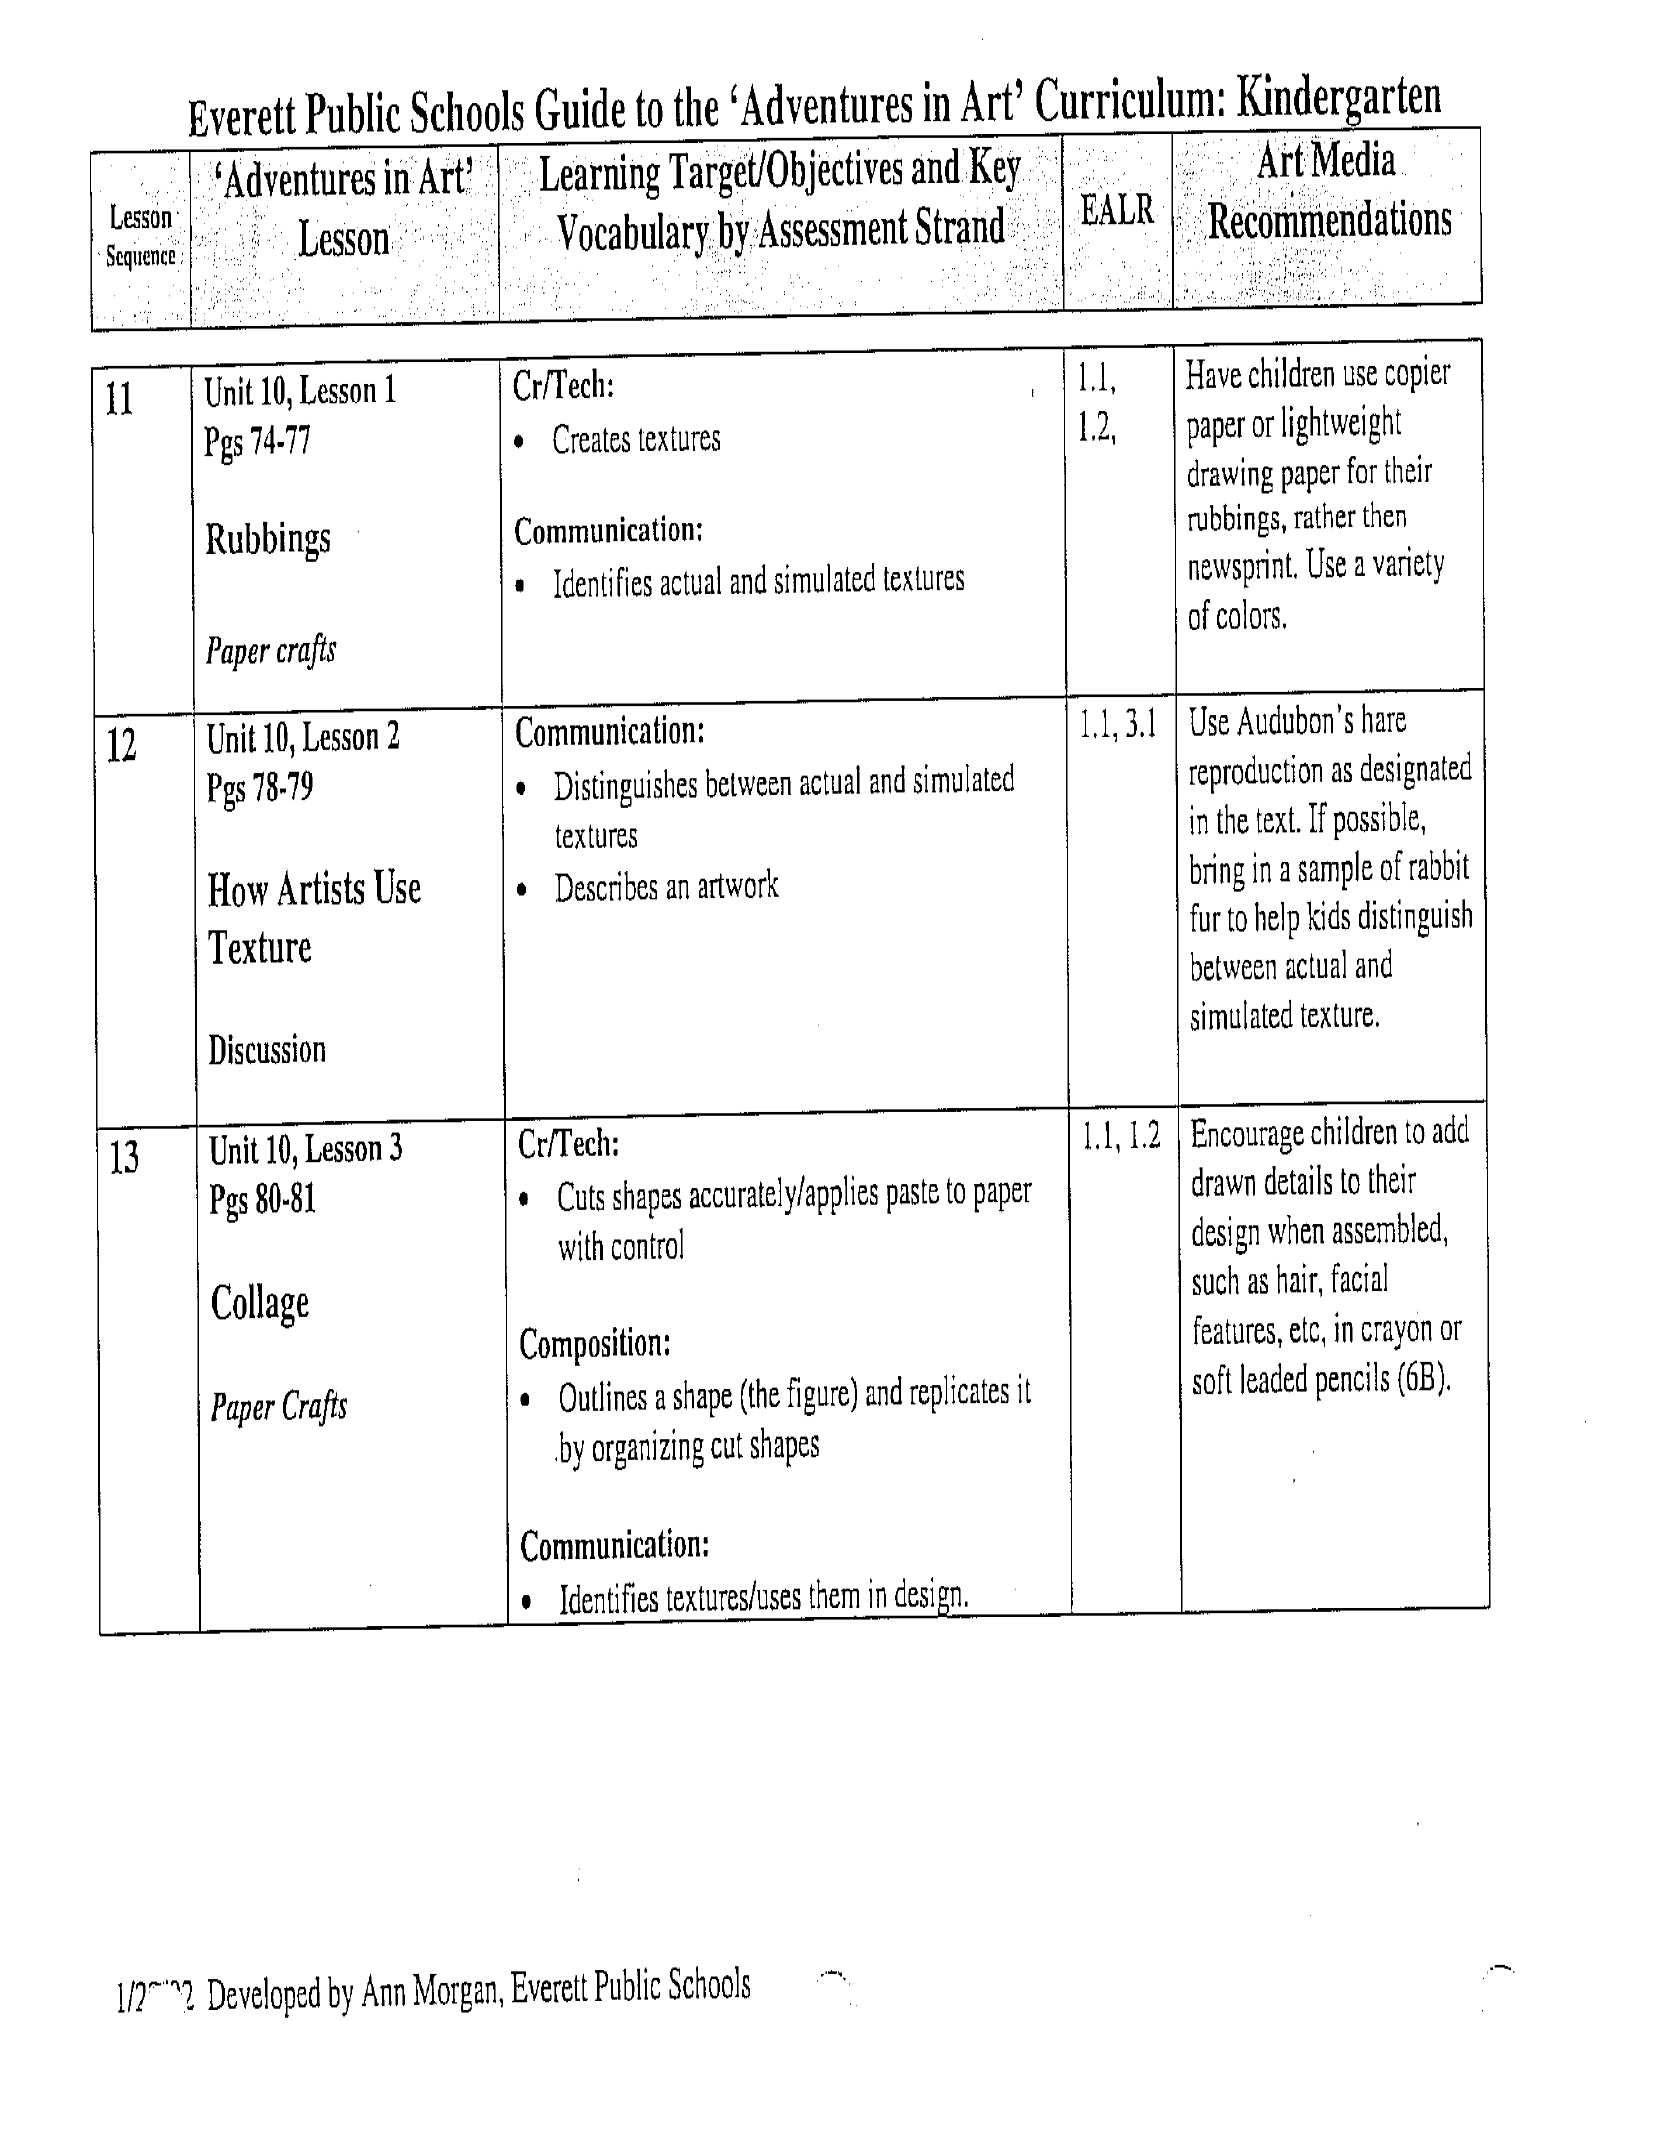
Core Lessons: U2, Lessons 1, 2, U7, lessons 2,3, U3 Lesson 1, U9, lesson 1-3, U10, lessons
1-3, U14, lessons 1-3, U11, lessons 1, 2, U12, lesson 1,2.
Supplemental Lessons: Complete above units, plus Units 1, 8, 15, 17
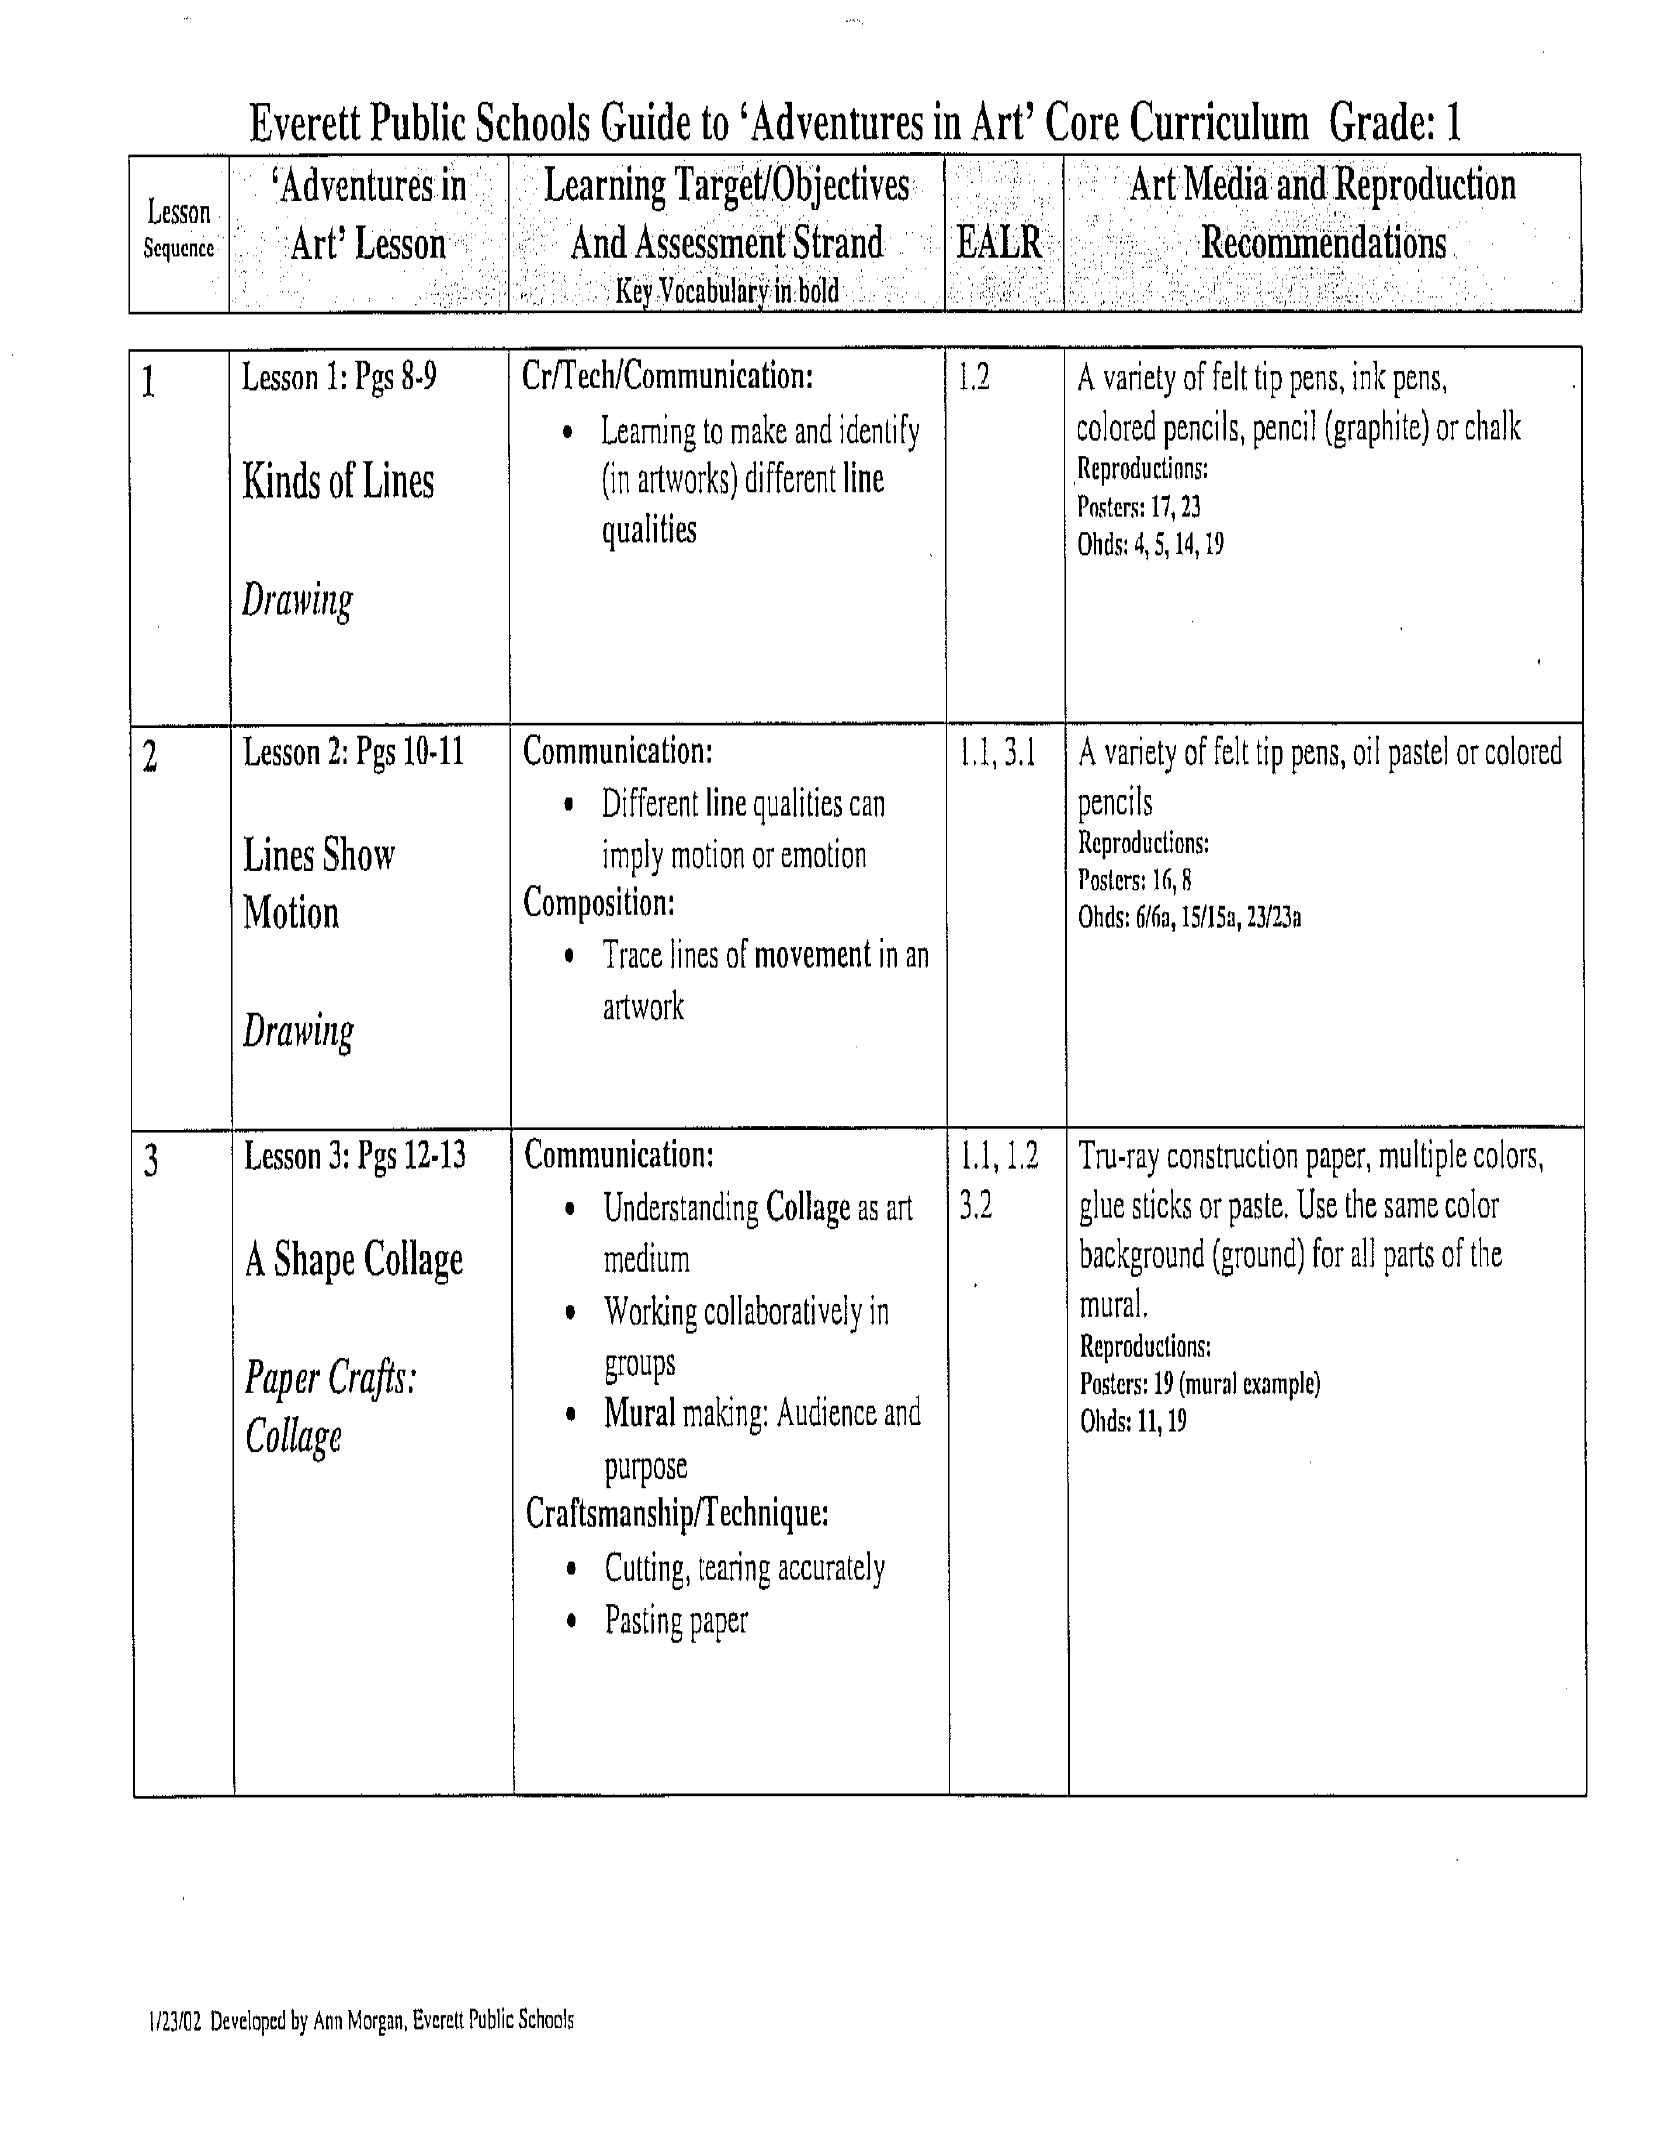
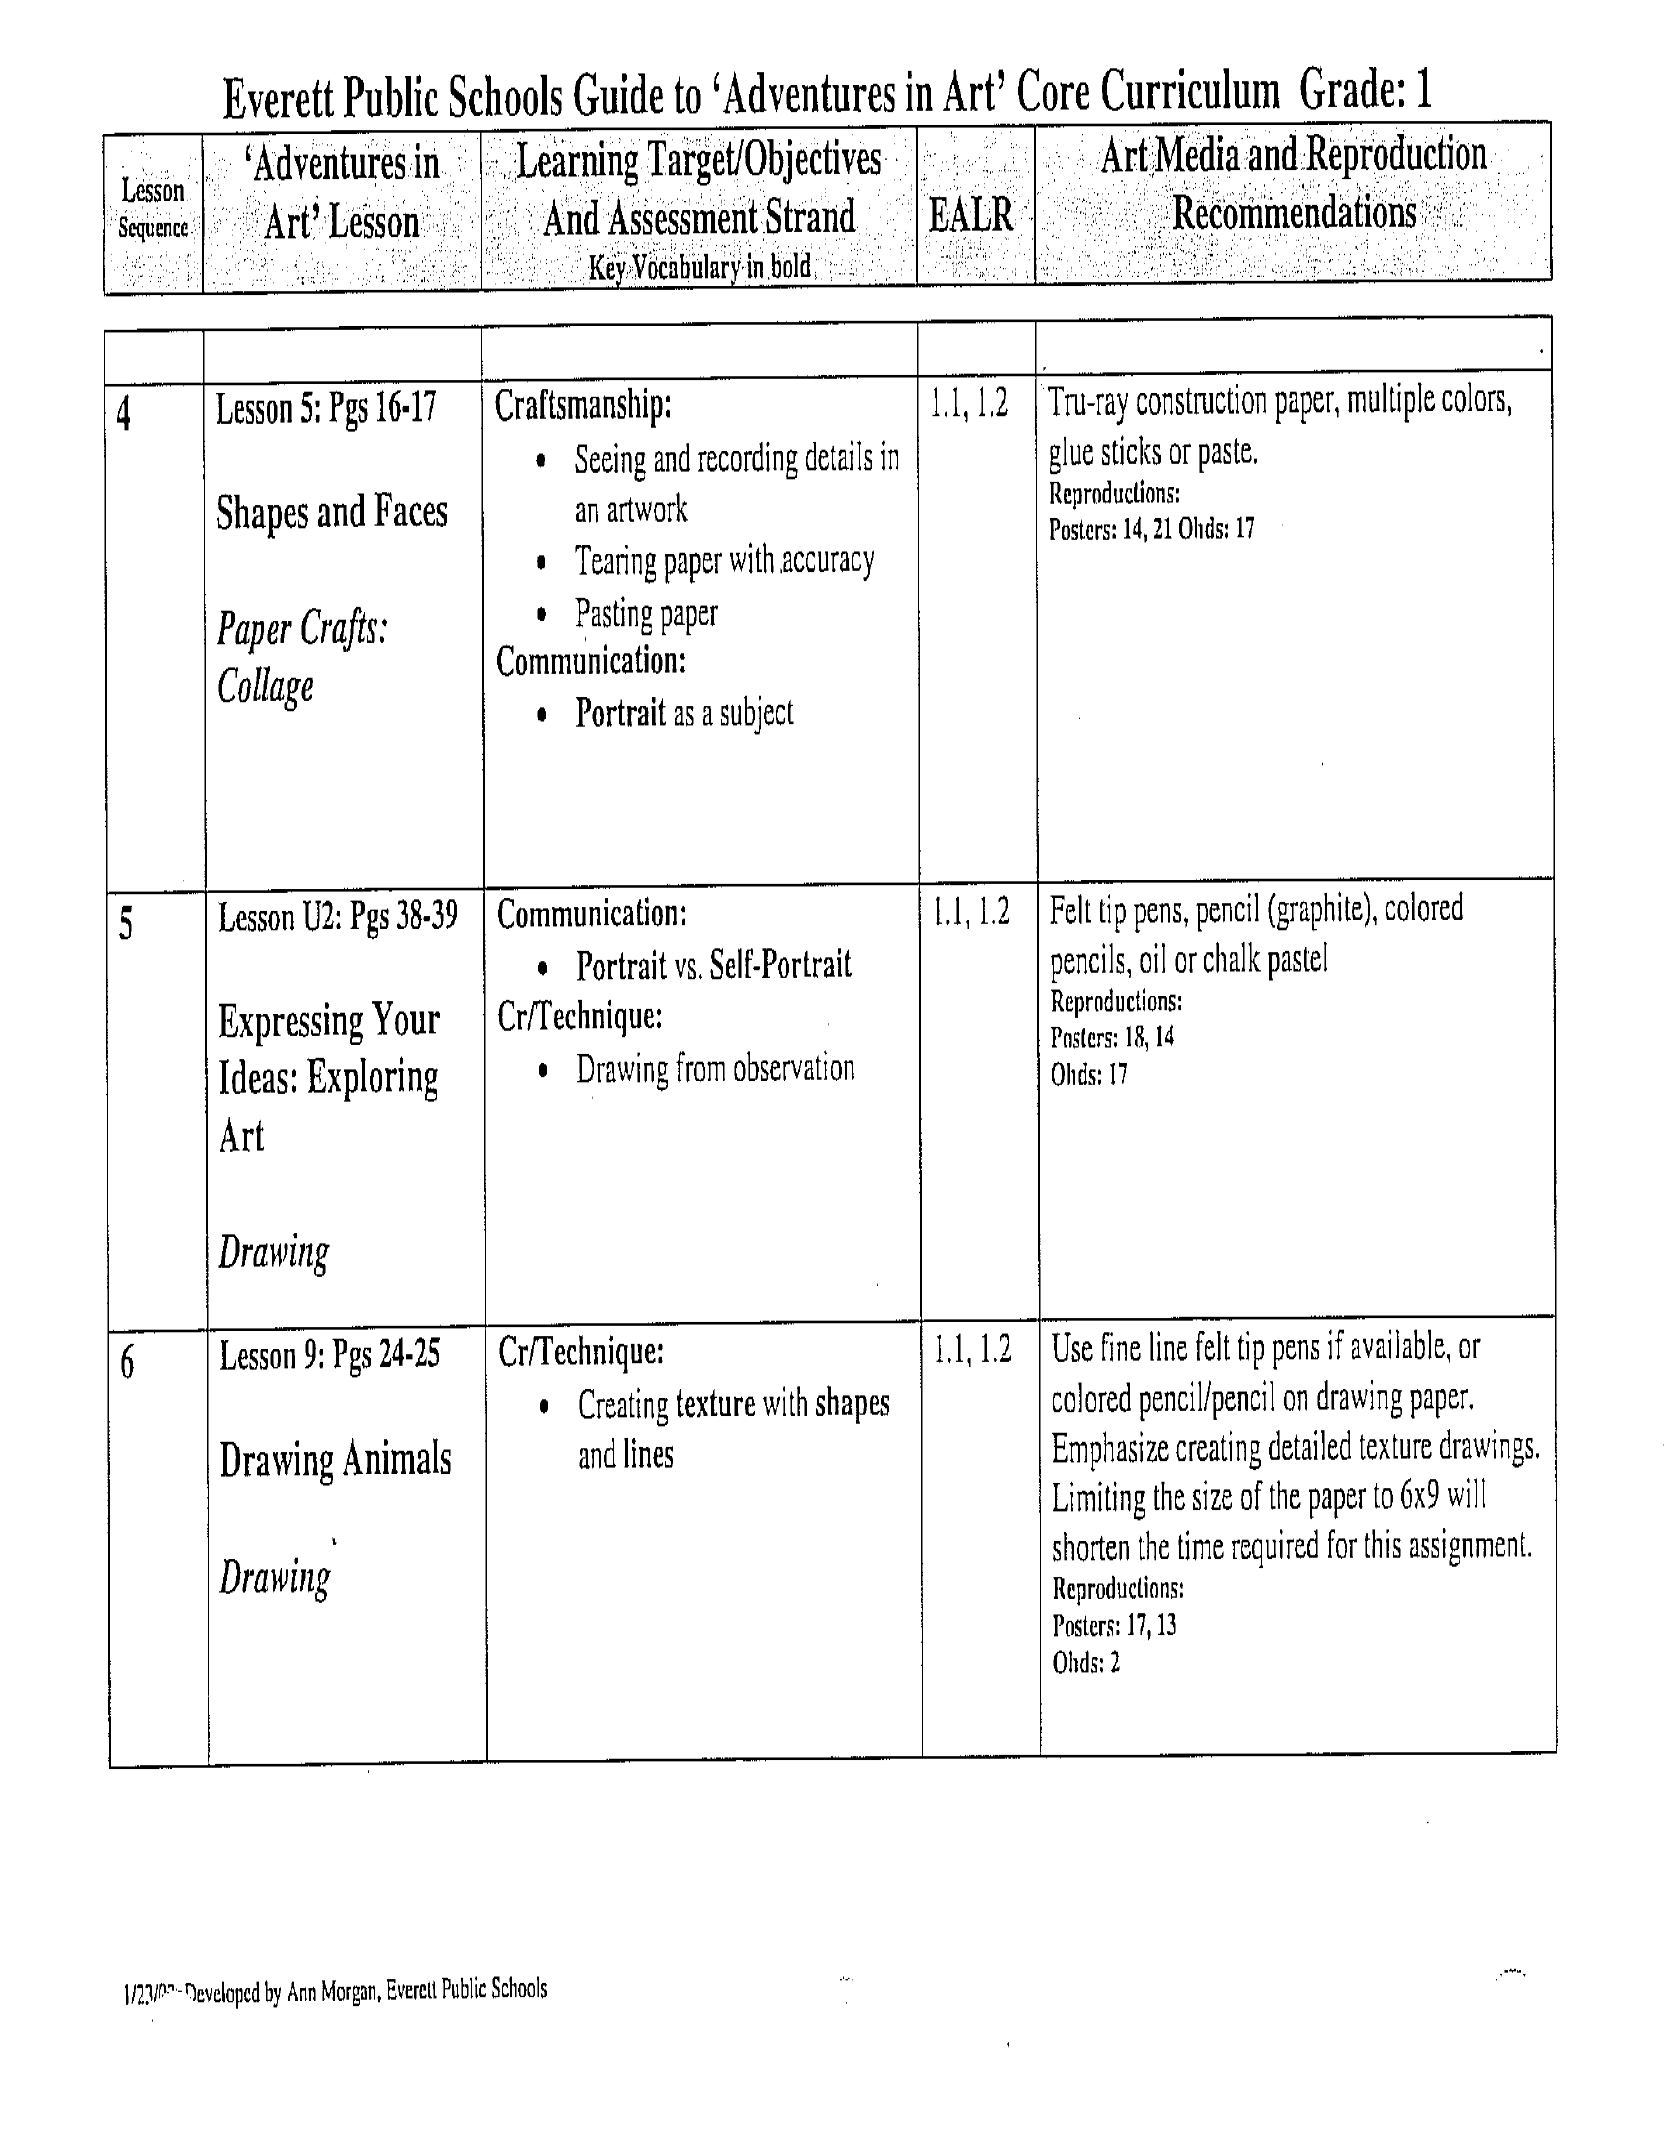
First Grade:
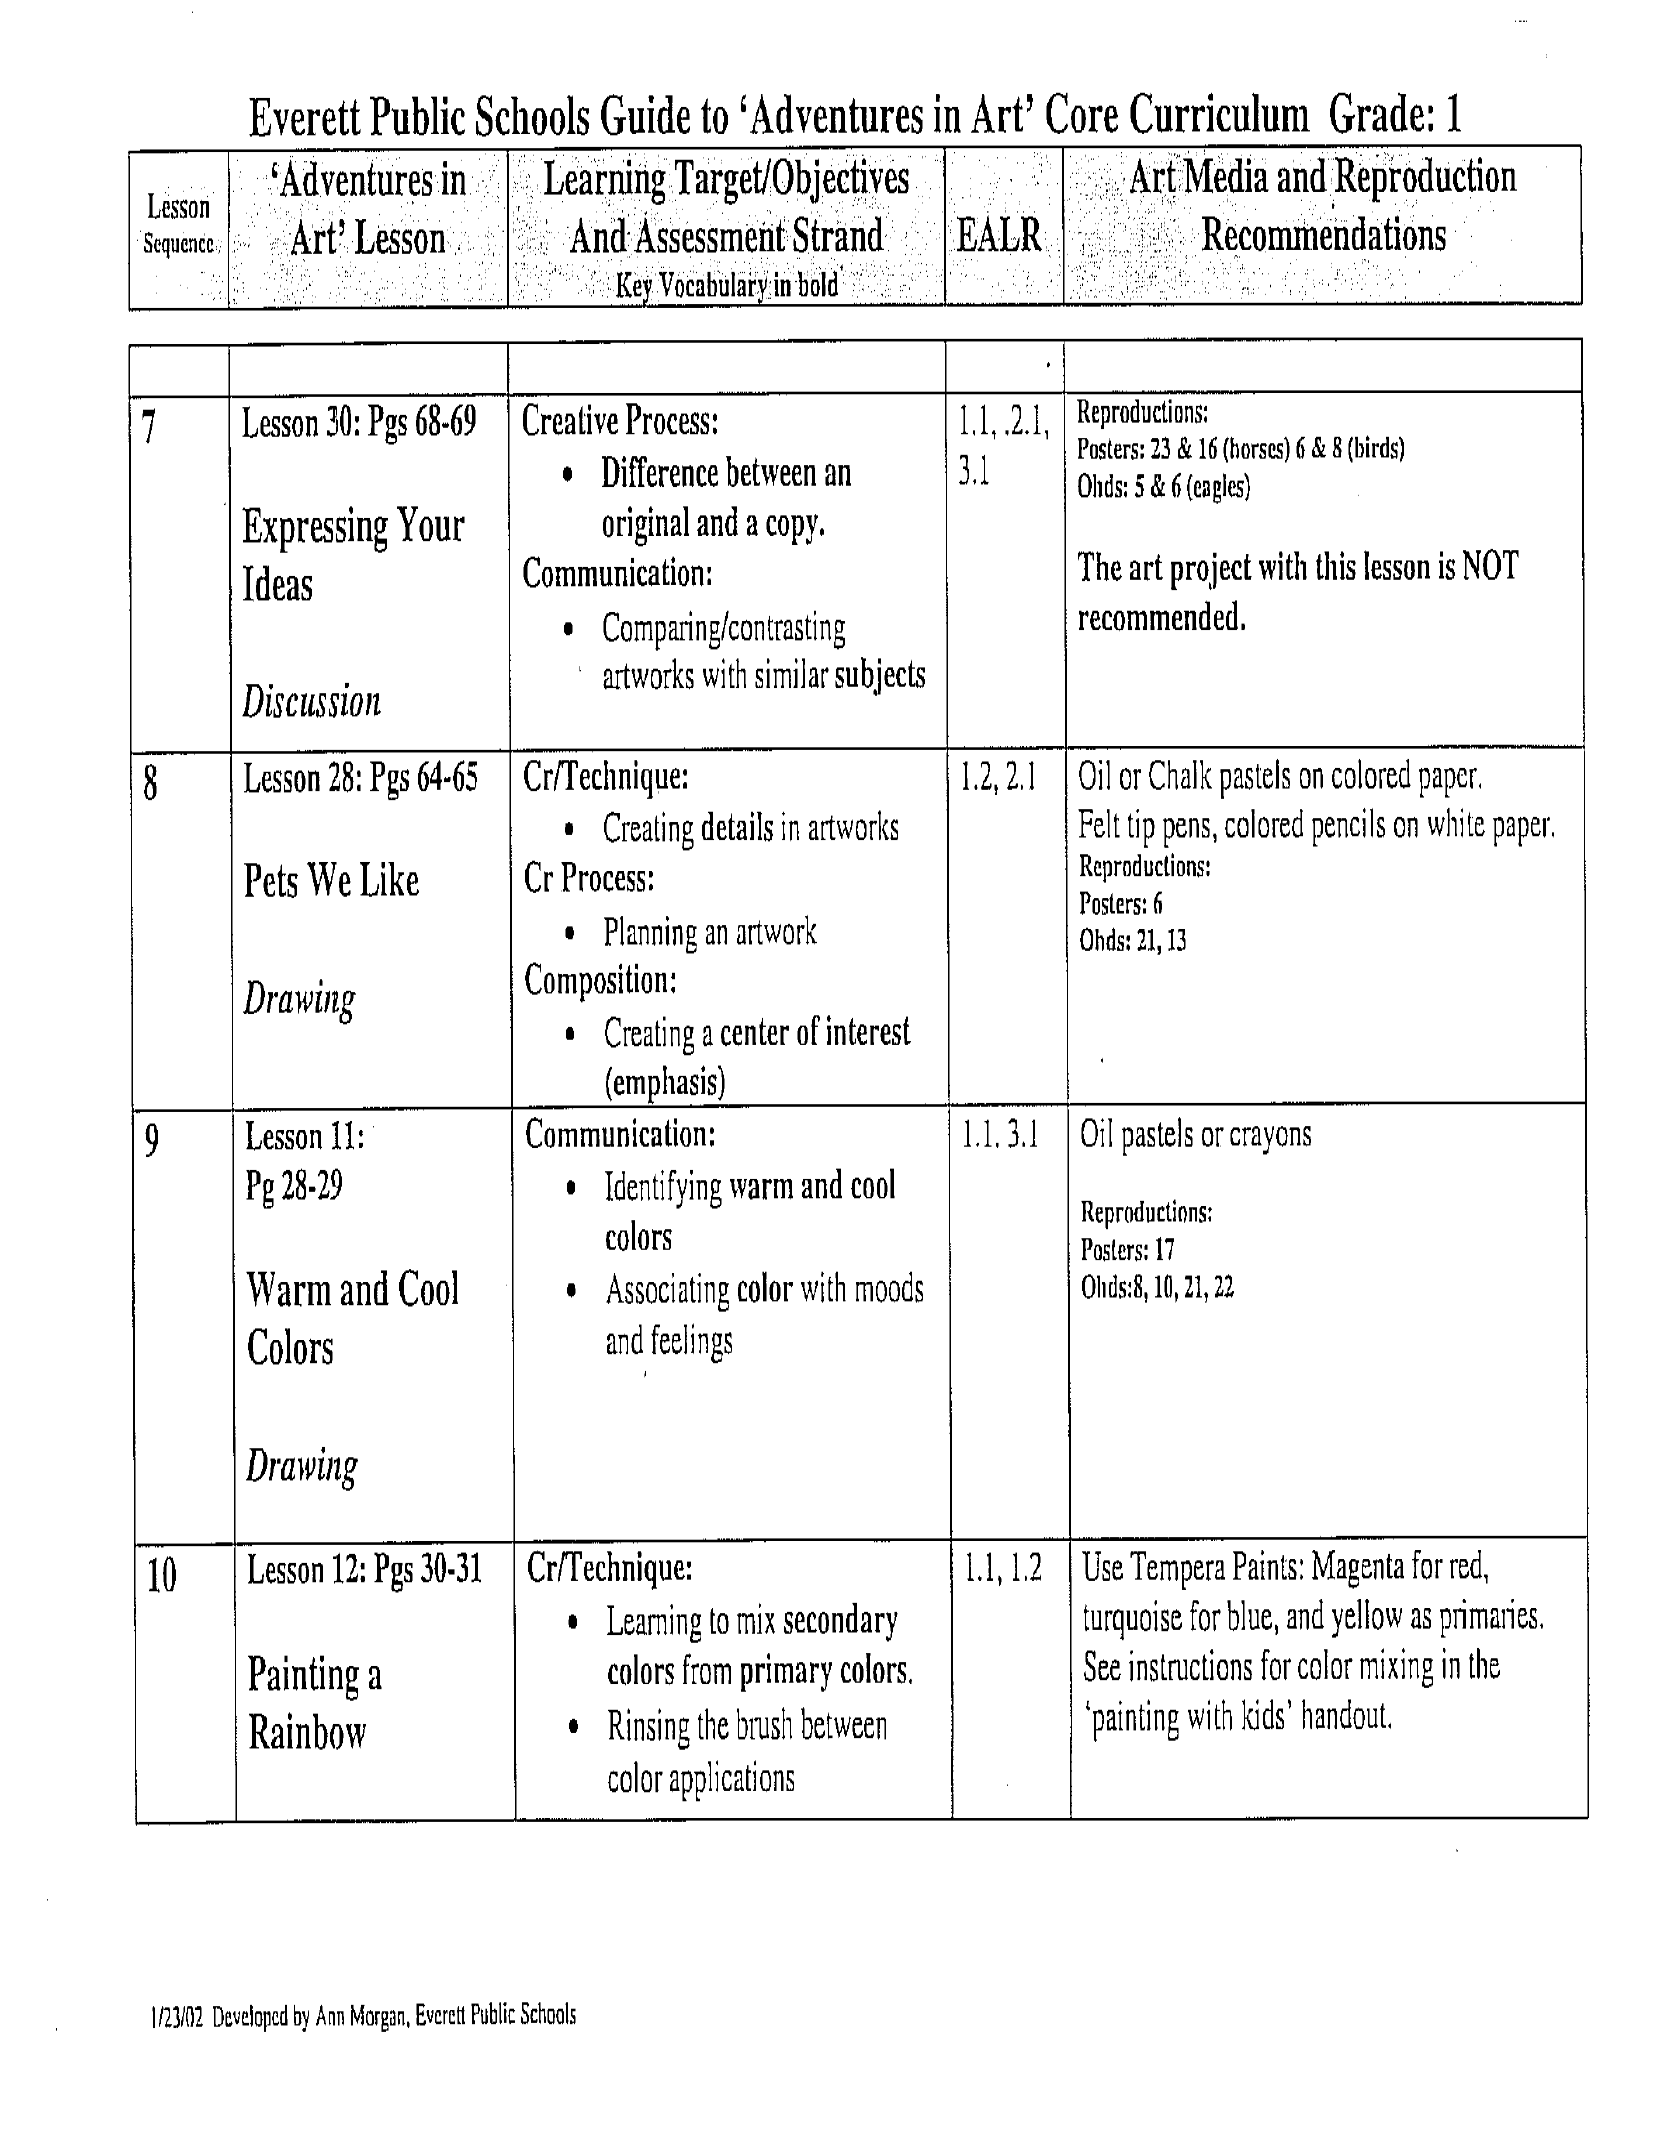
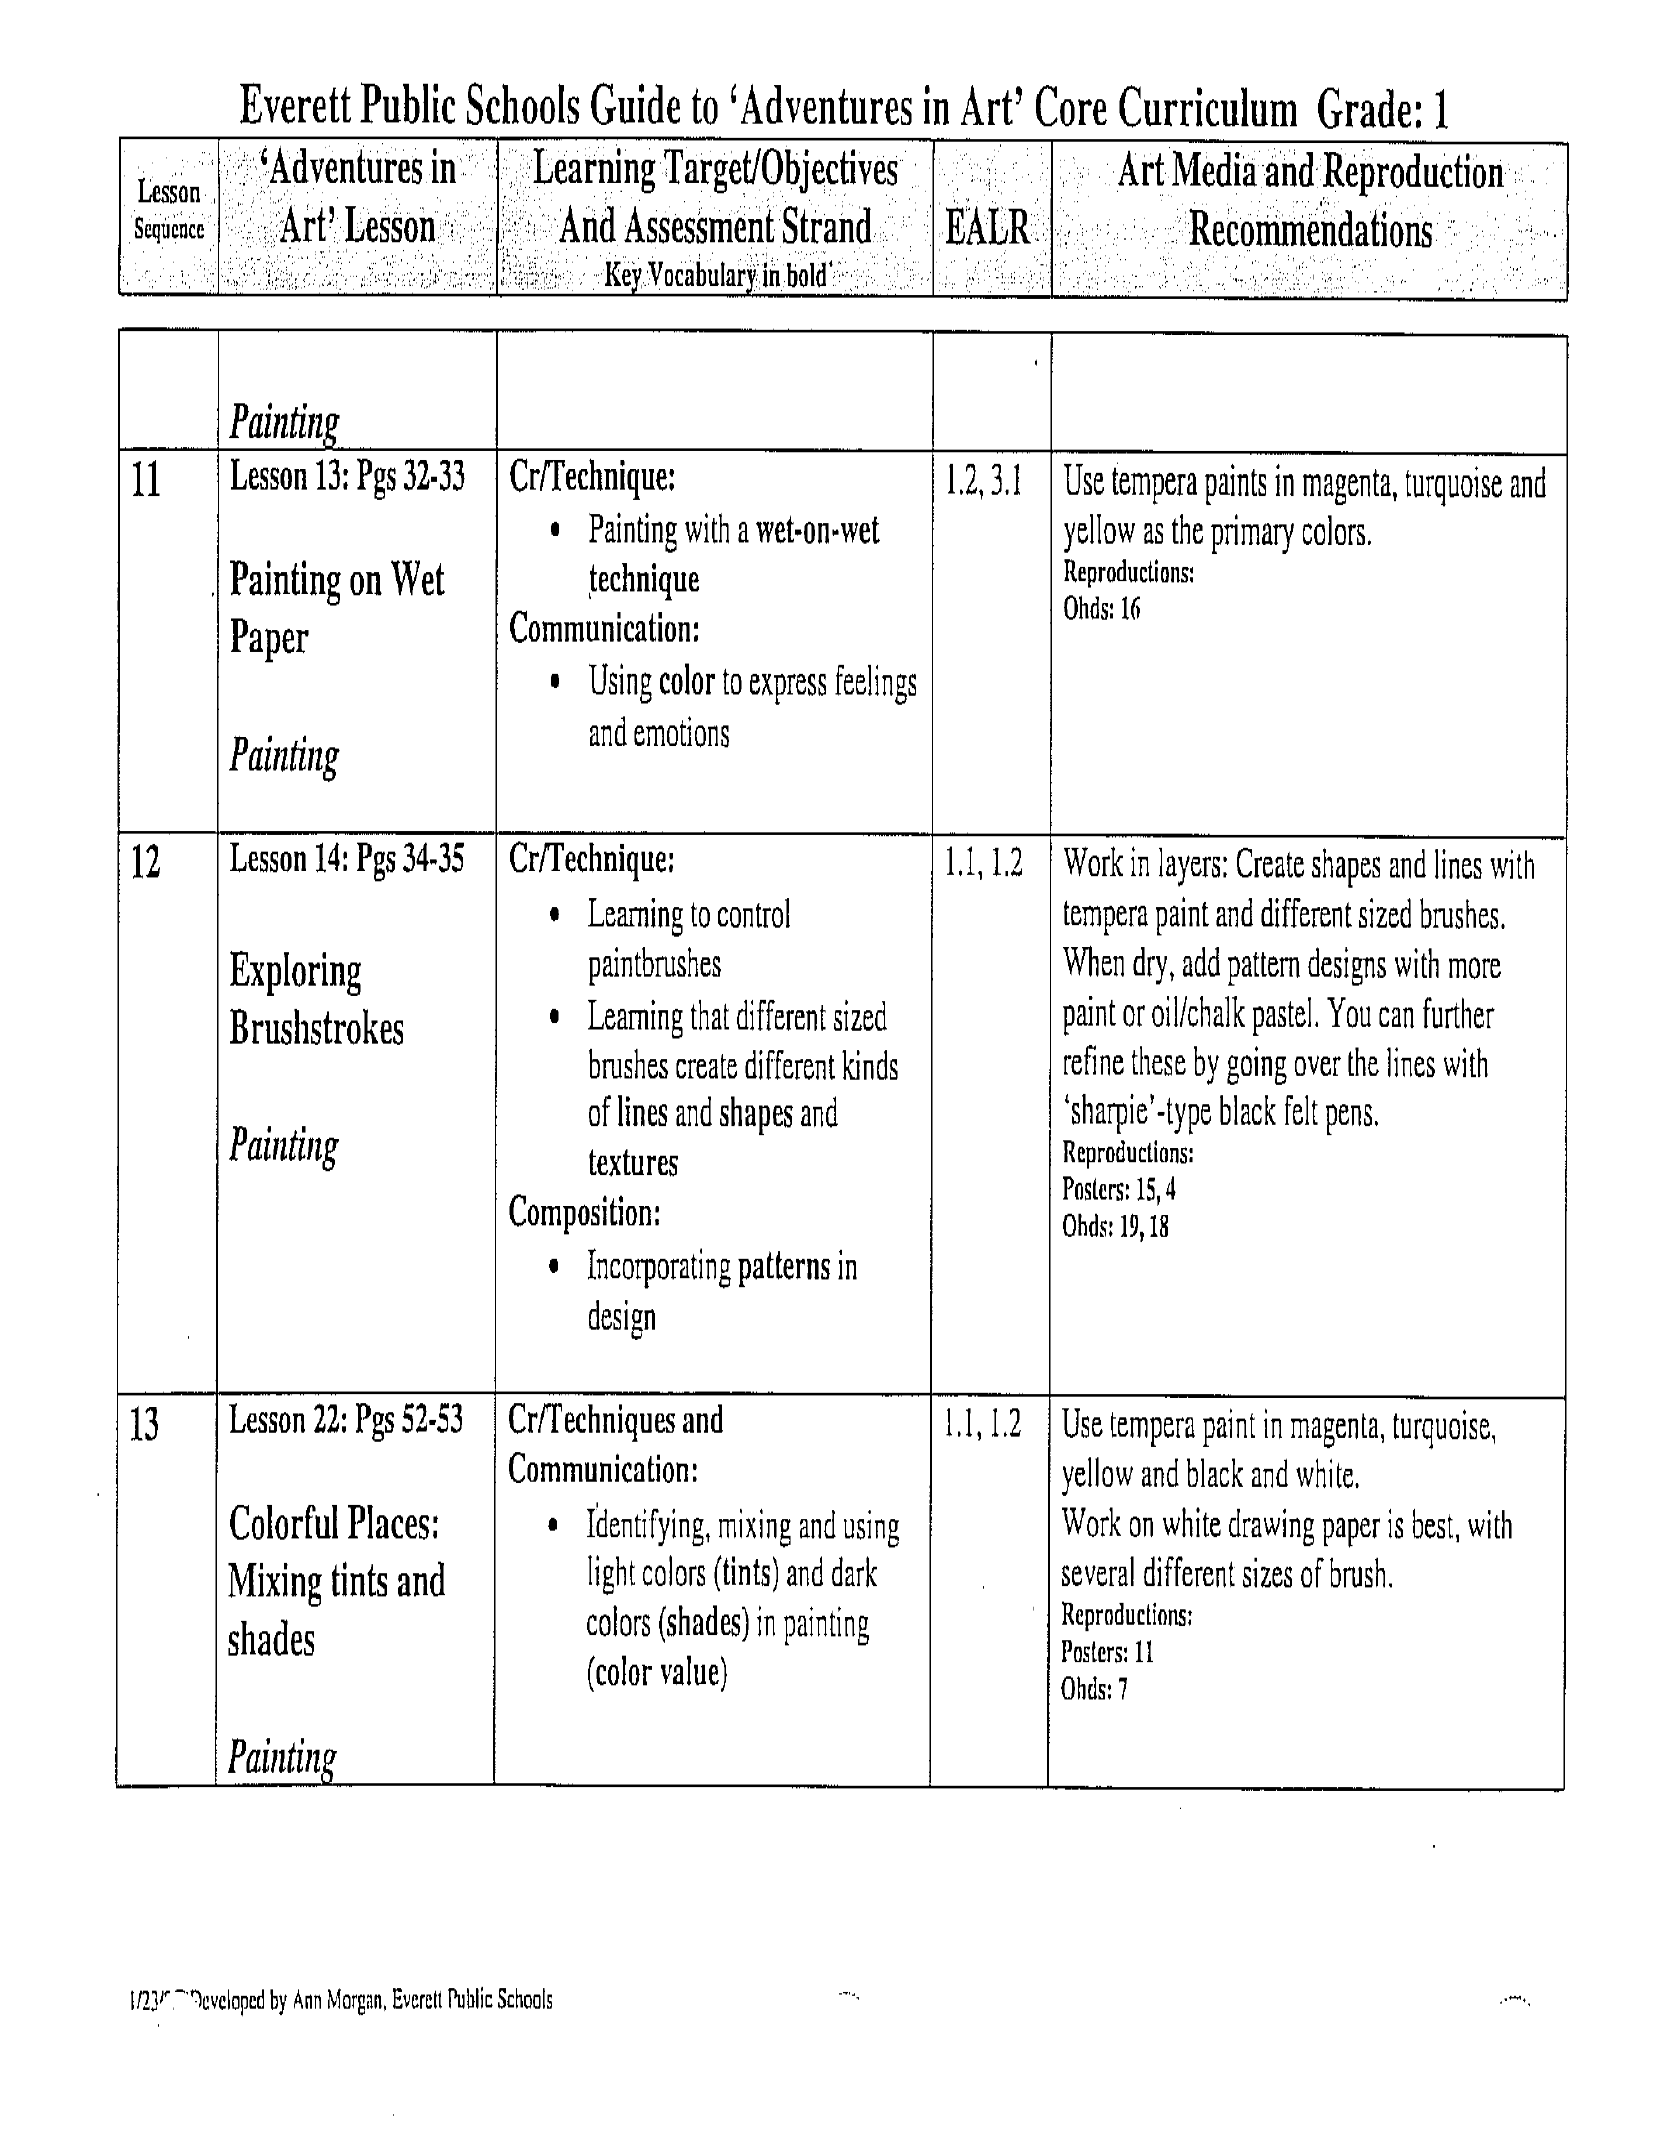
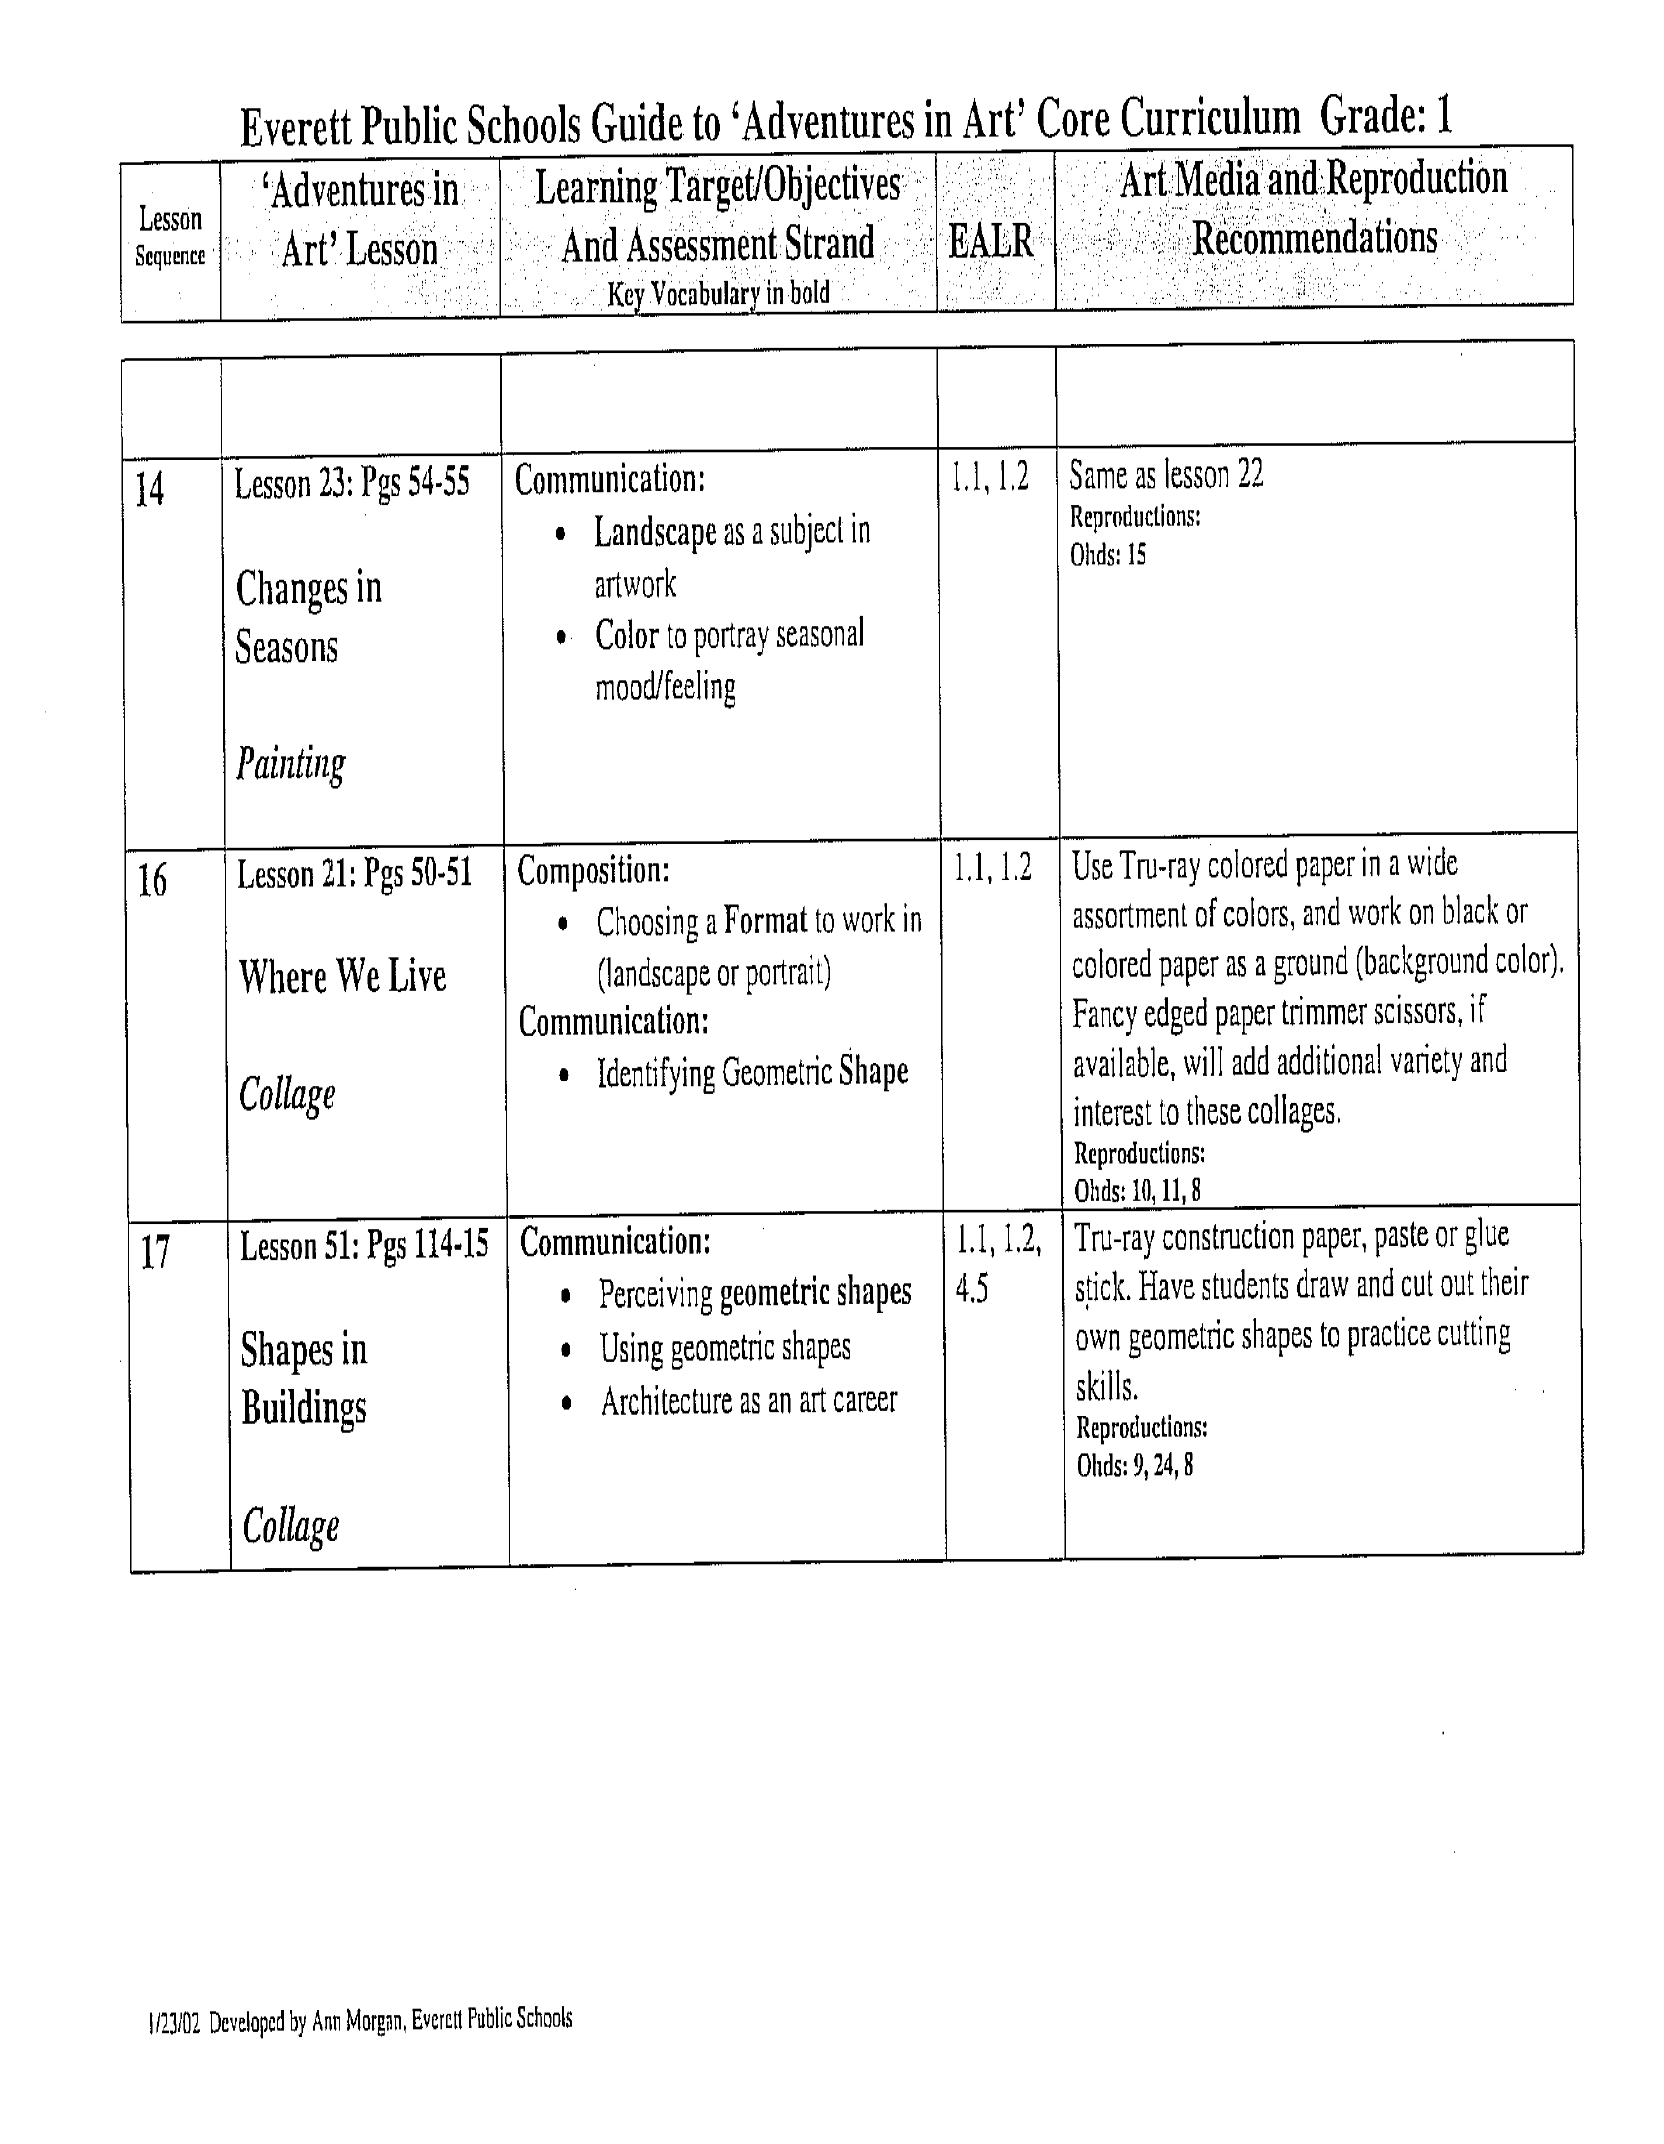
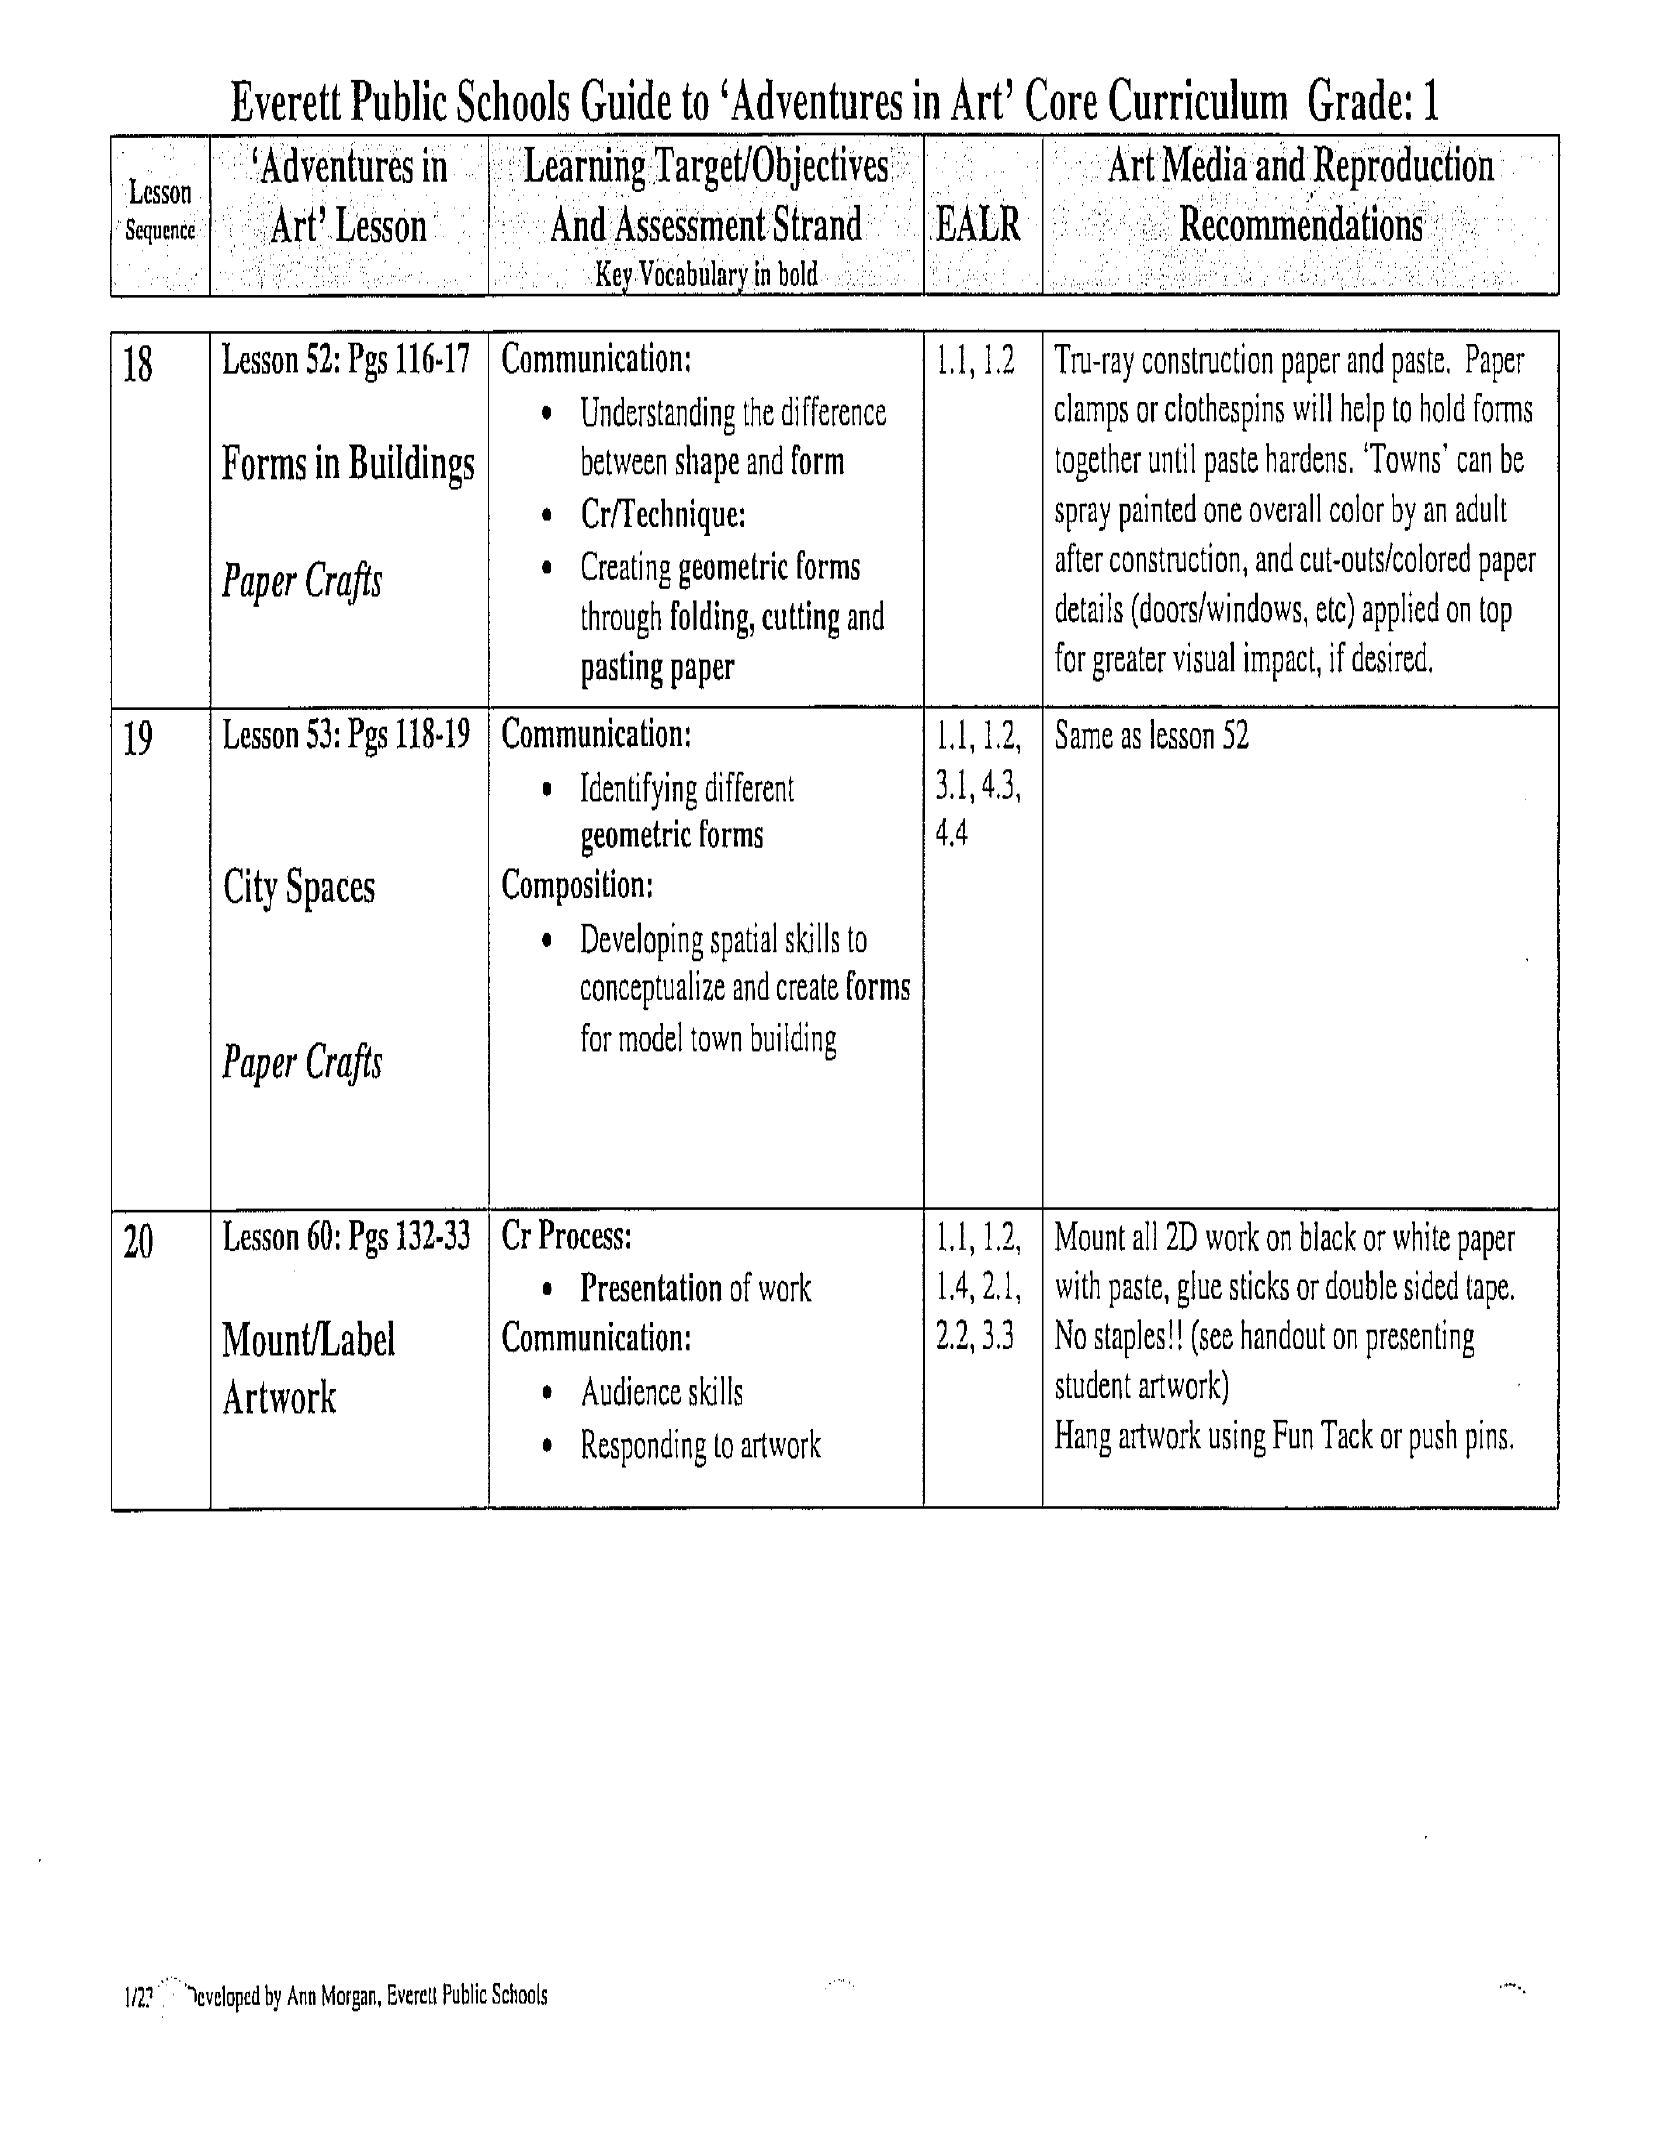
Core Lessons: 1,2,3,5,U2,9,30,28,11,12,13,14,22,23,21,51,52,53,60
Supplemental Lessons: 6,8,15,27,24,28,33,35,39
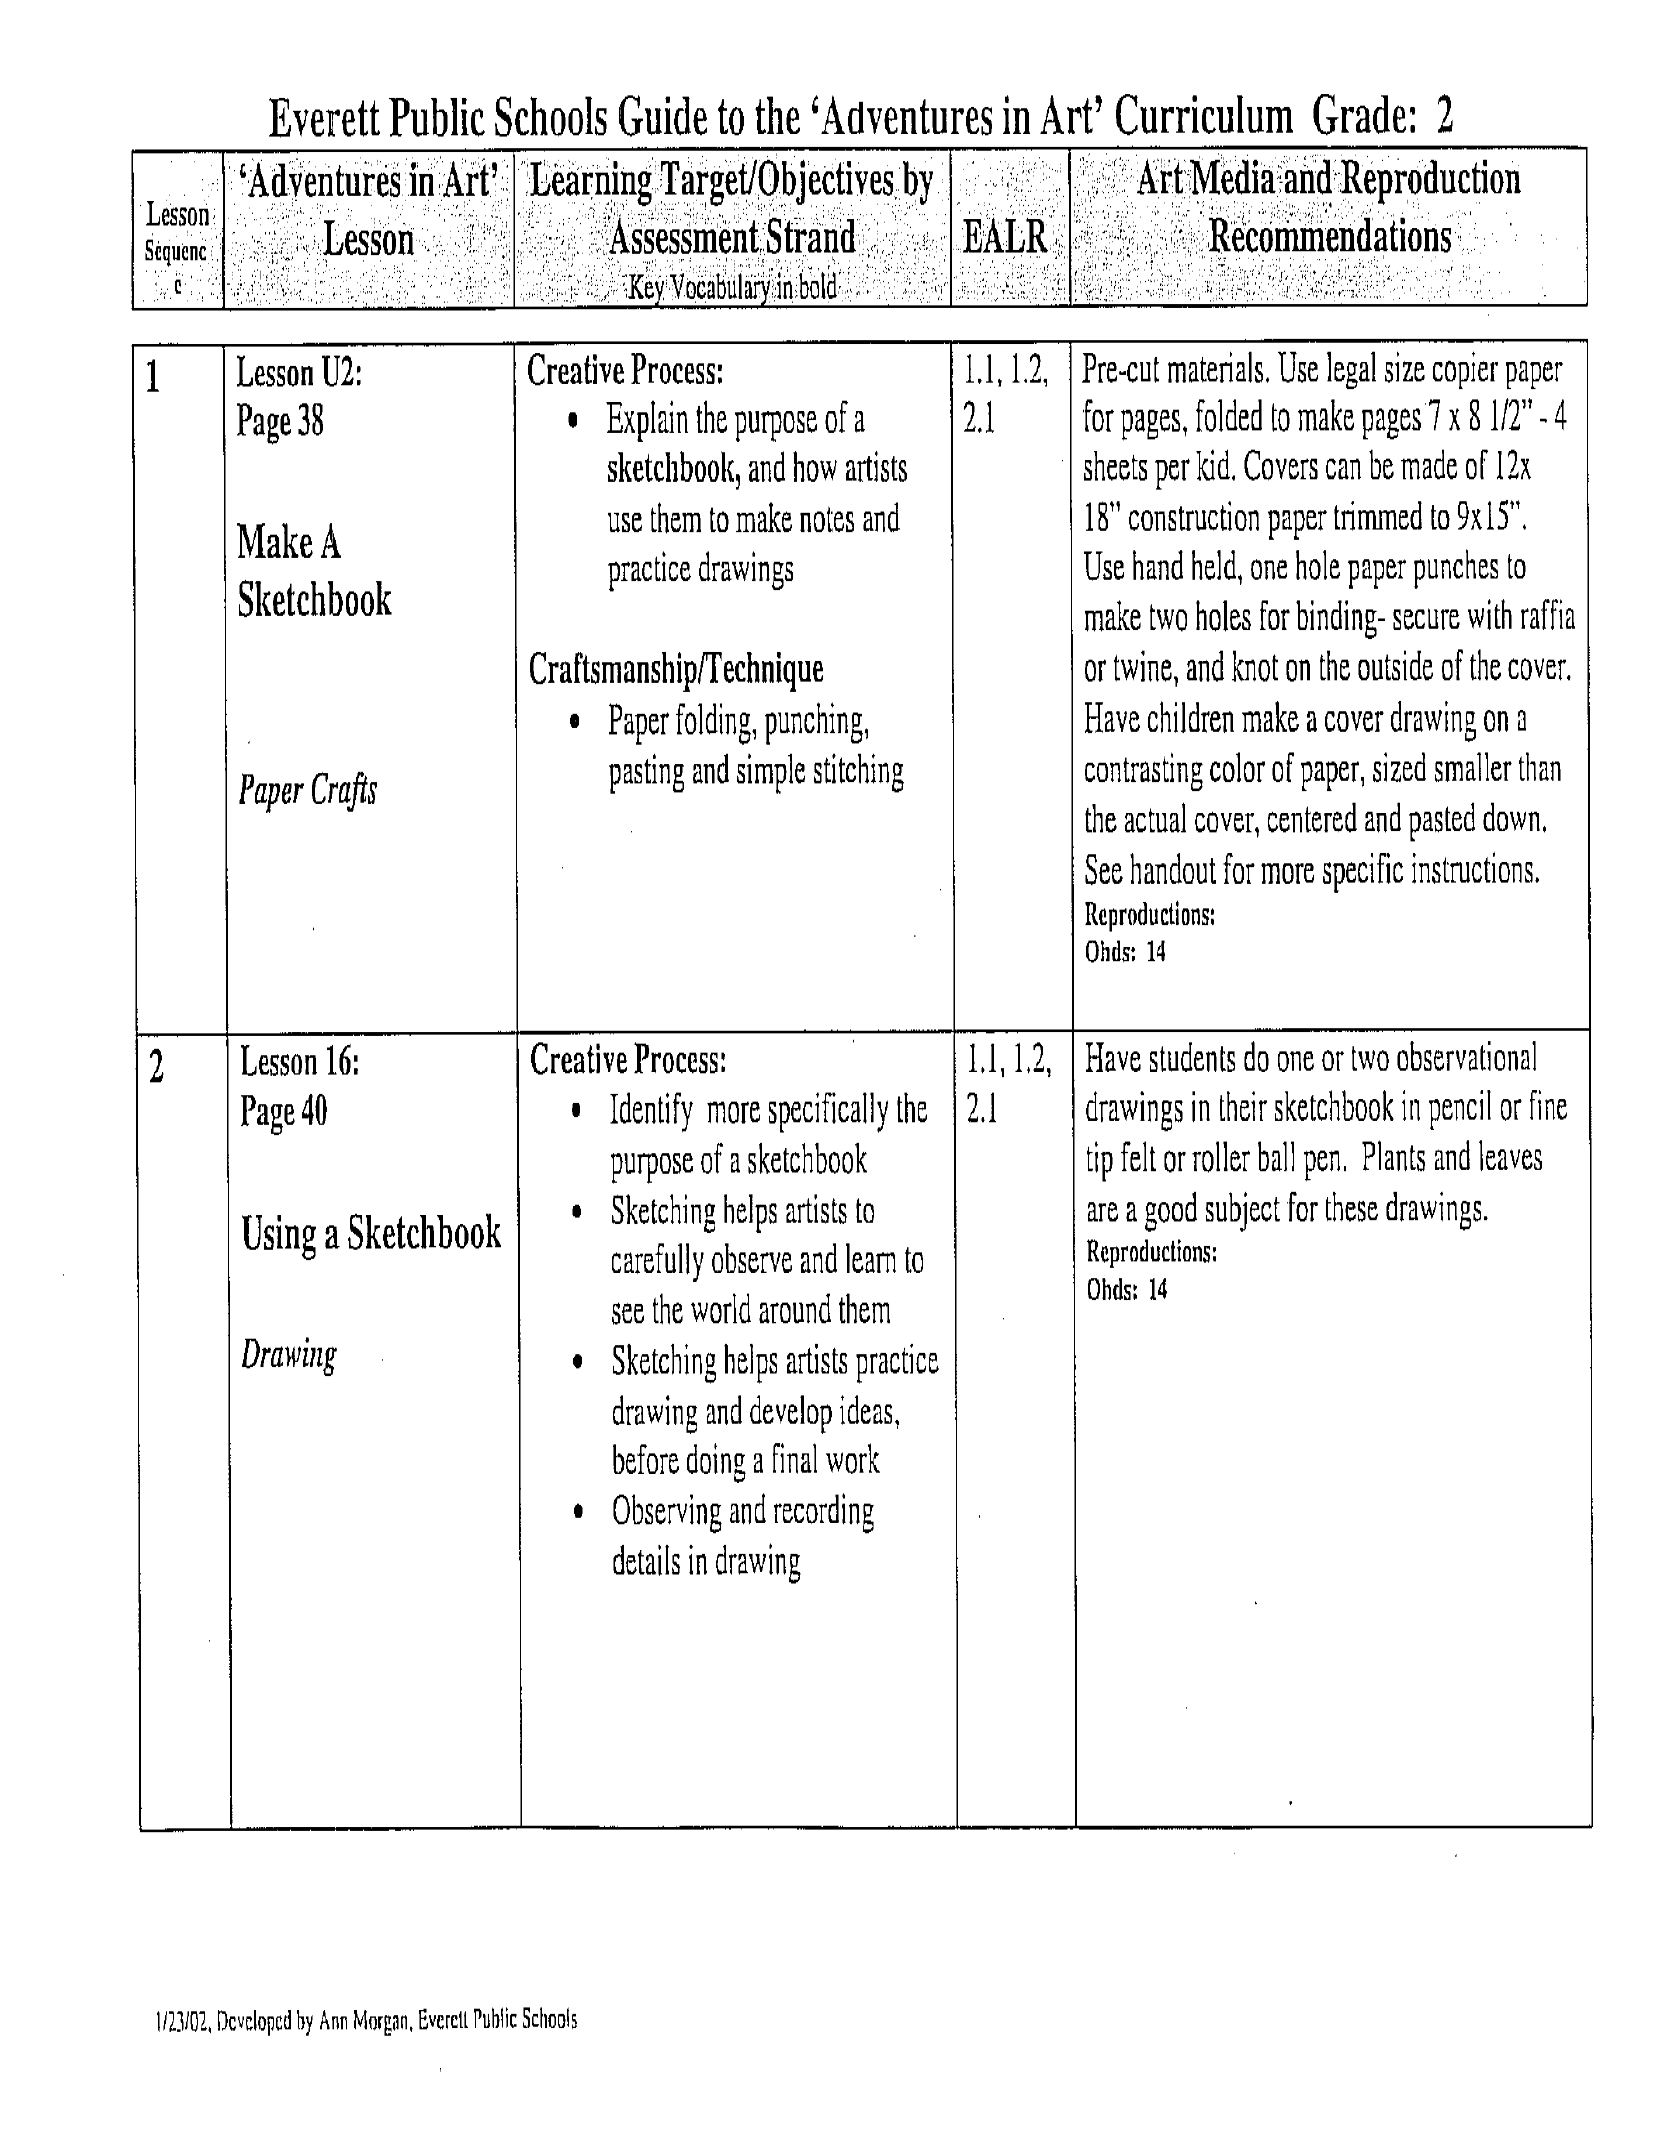
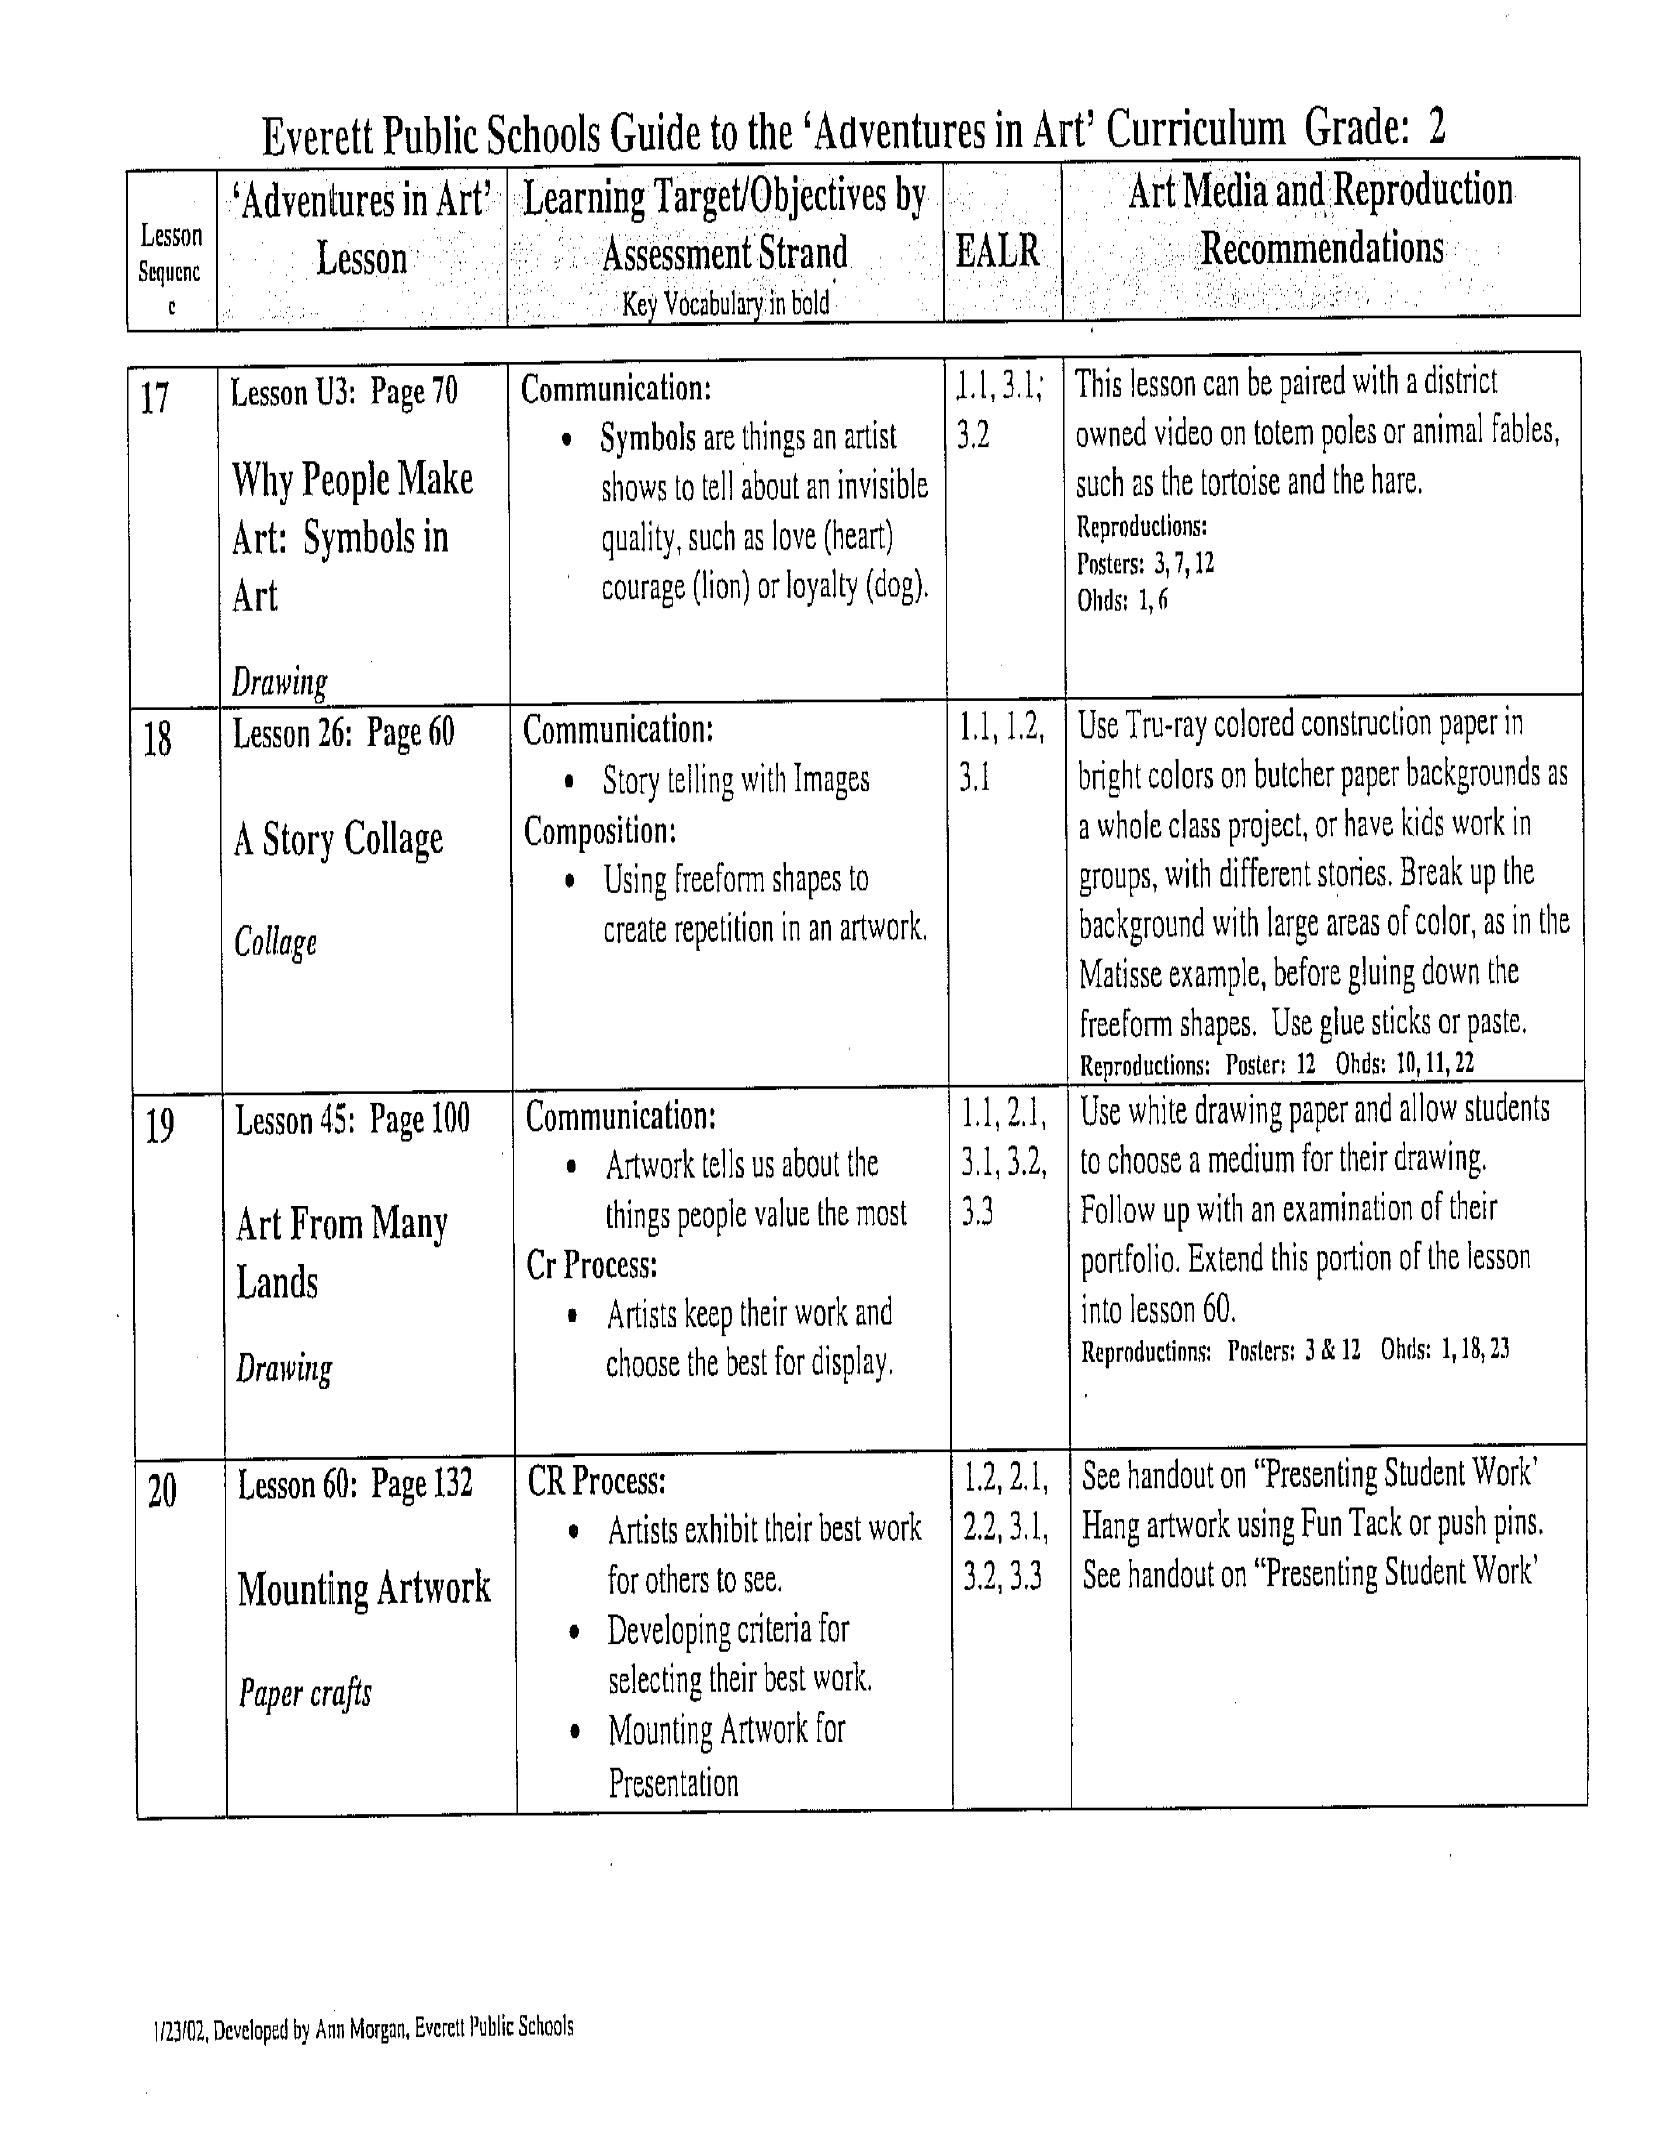
Second Grade:
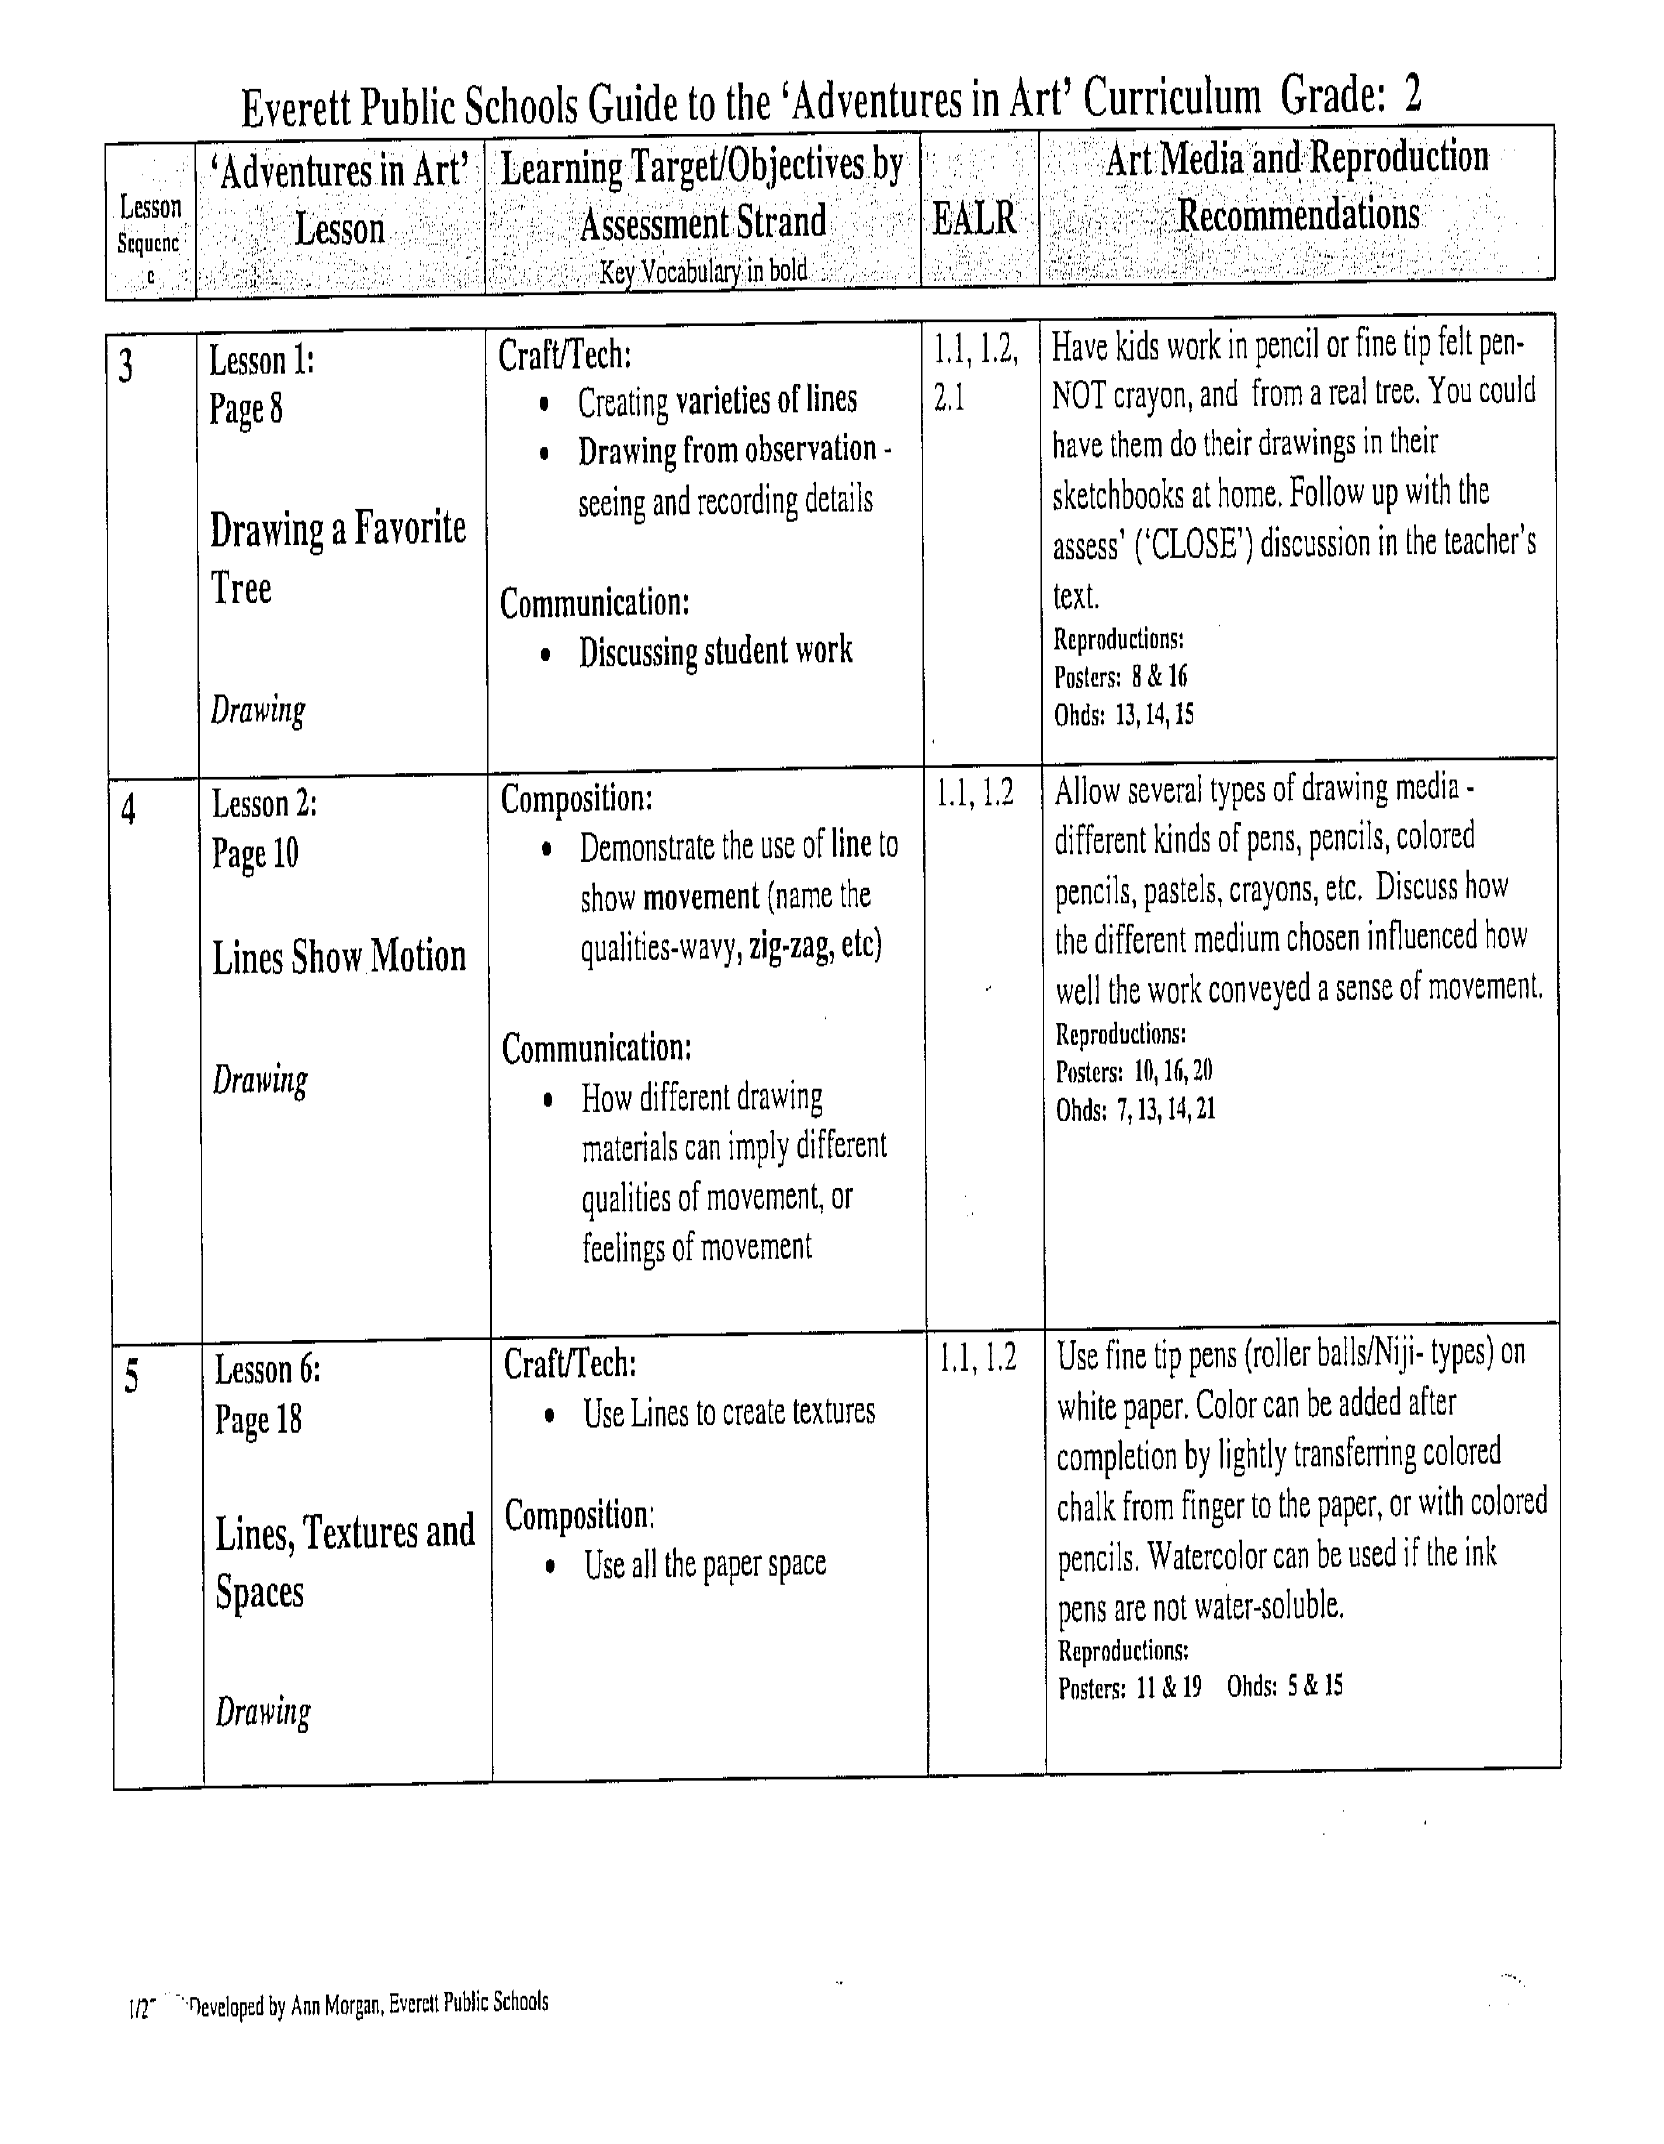
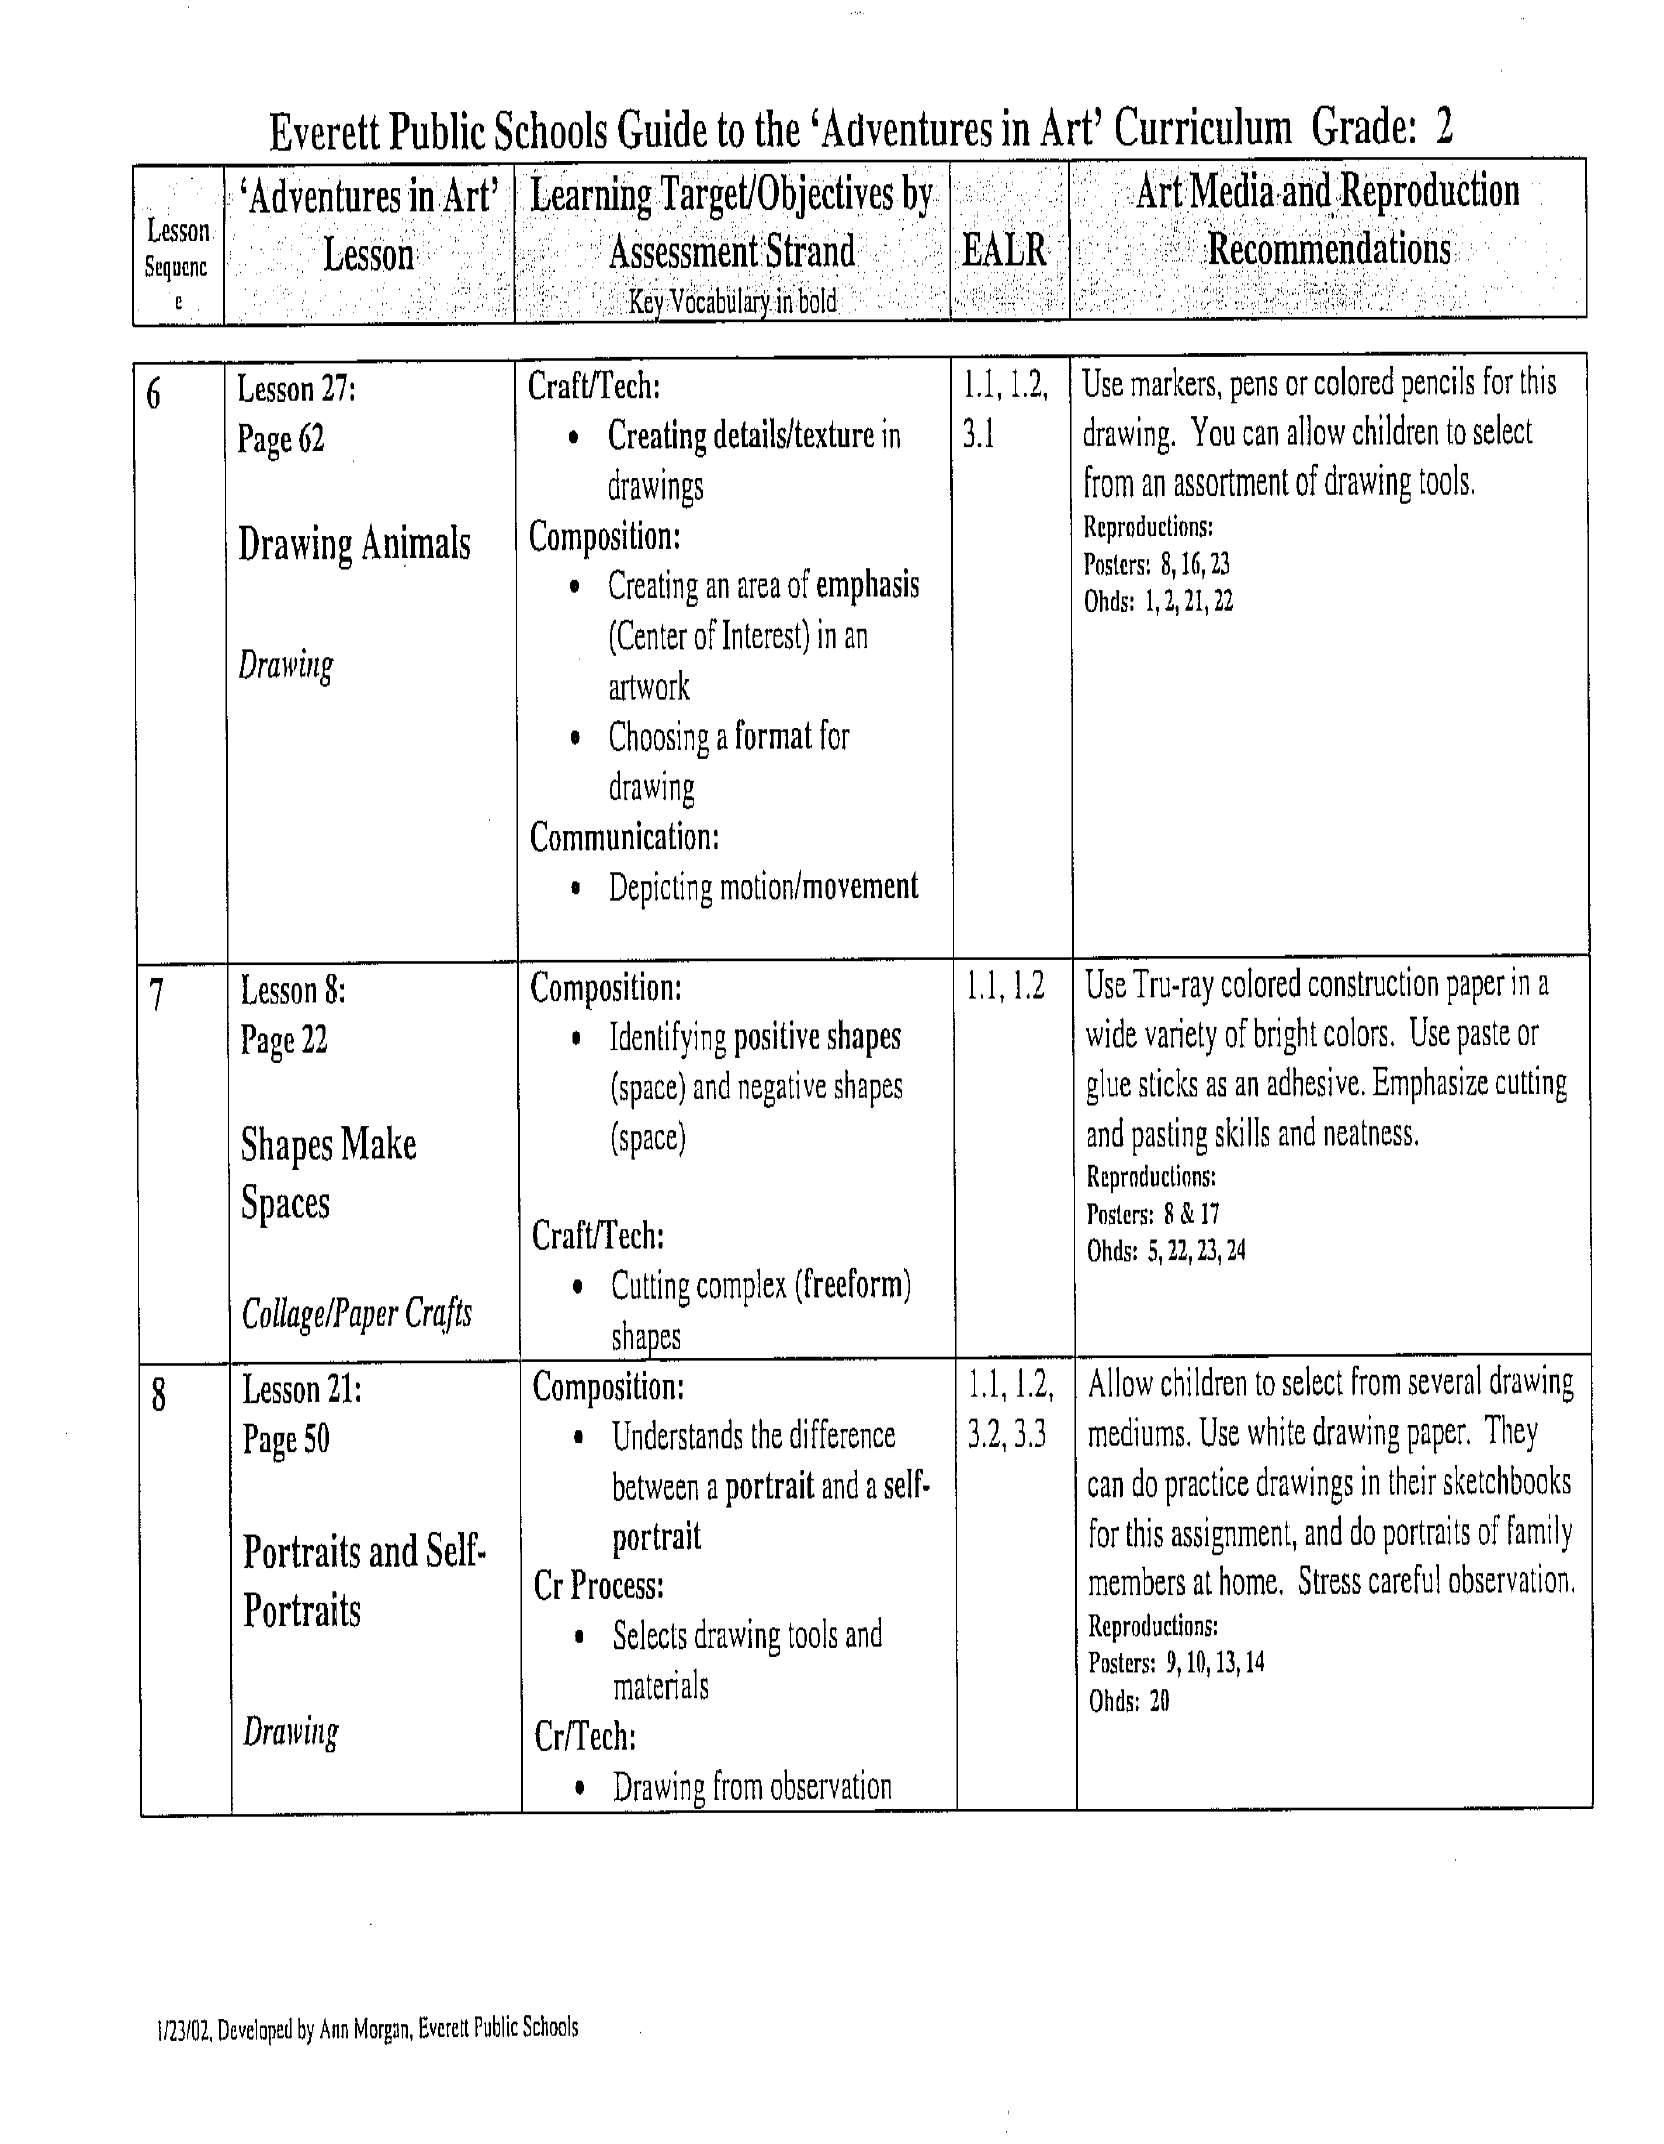
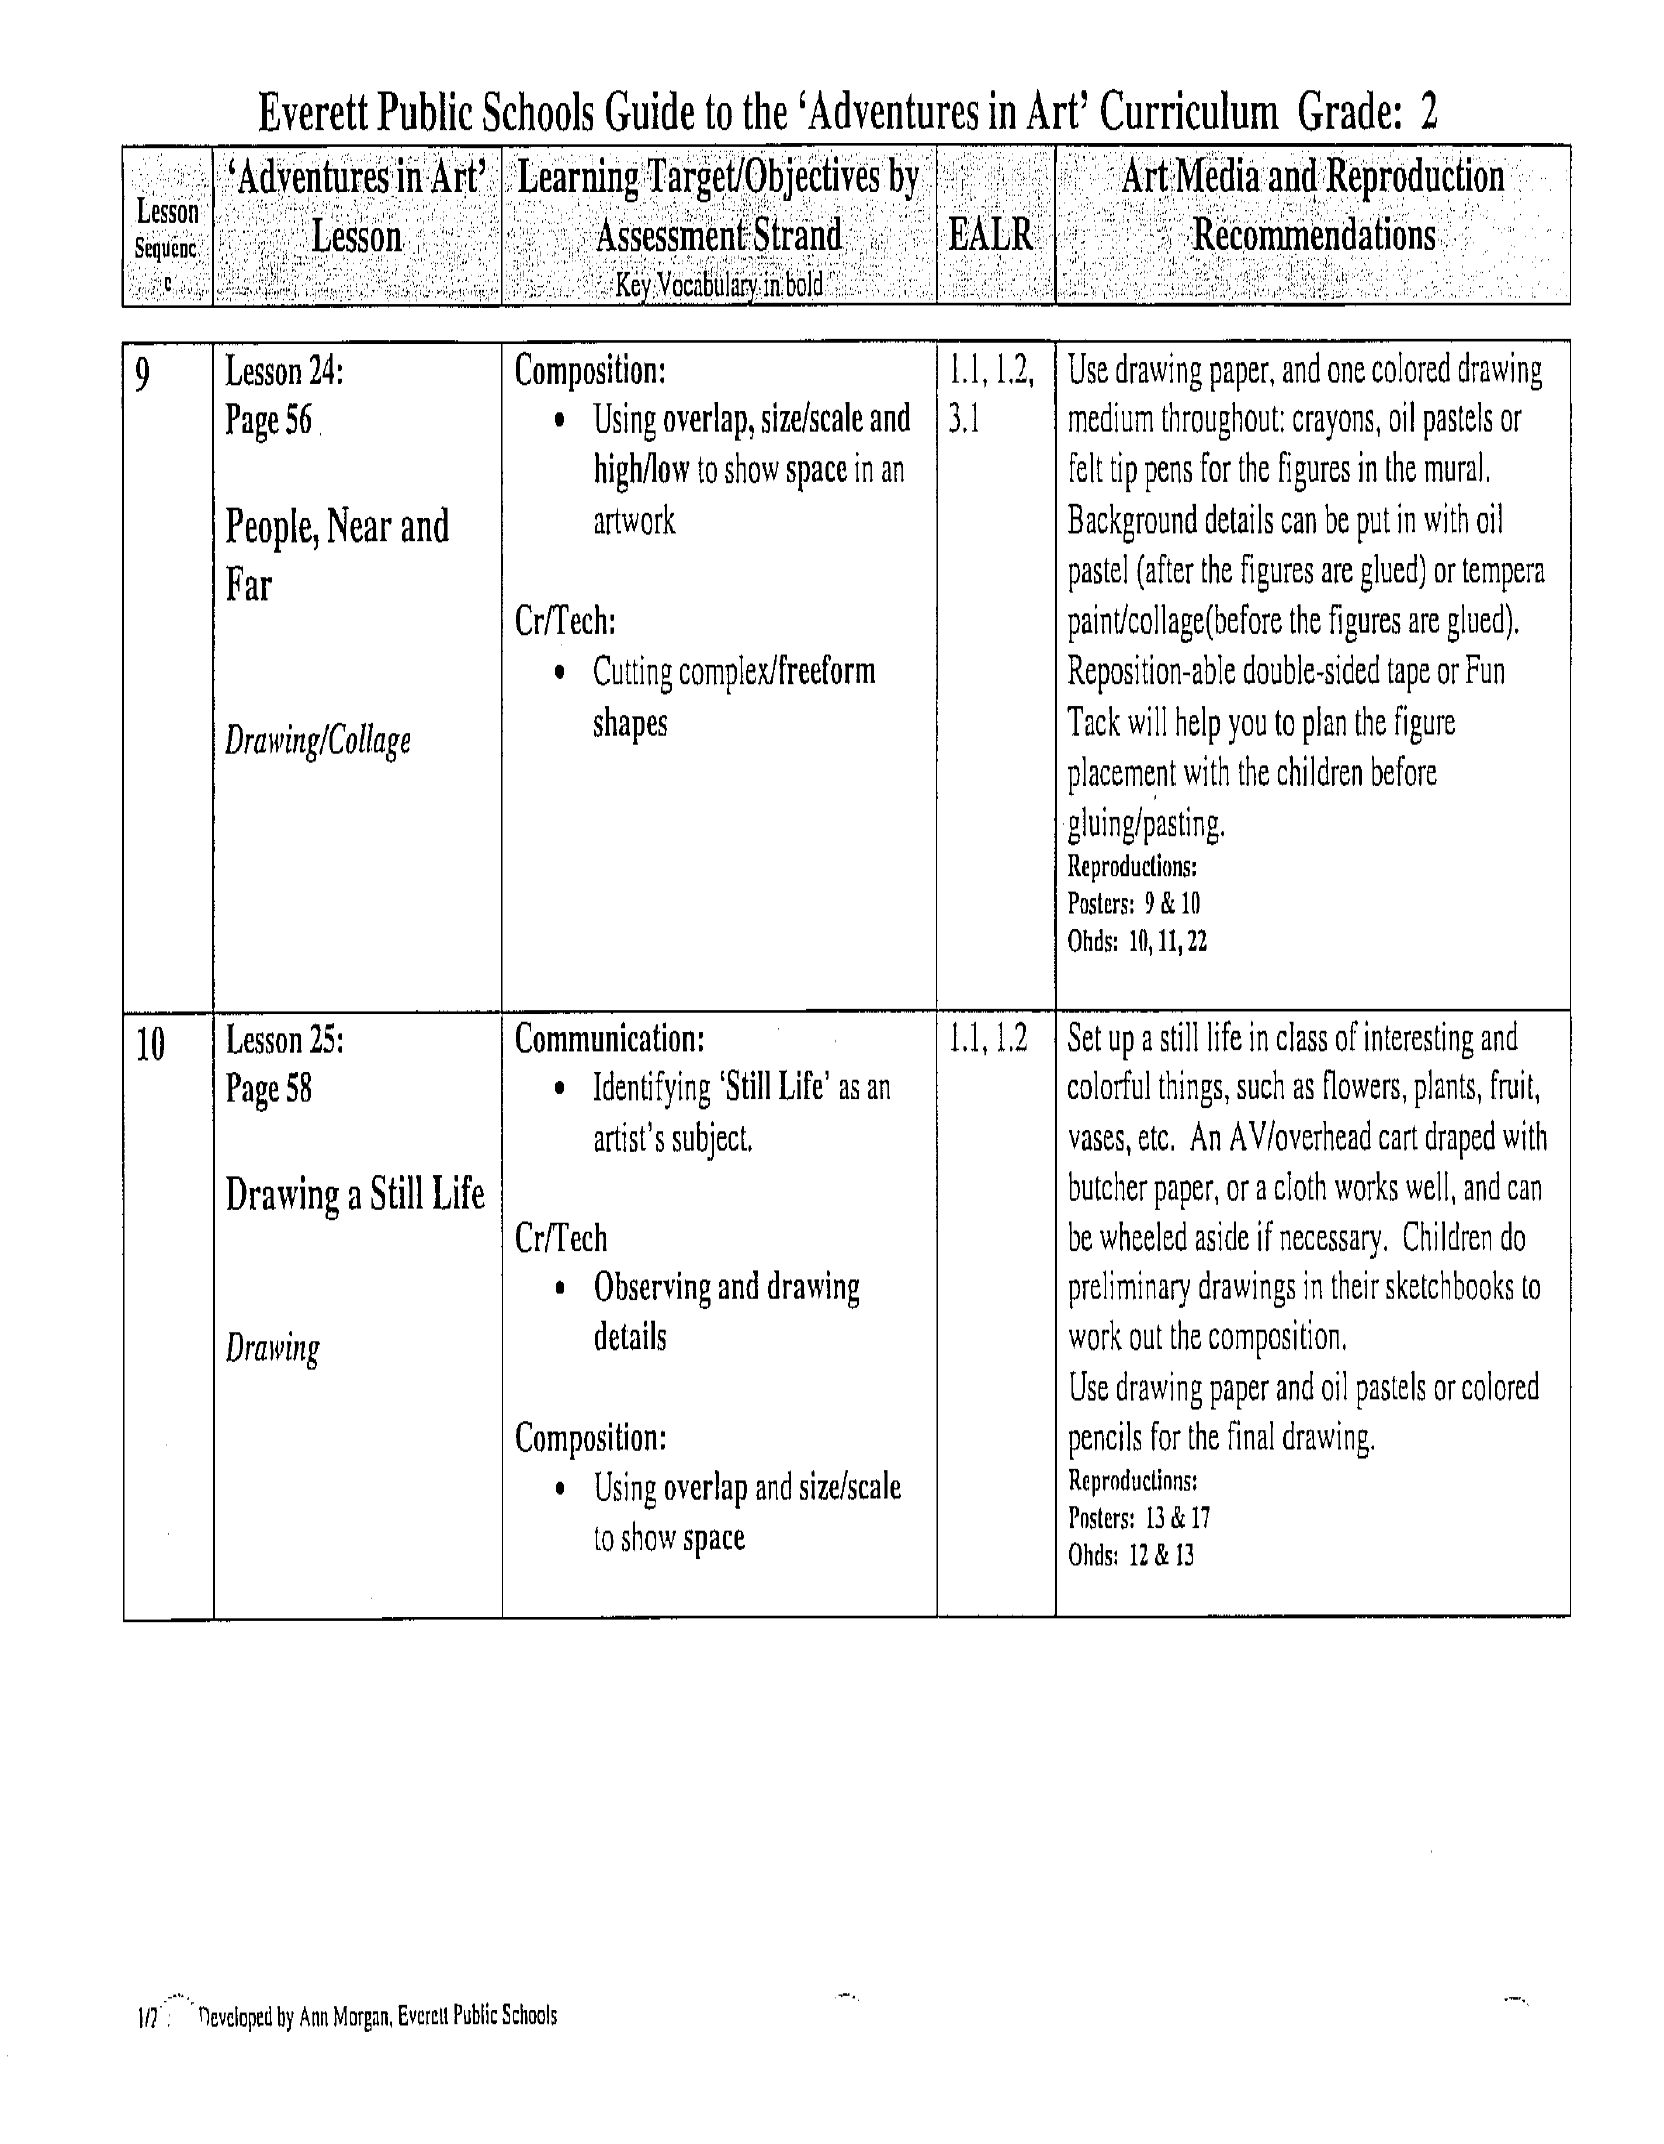
Core Lessons: U2, 16,1,2,6,24,25,27,8,21,17,12,13,14,18,19,U3,26,45,60
Supplemental Lessons: 7,16,20,31-33,35,52
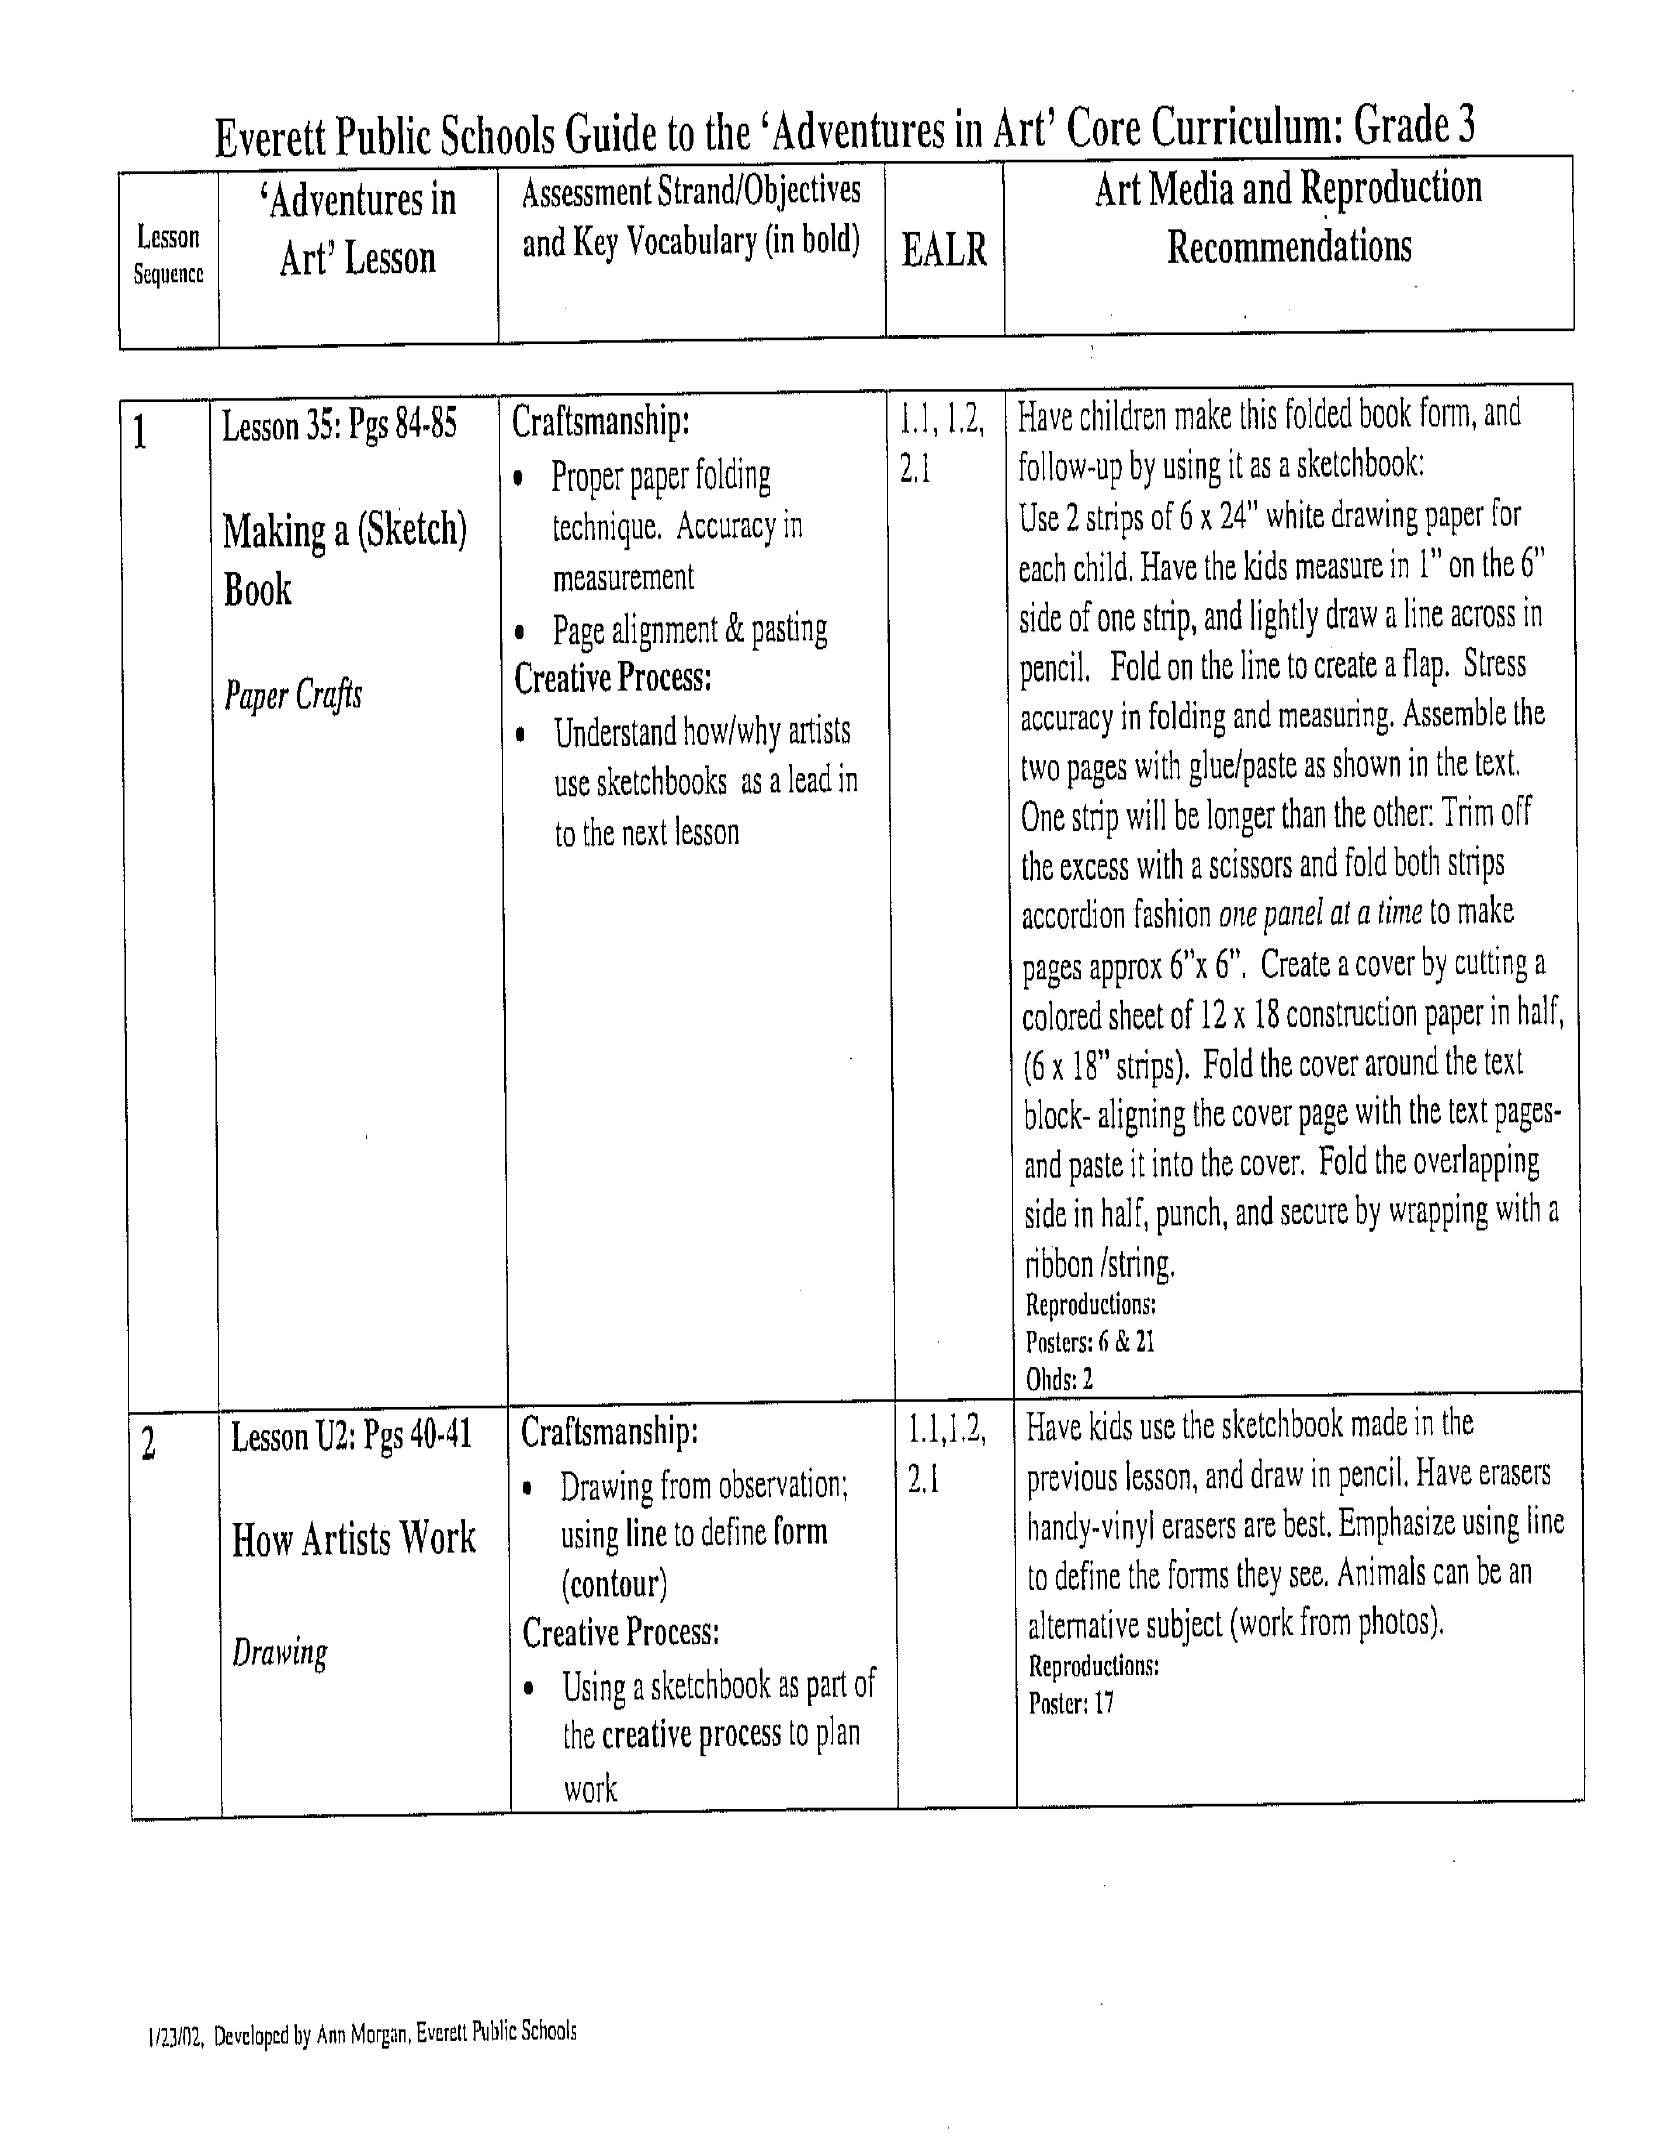
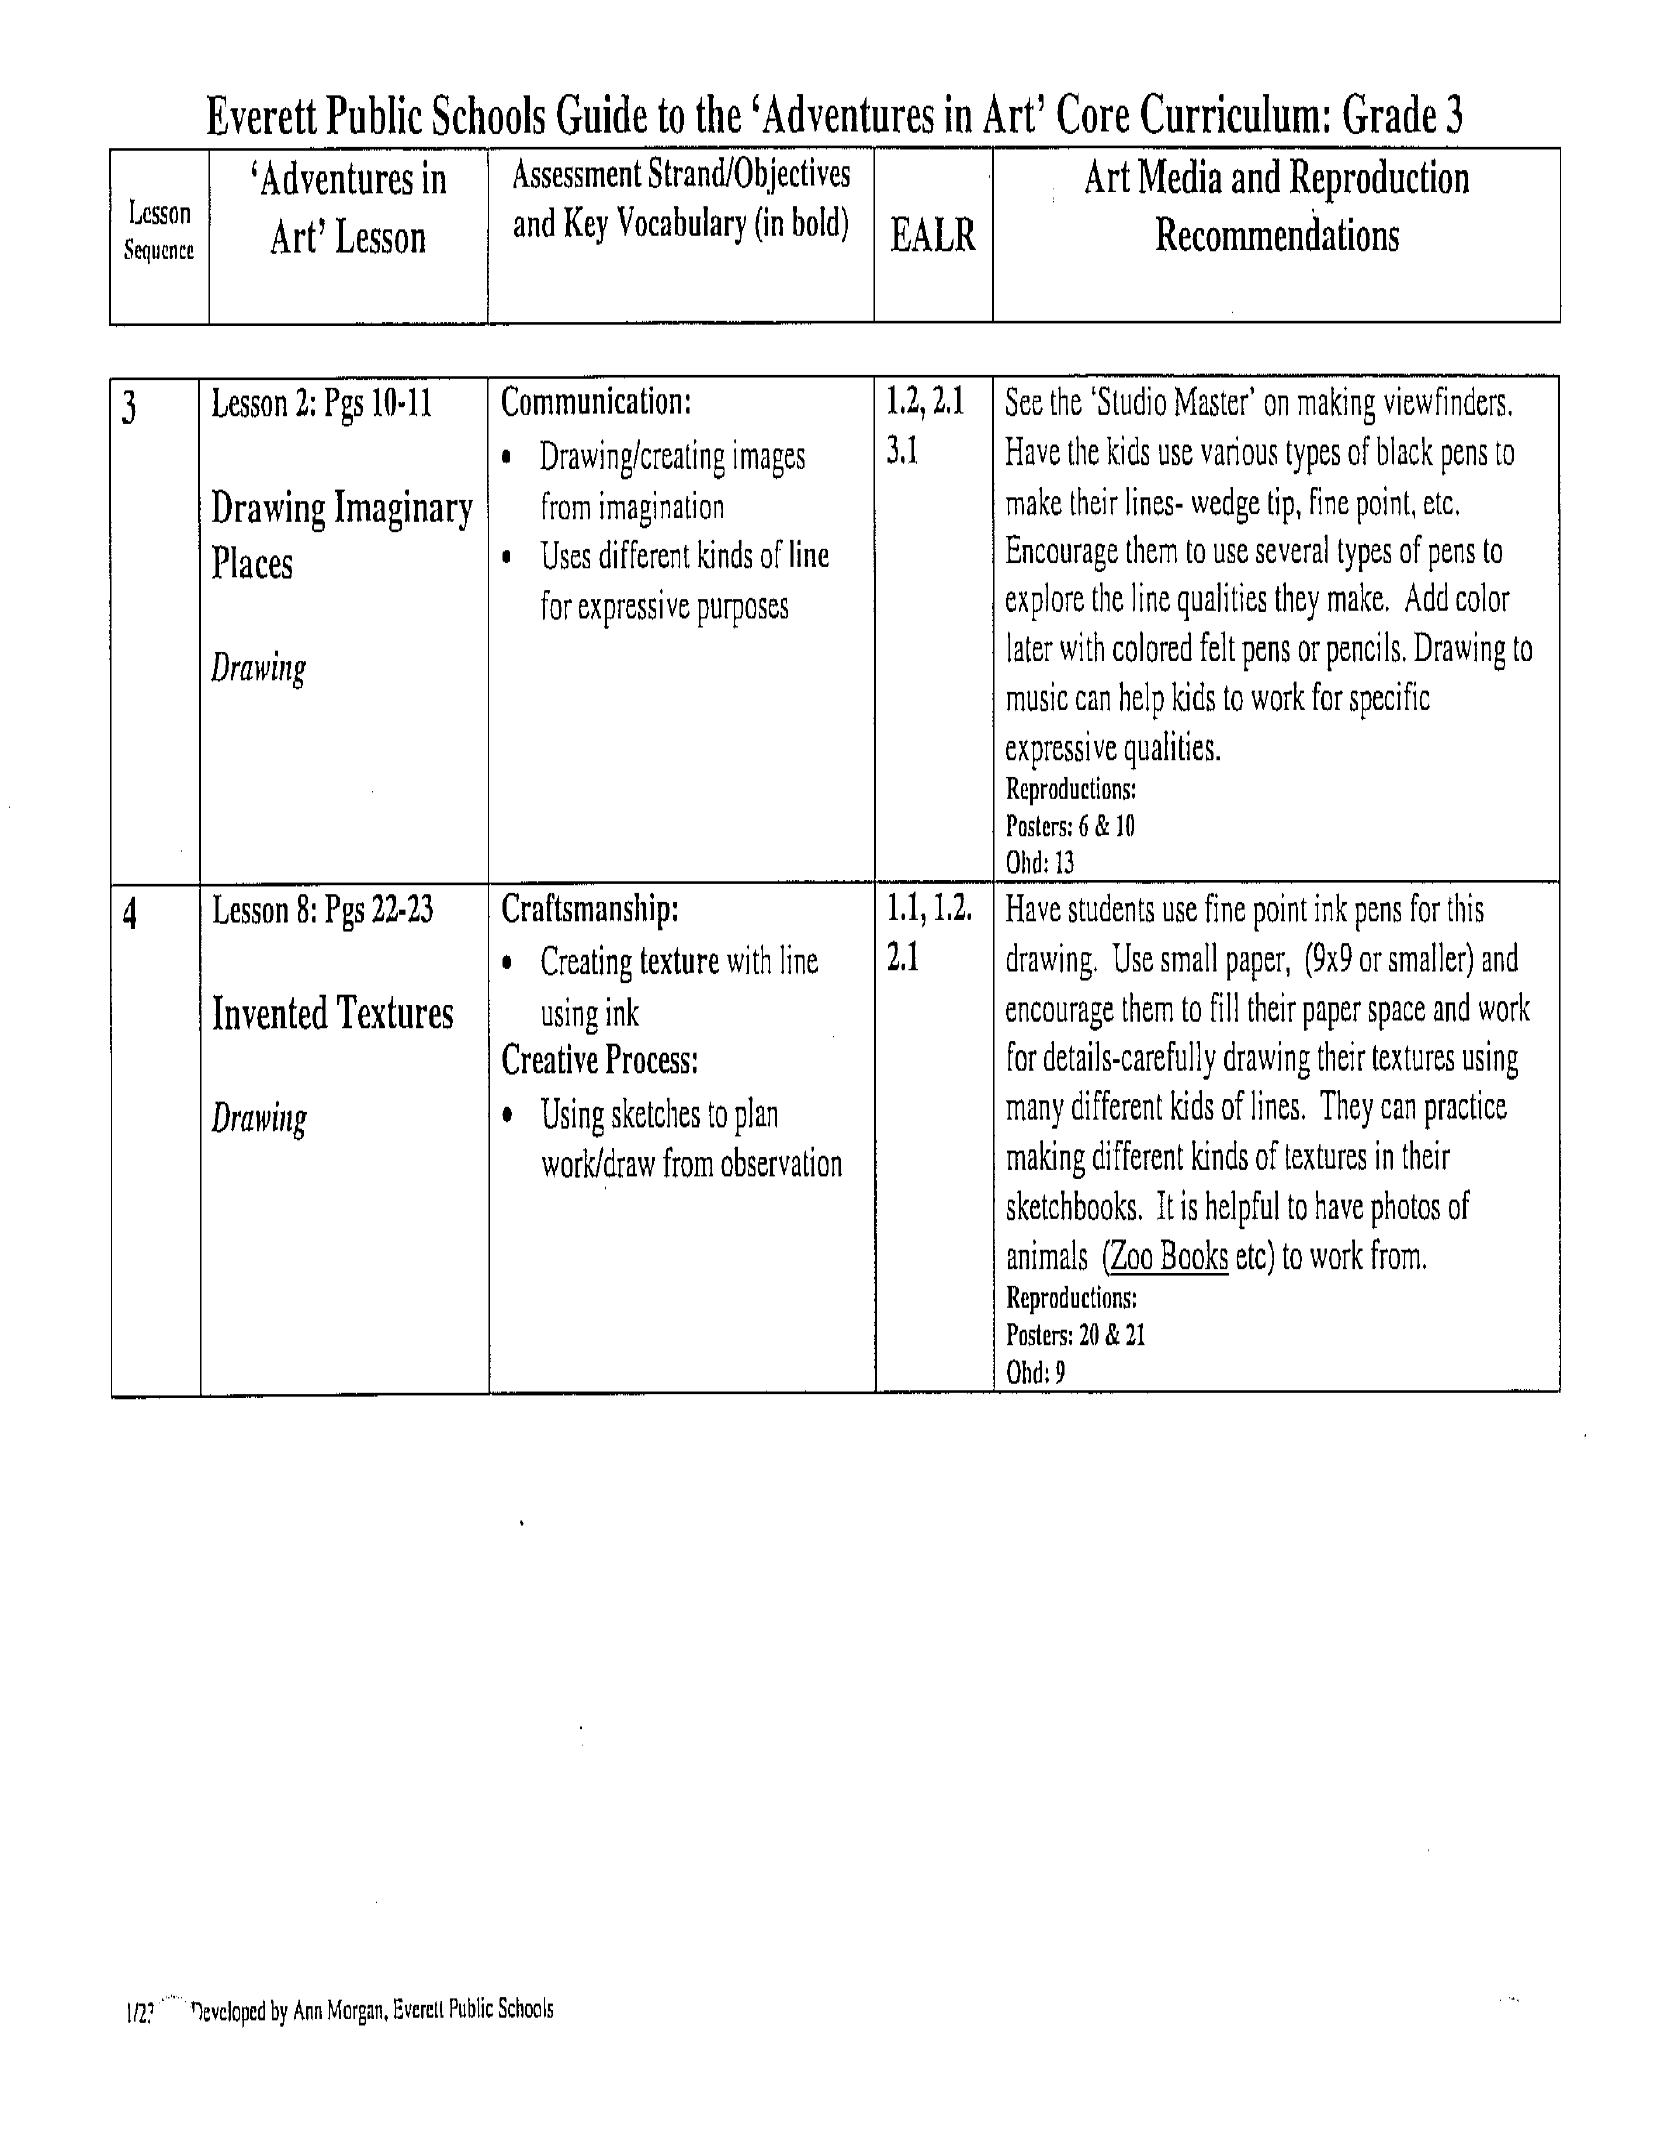
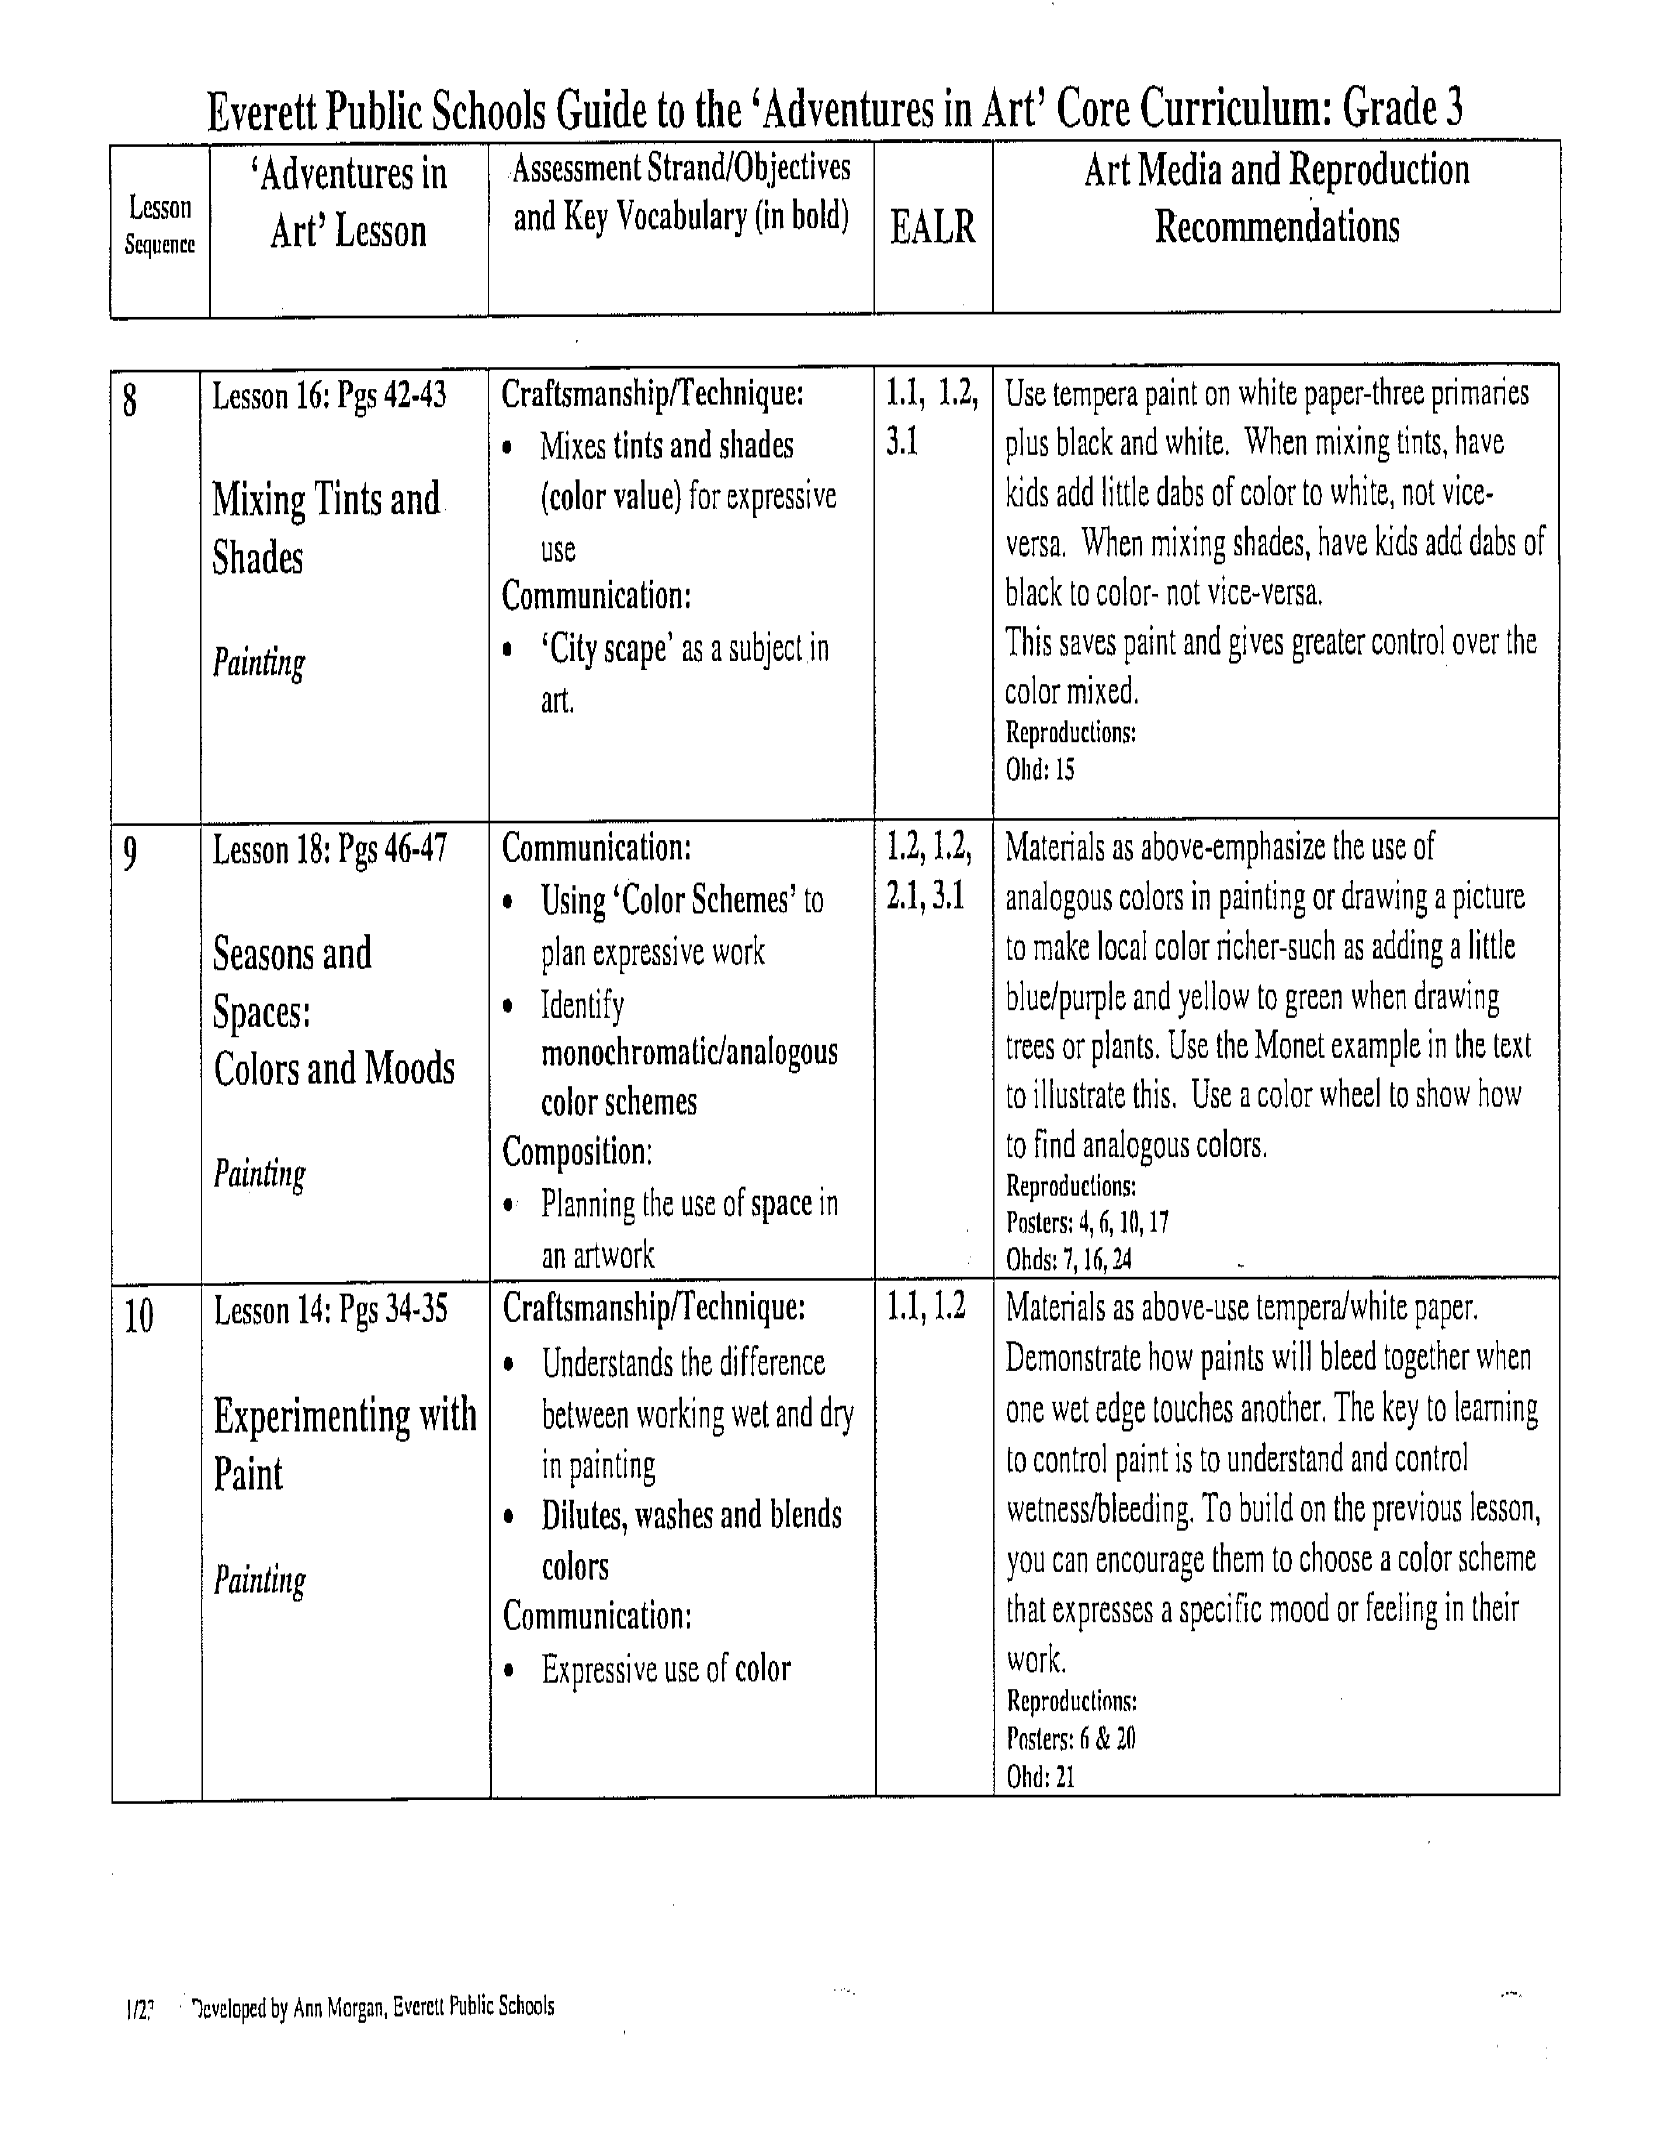
Third Grade:
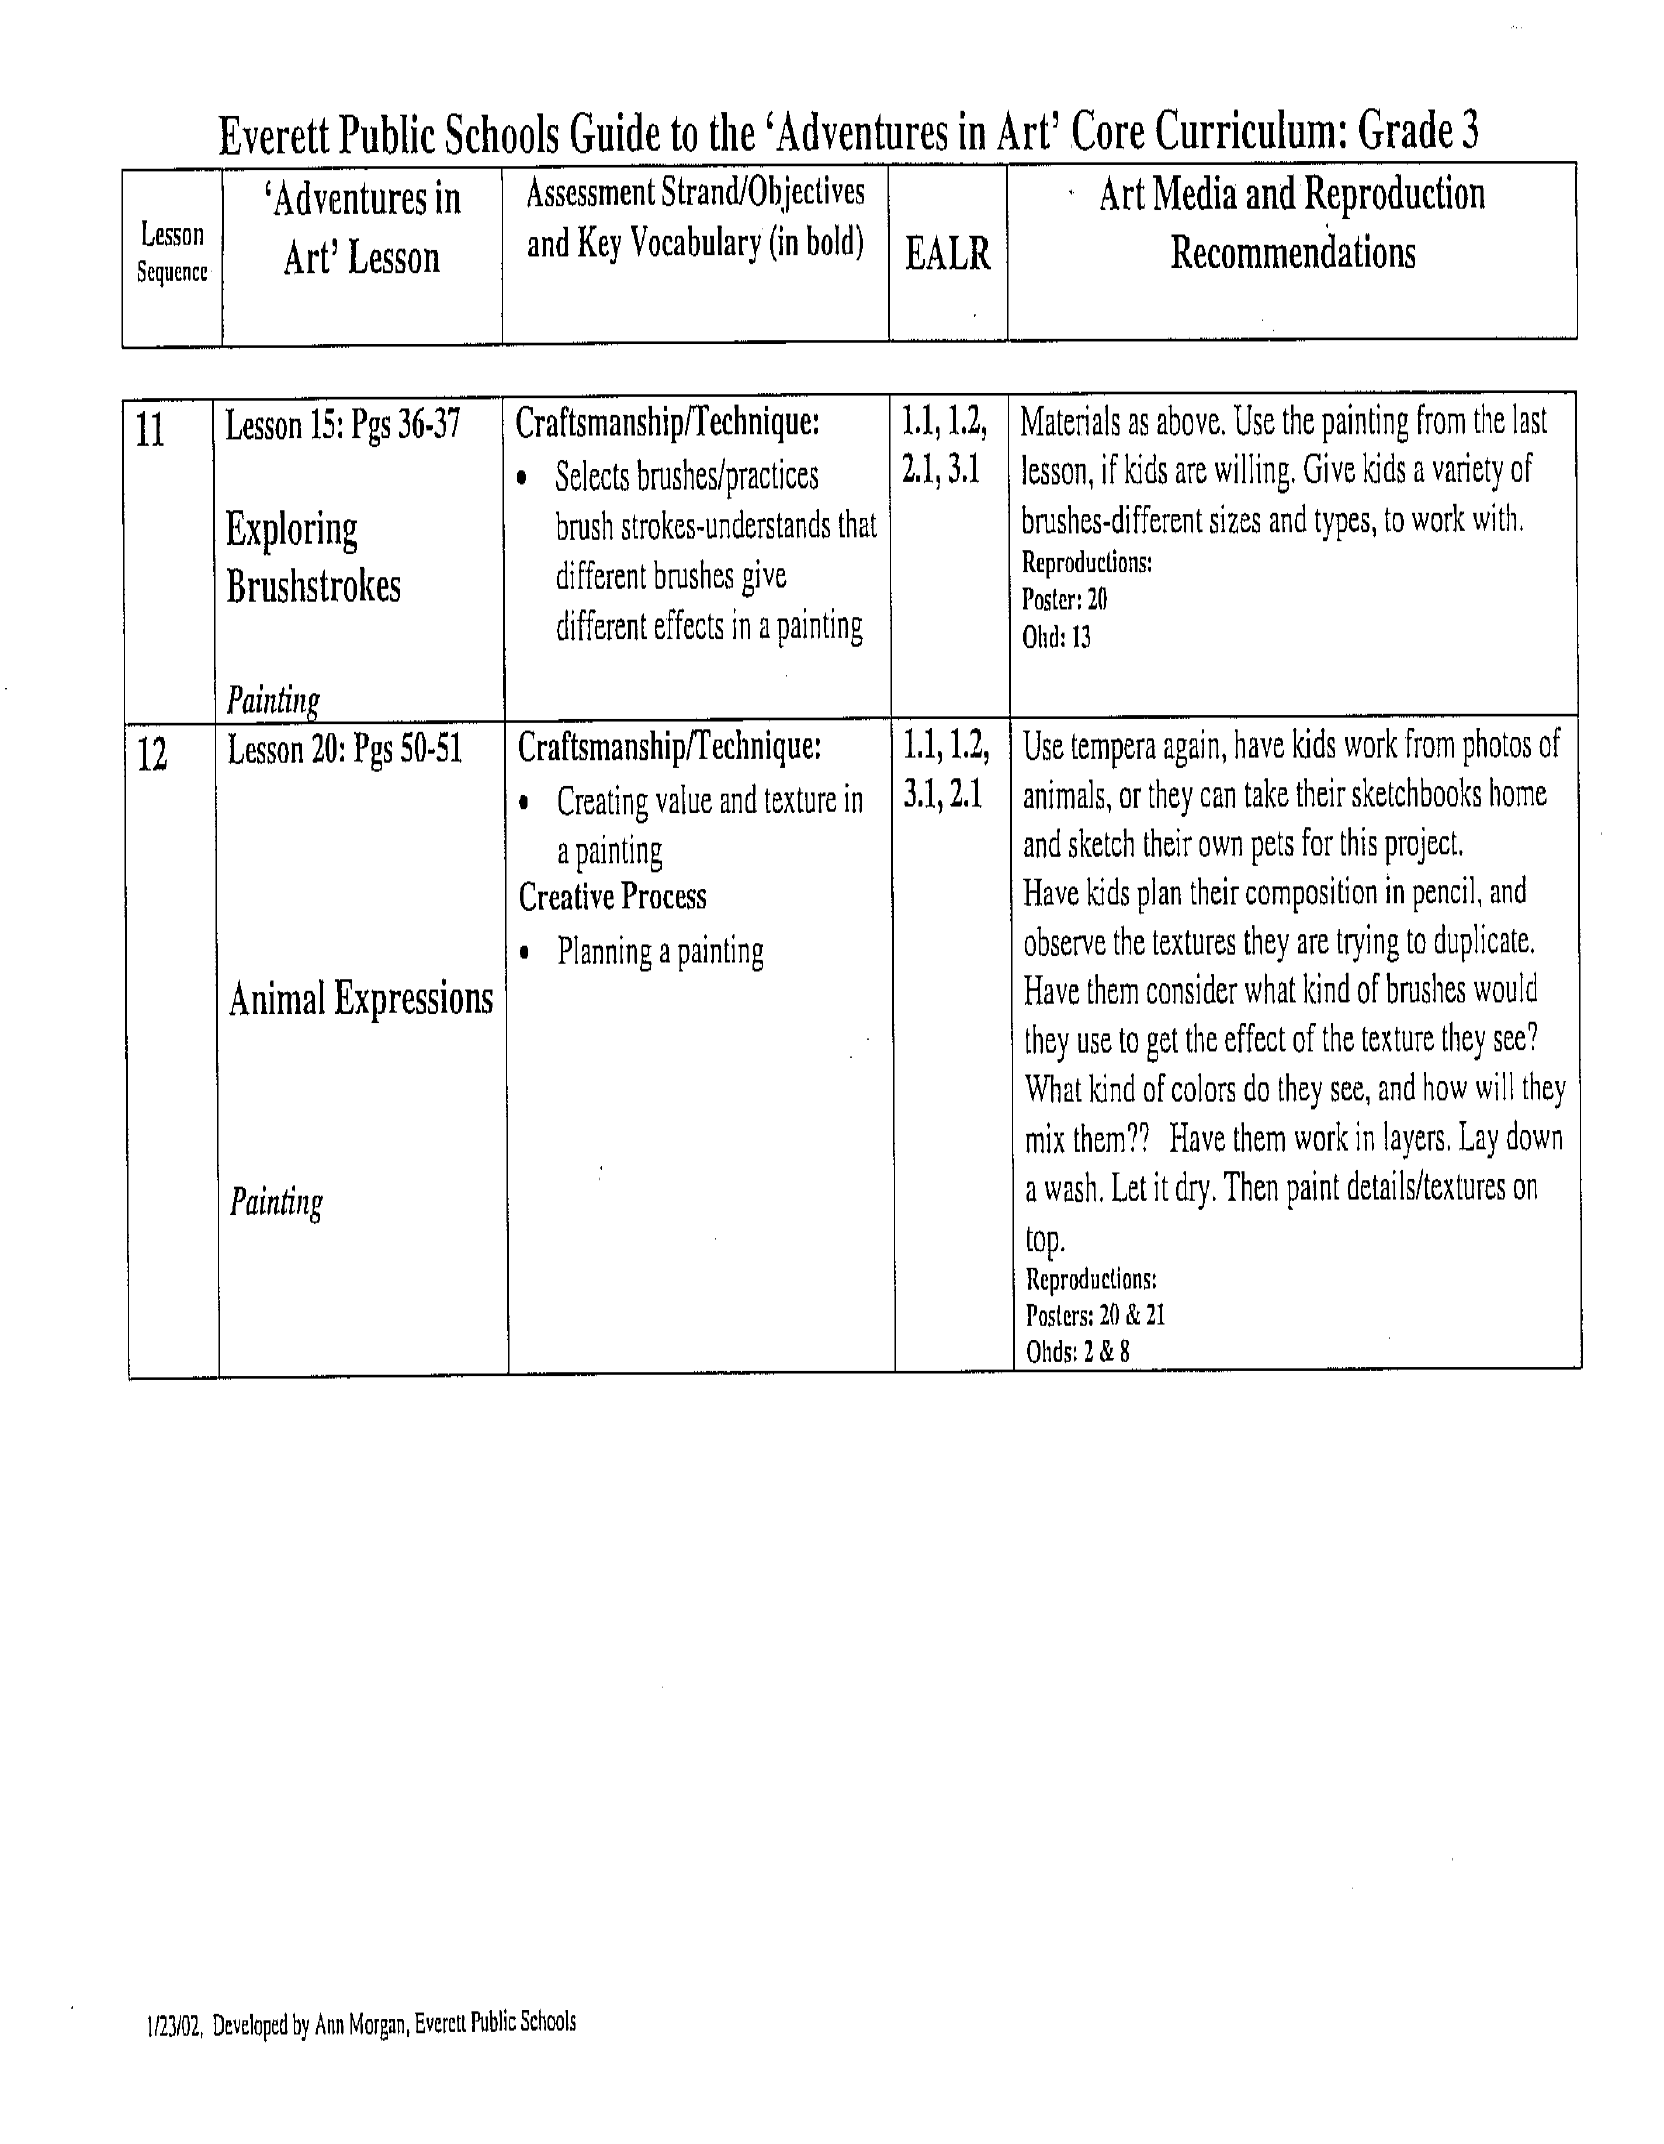
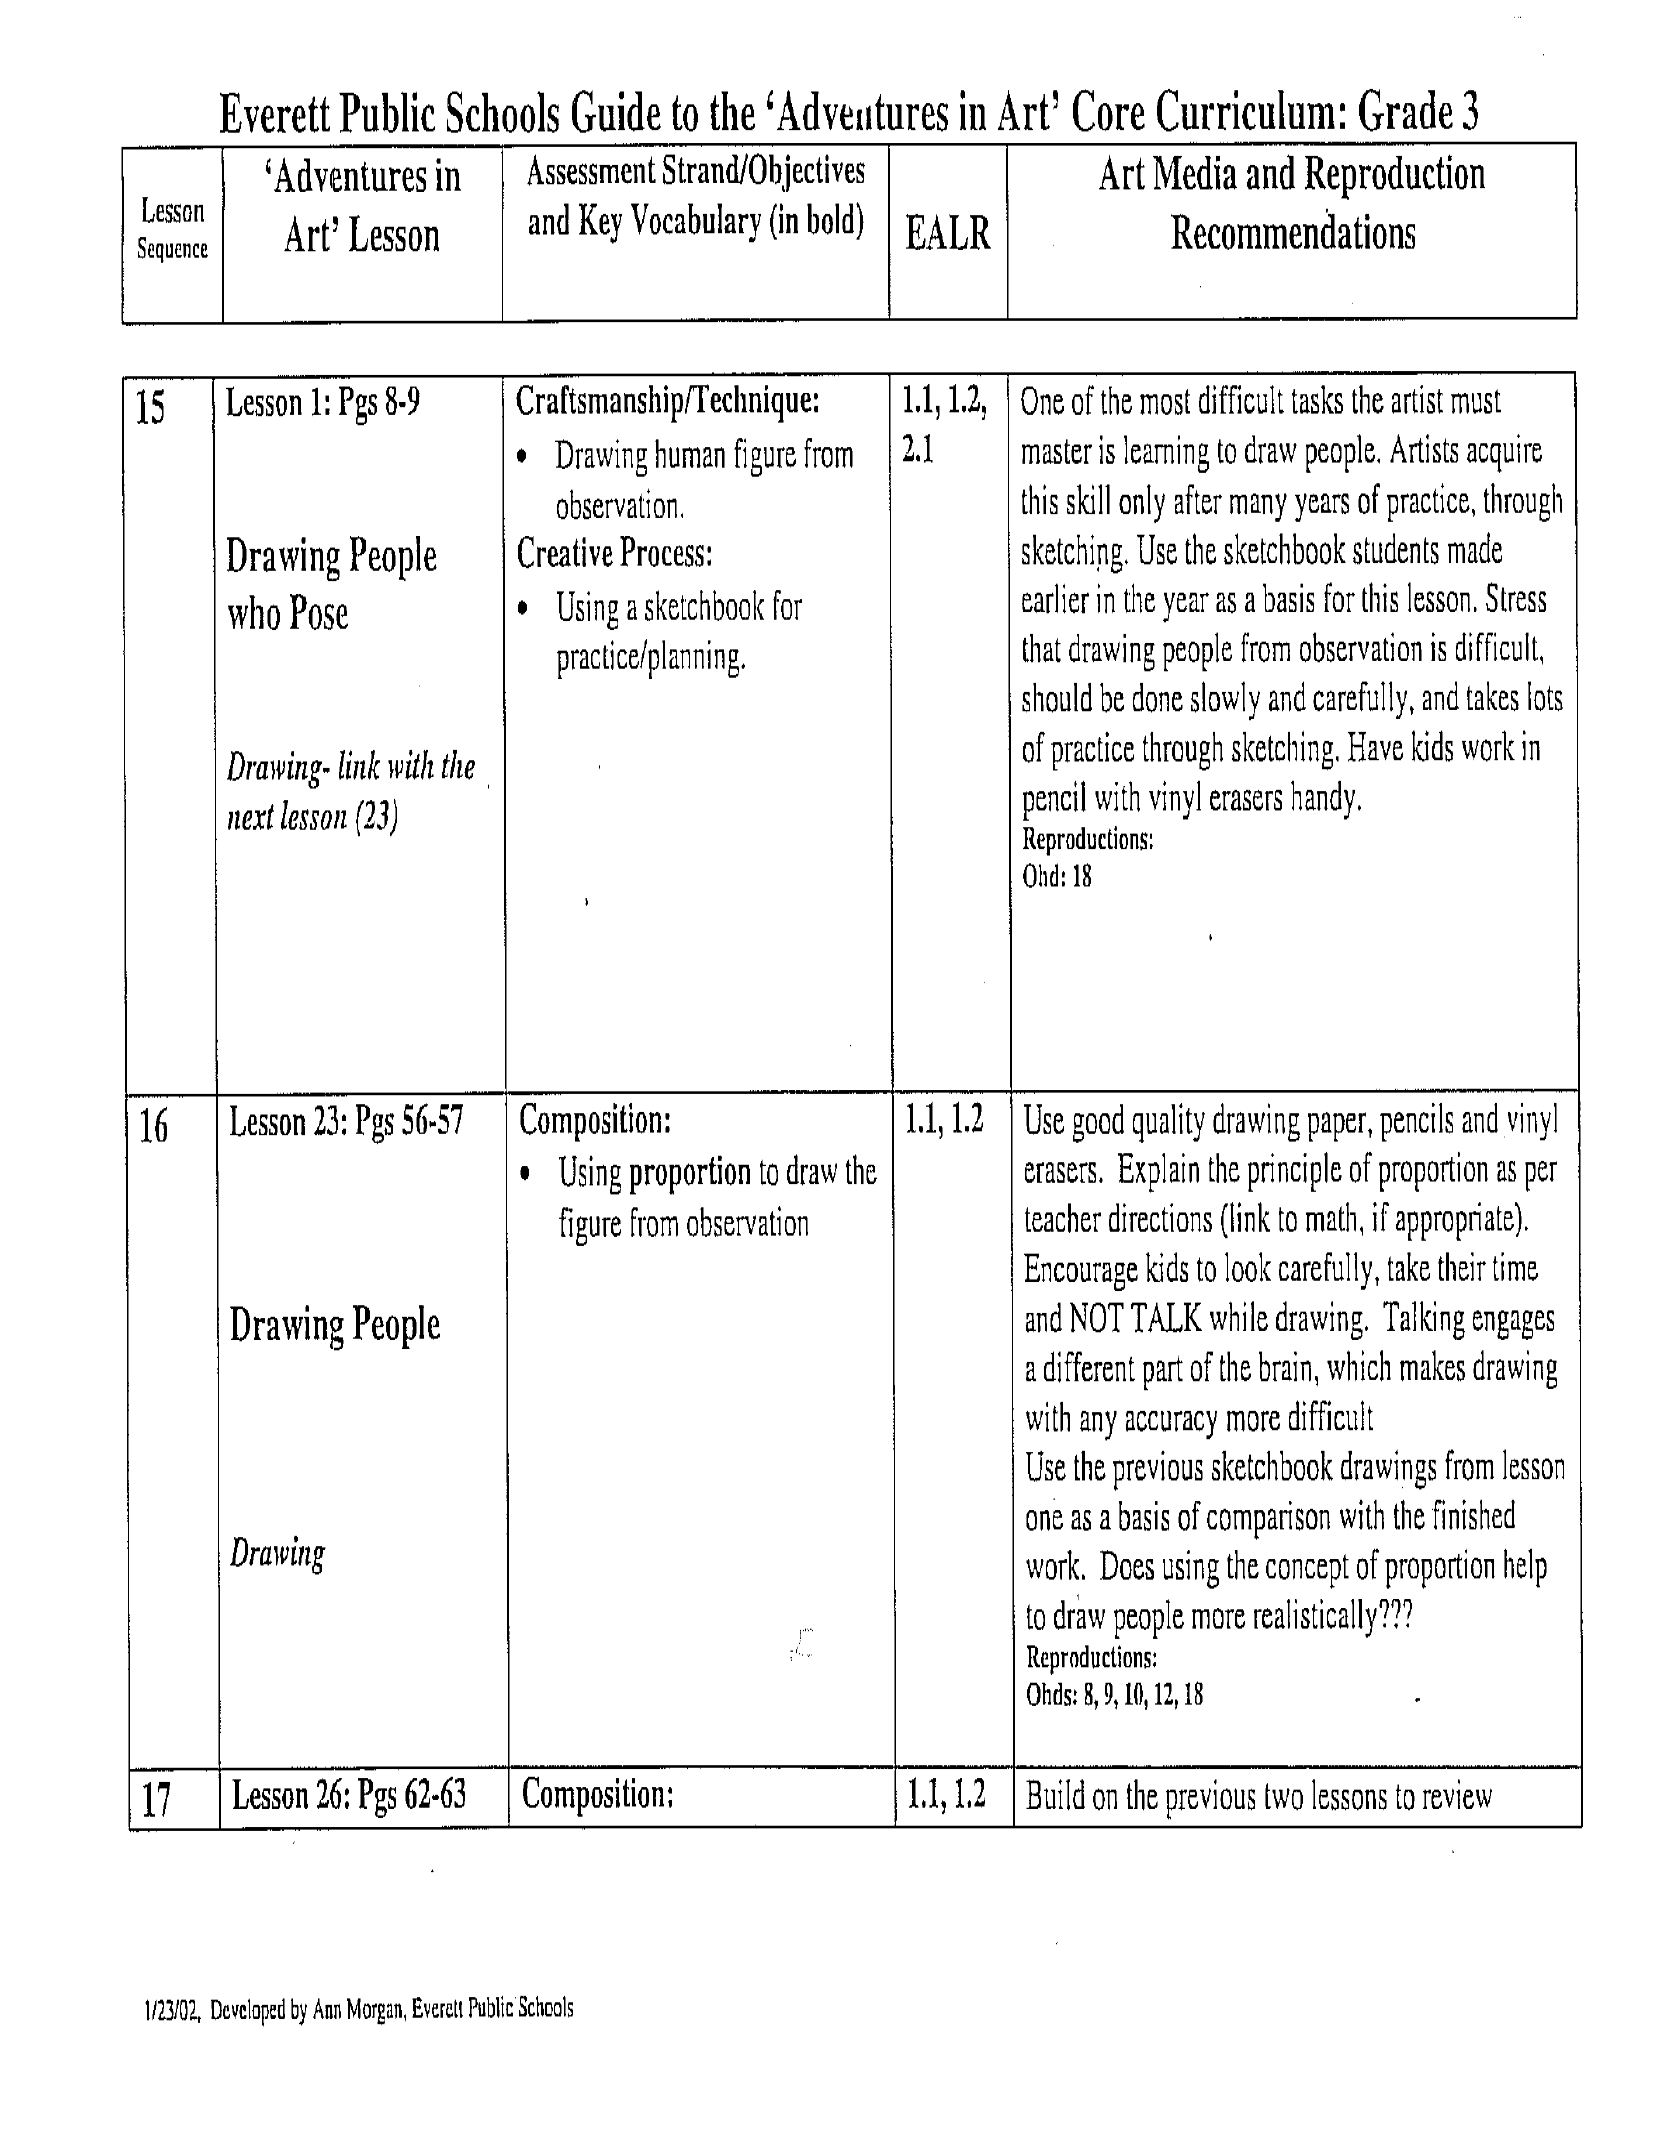
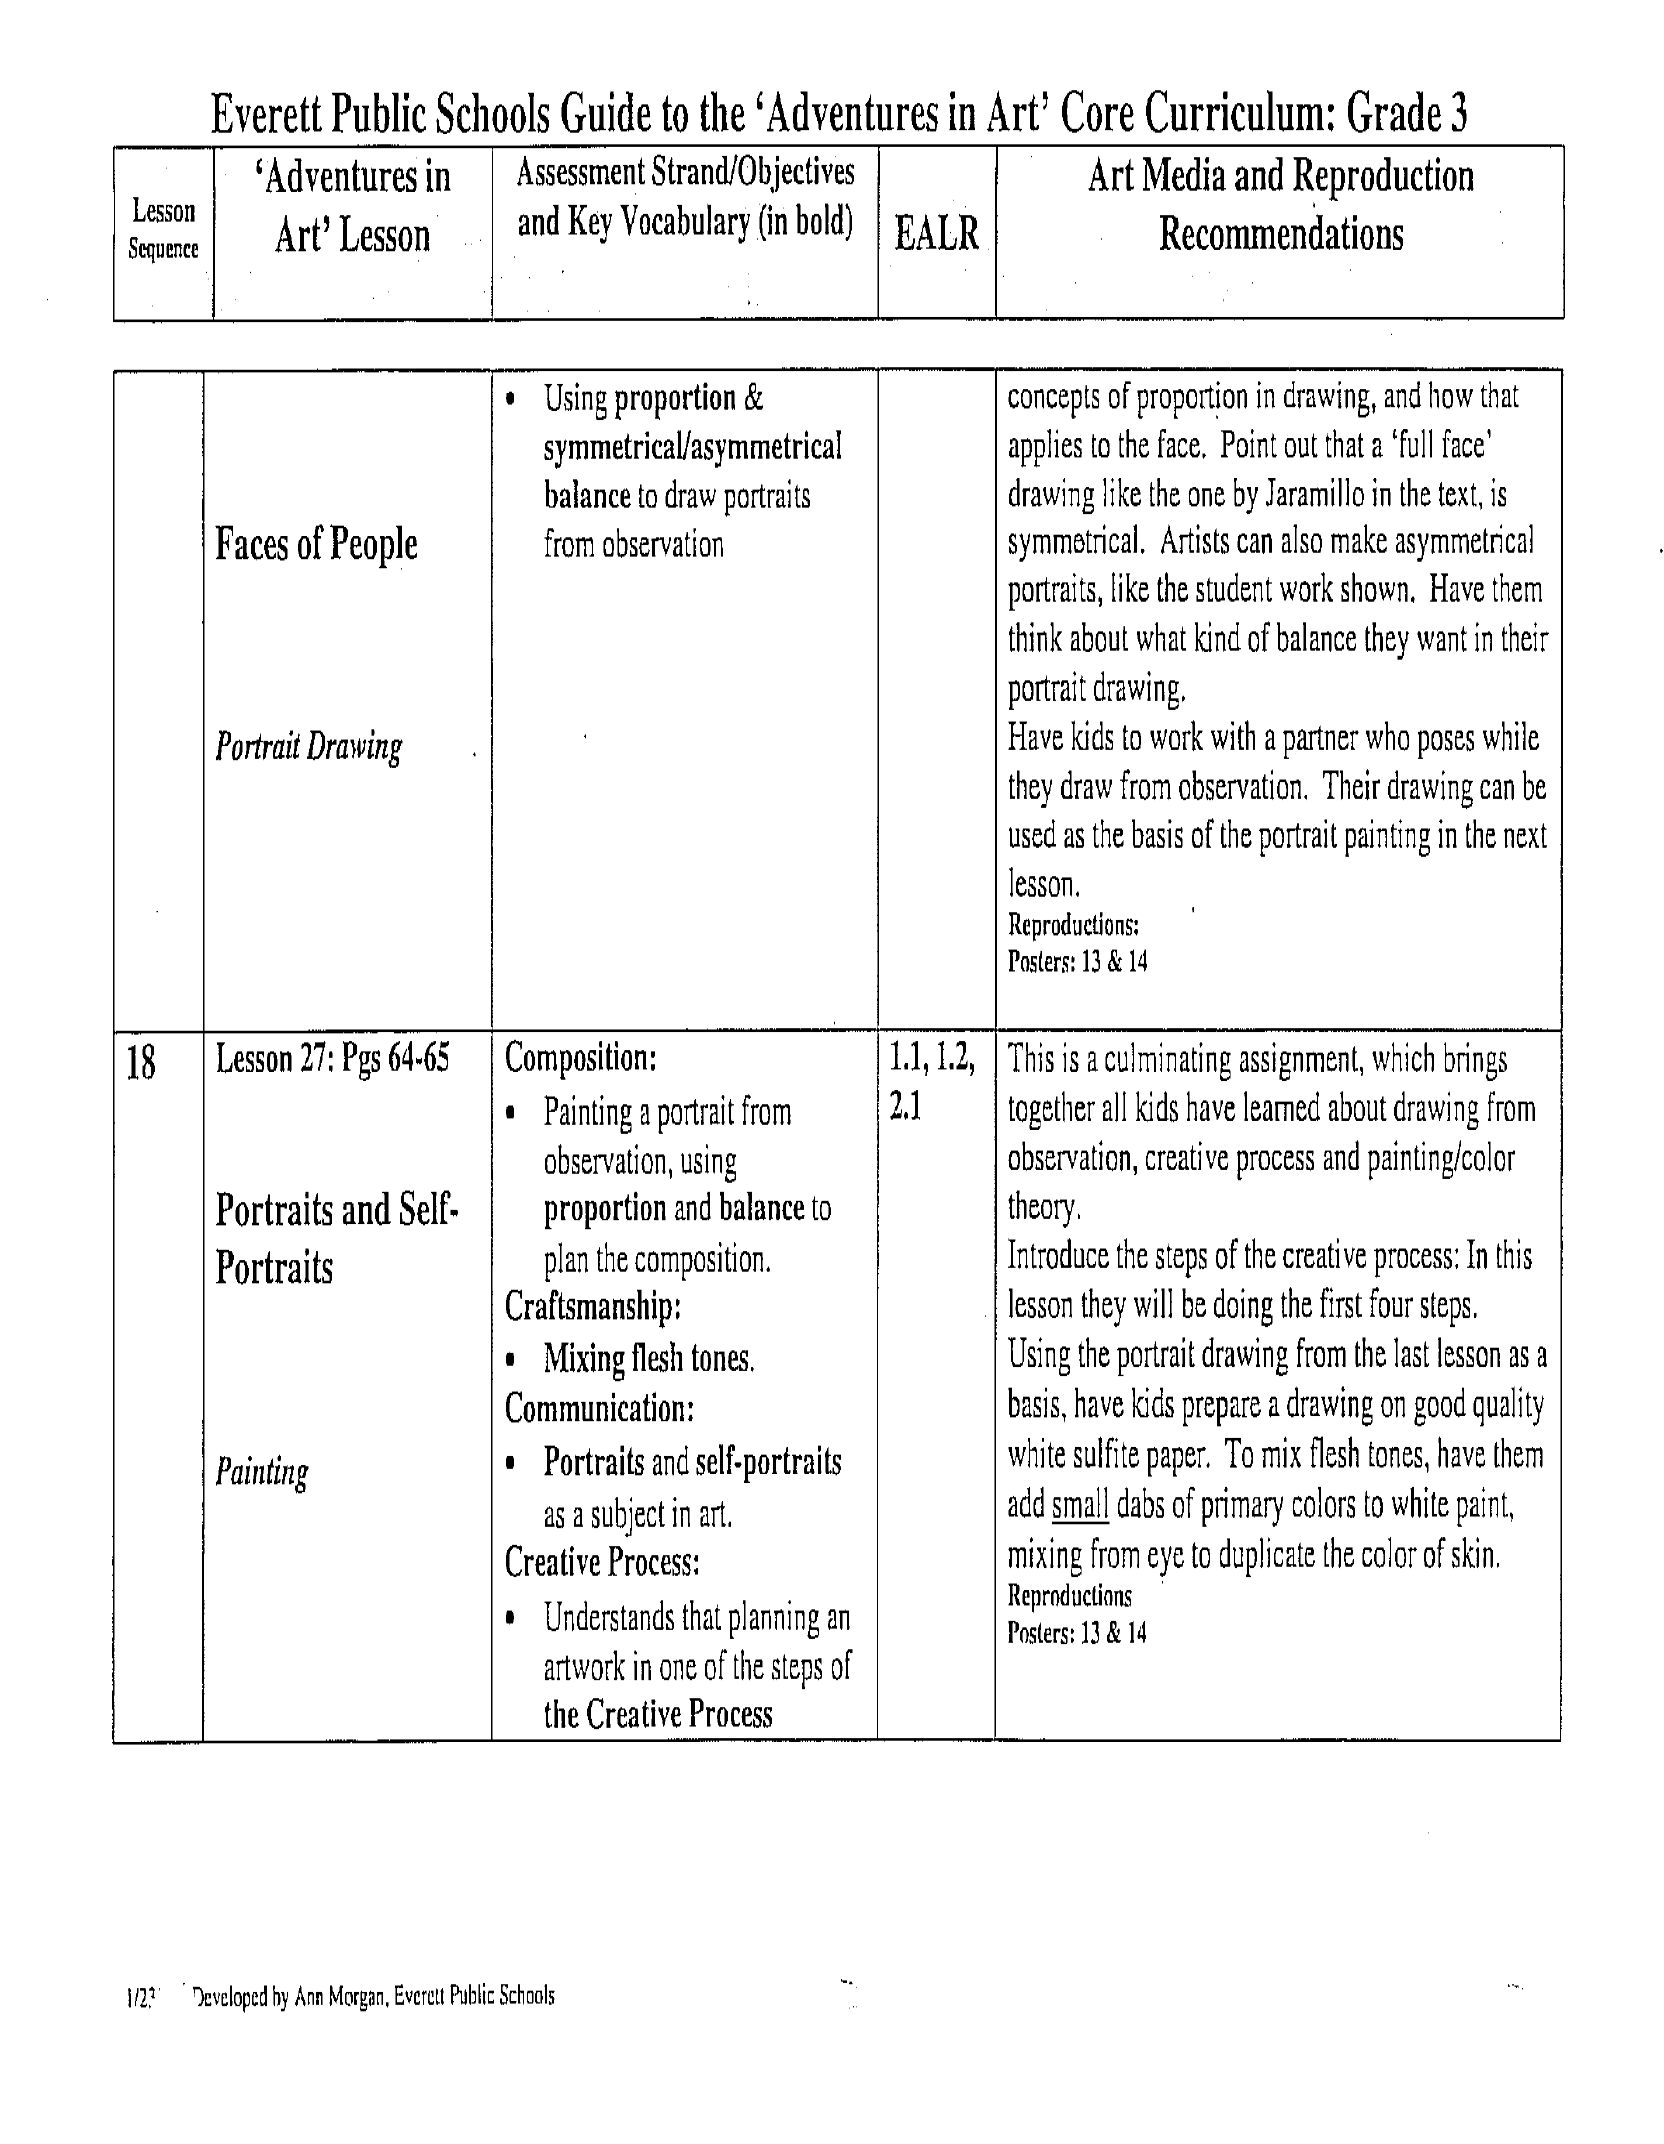
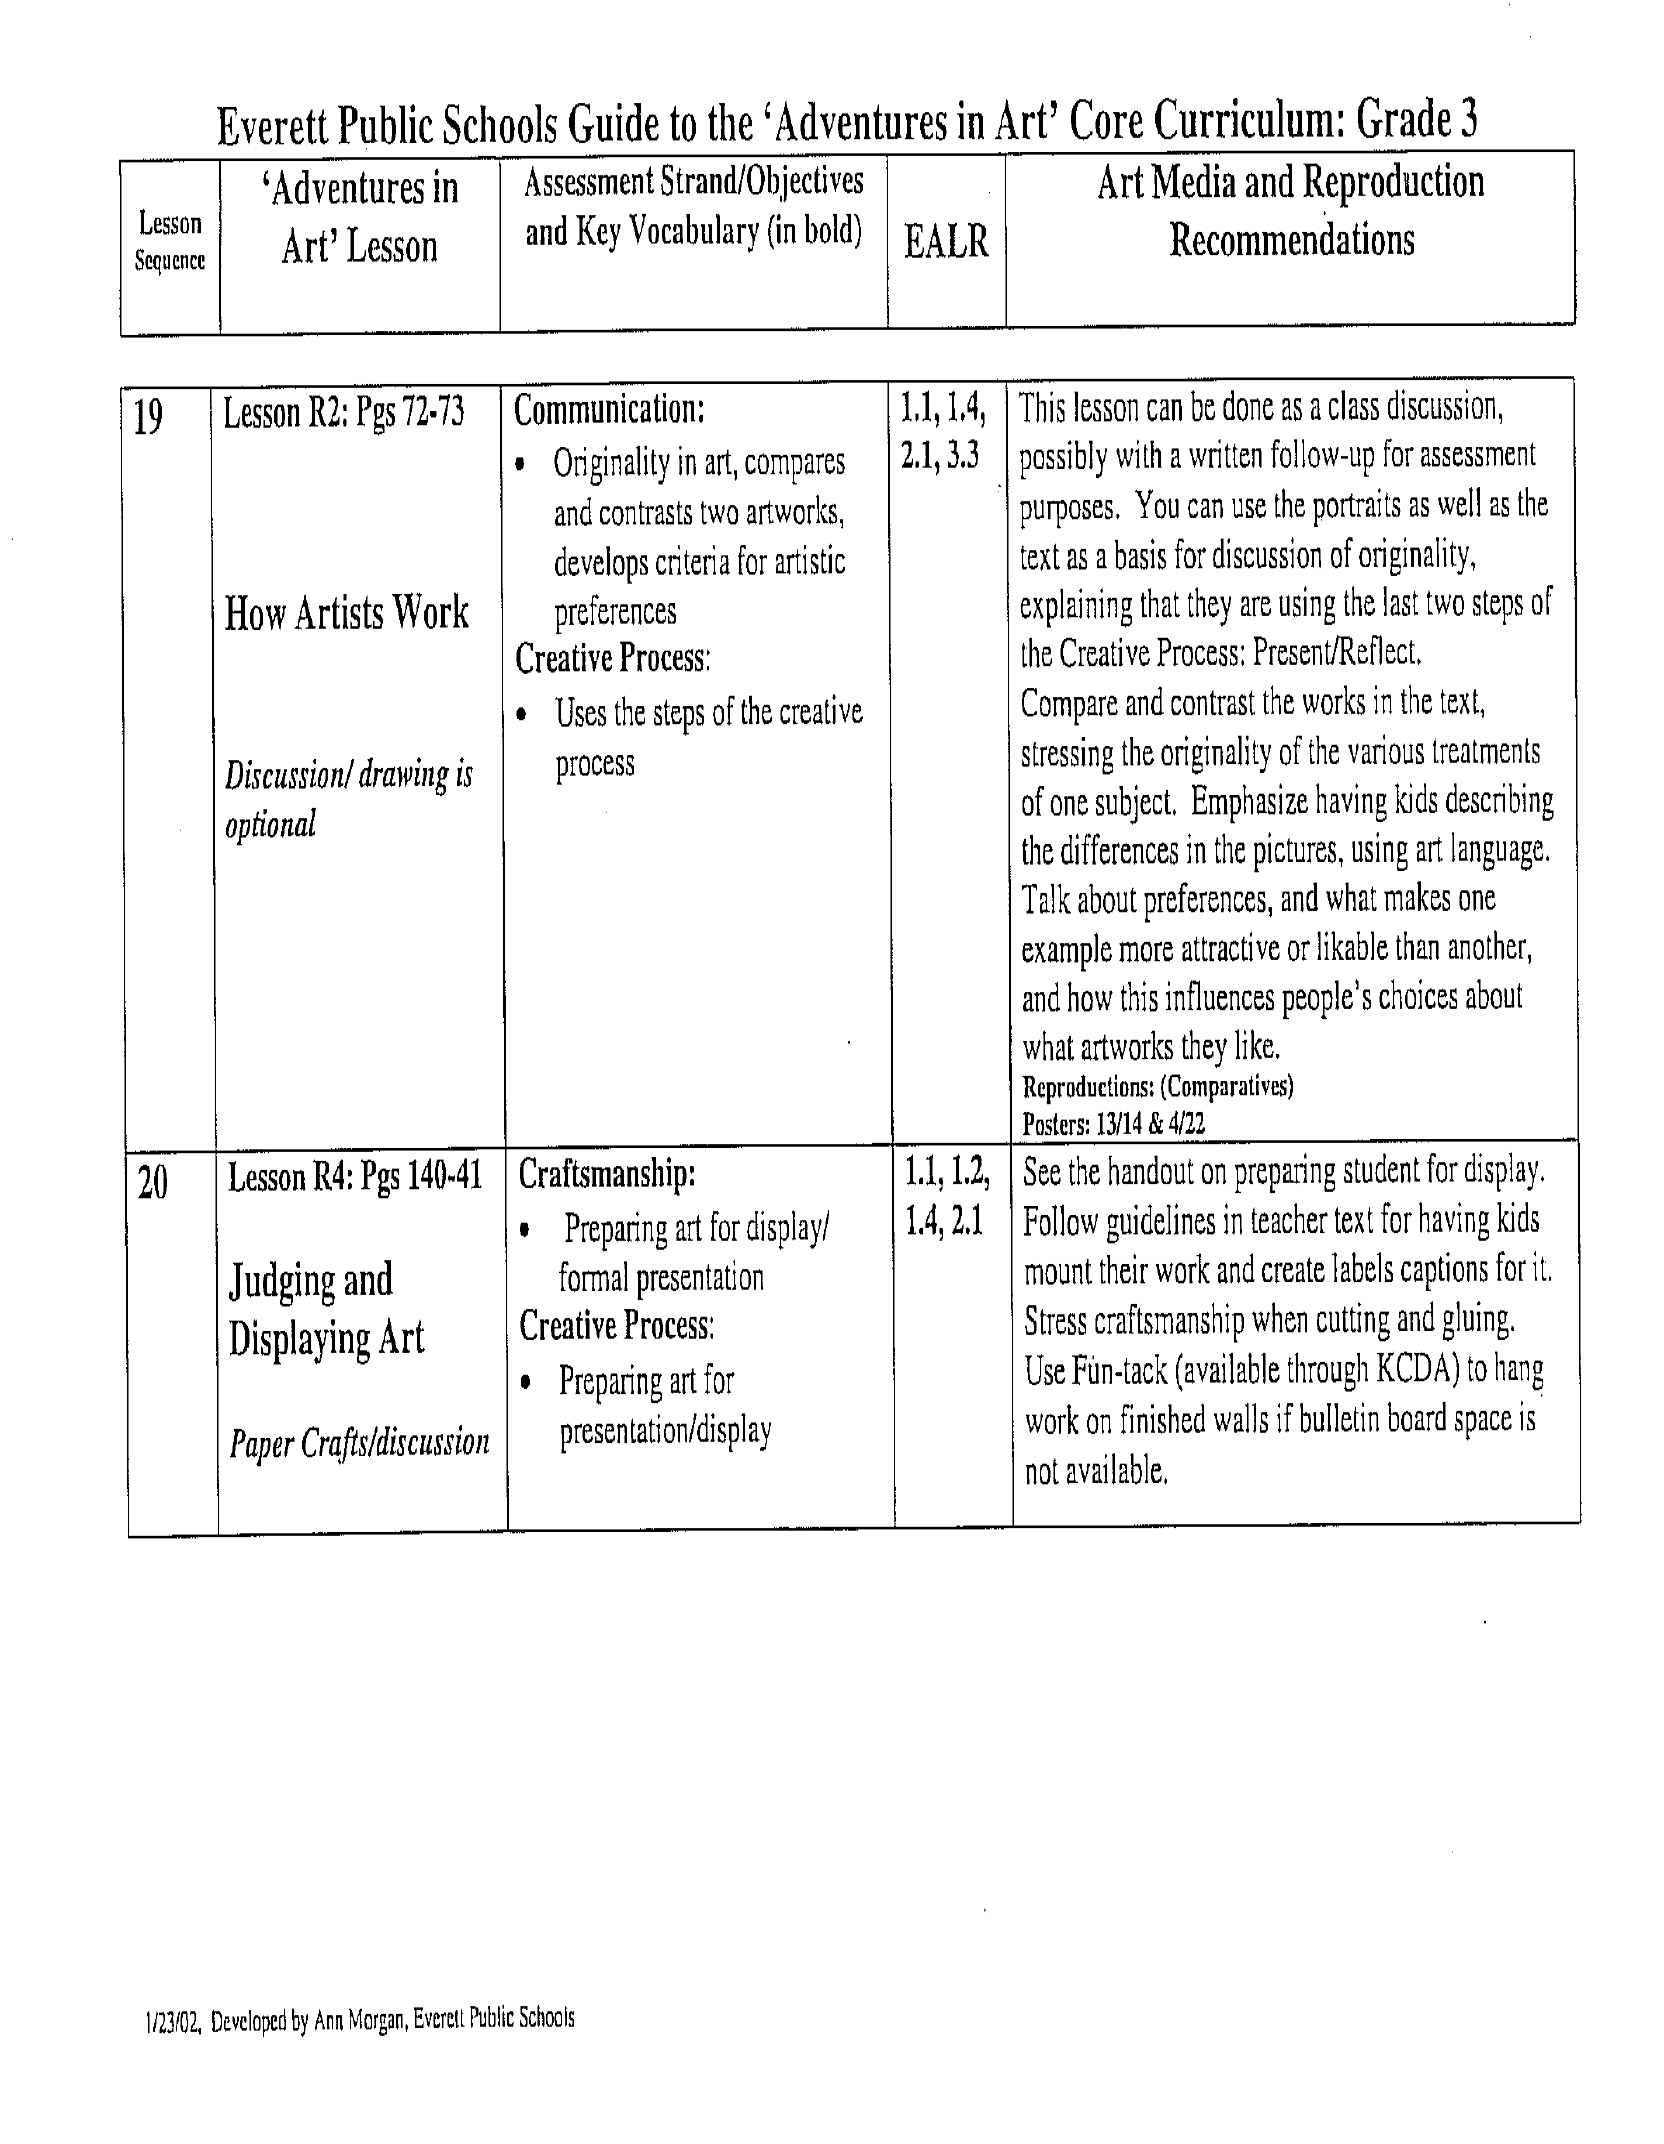
Core Lessons: 35,U2,2,8,6,11,13,16,18,14,15,20,17,R1,1,23,26,27,R2,R4
Supplemental Lessons: 3,6,8,12,15,20, 53-55, 57-58
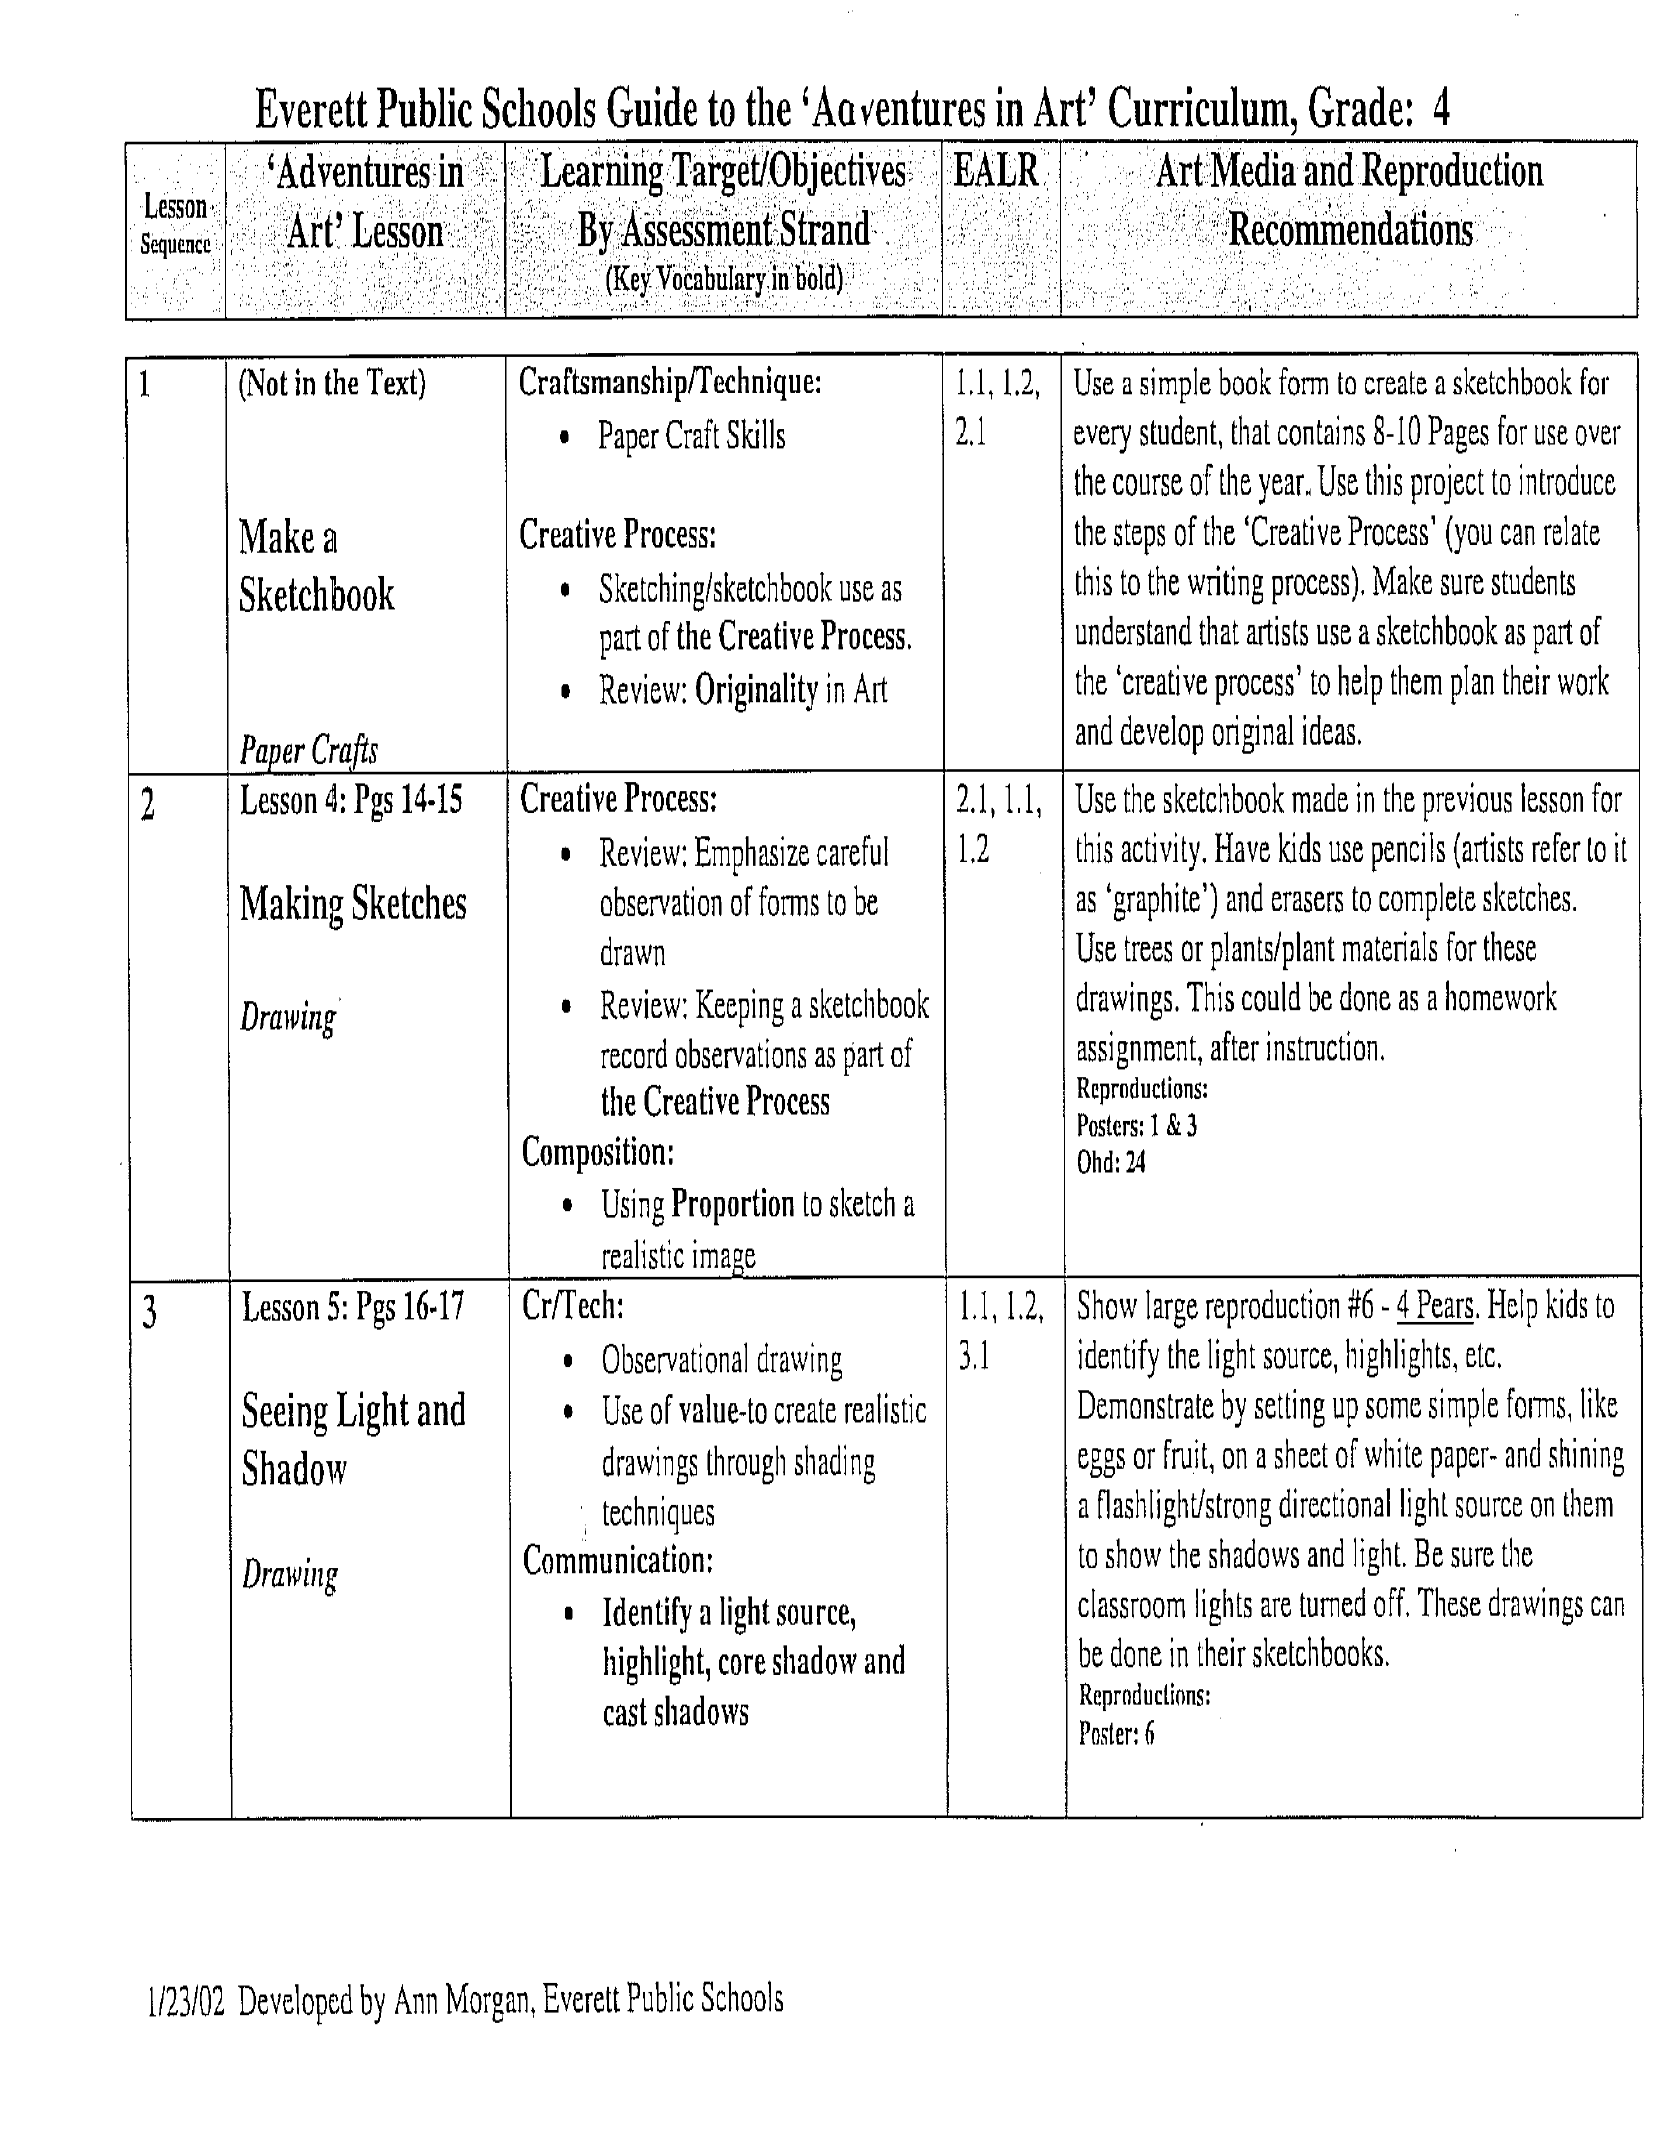
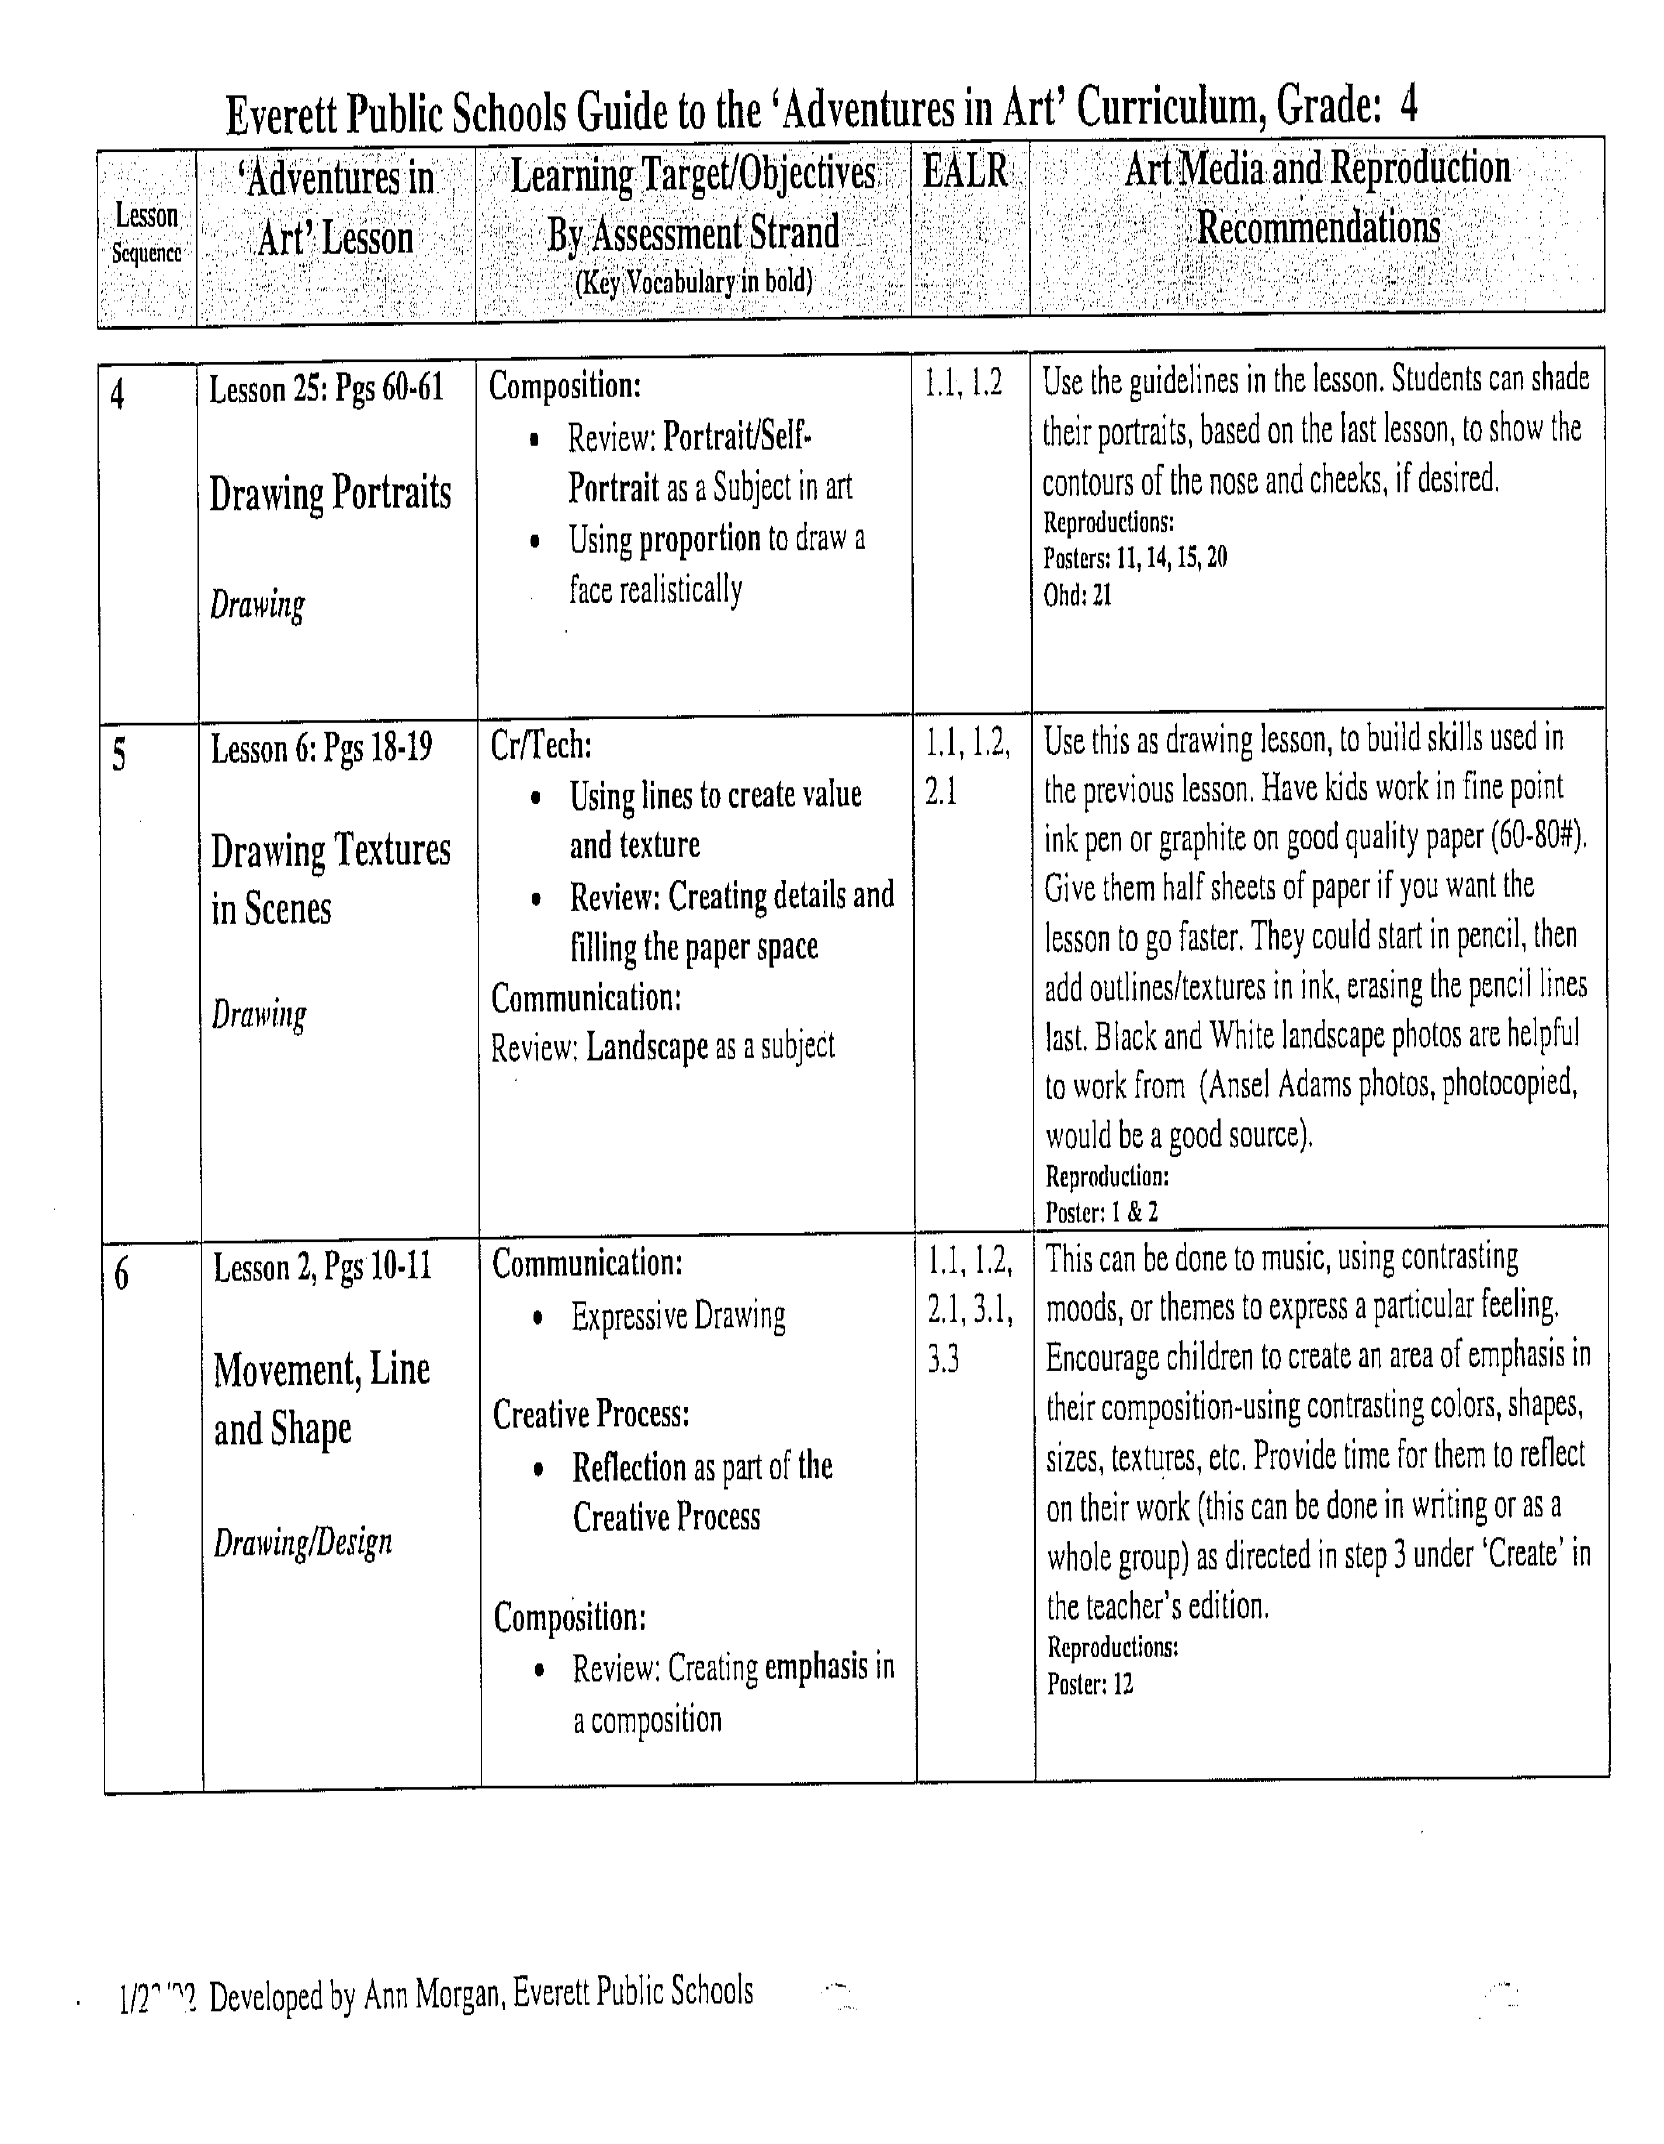
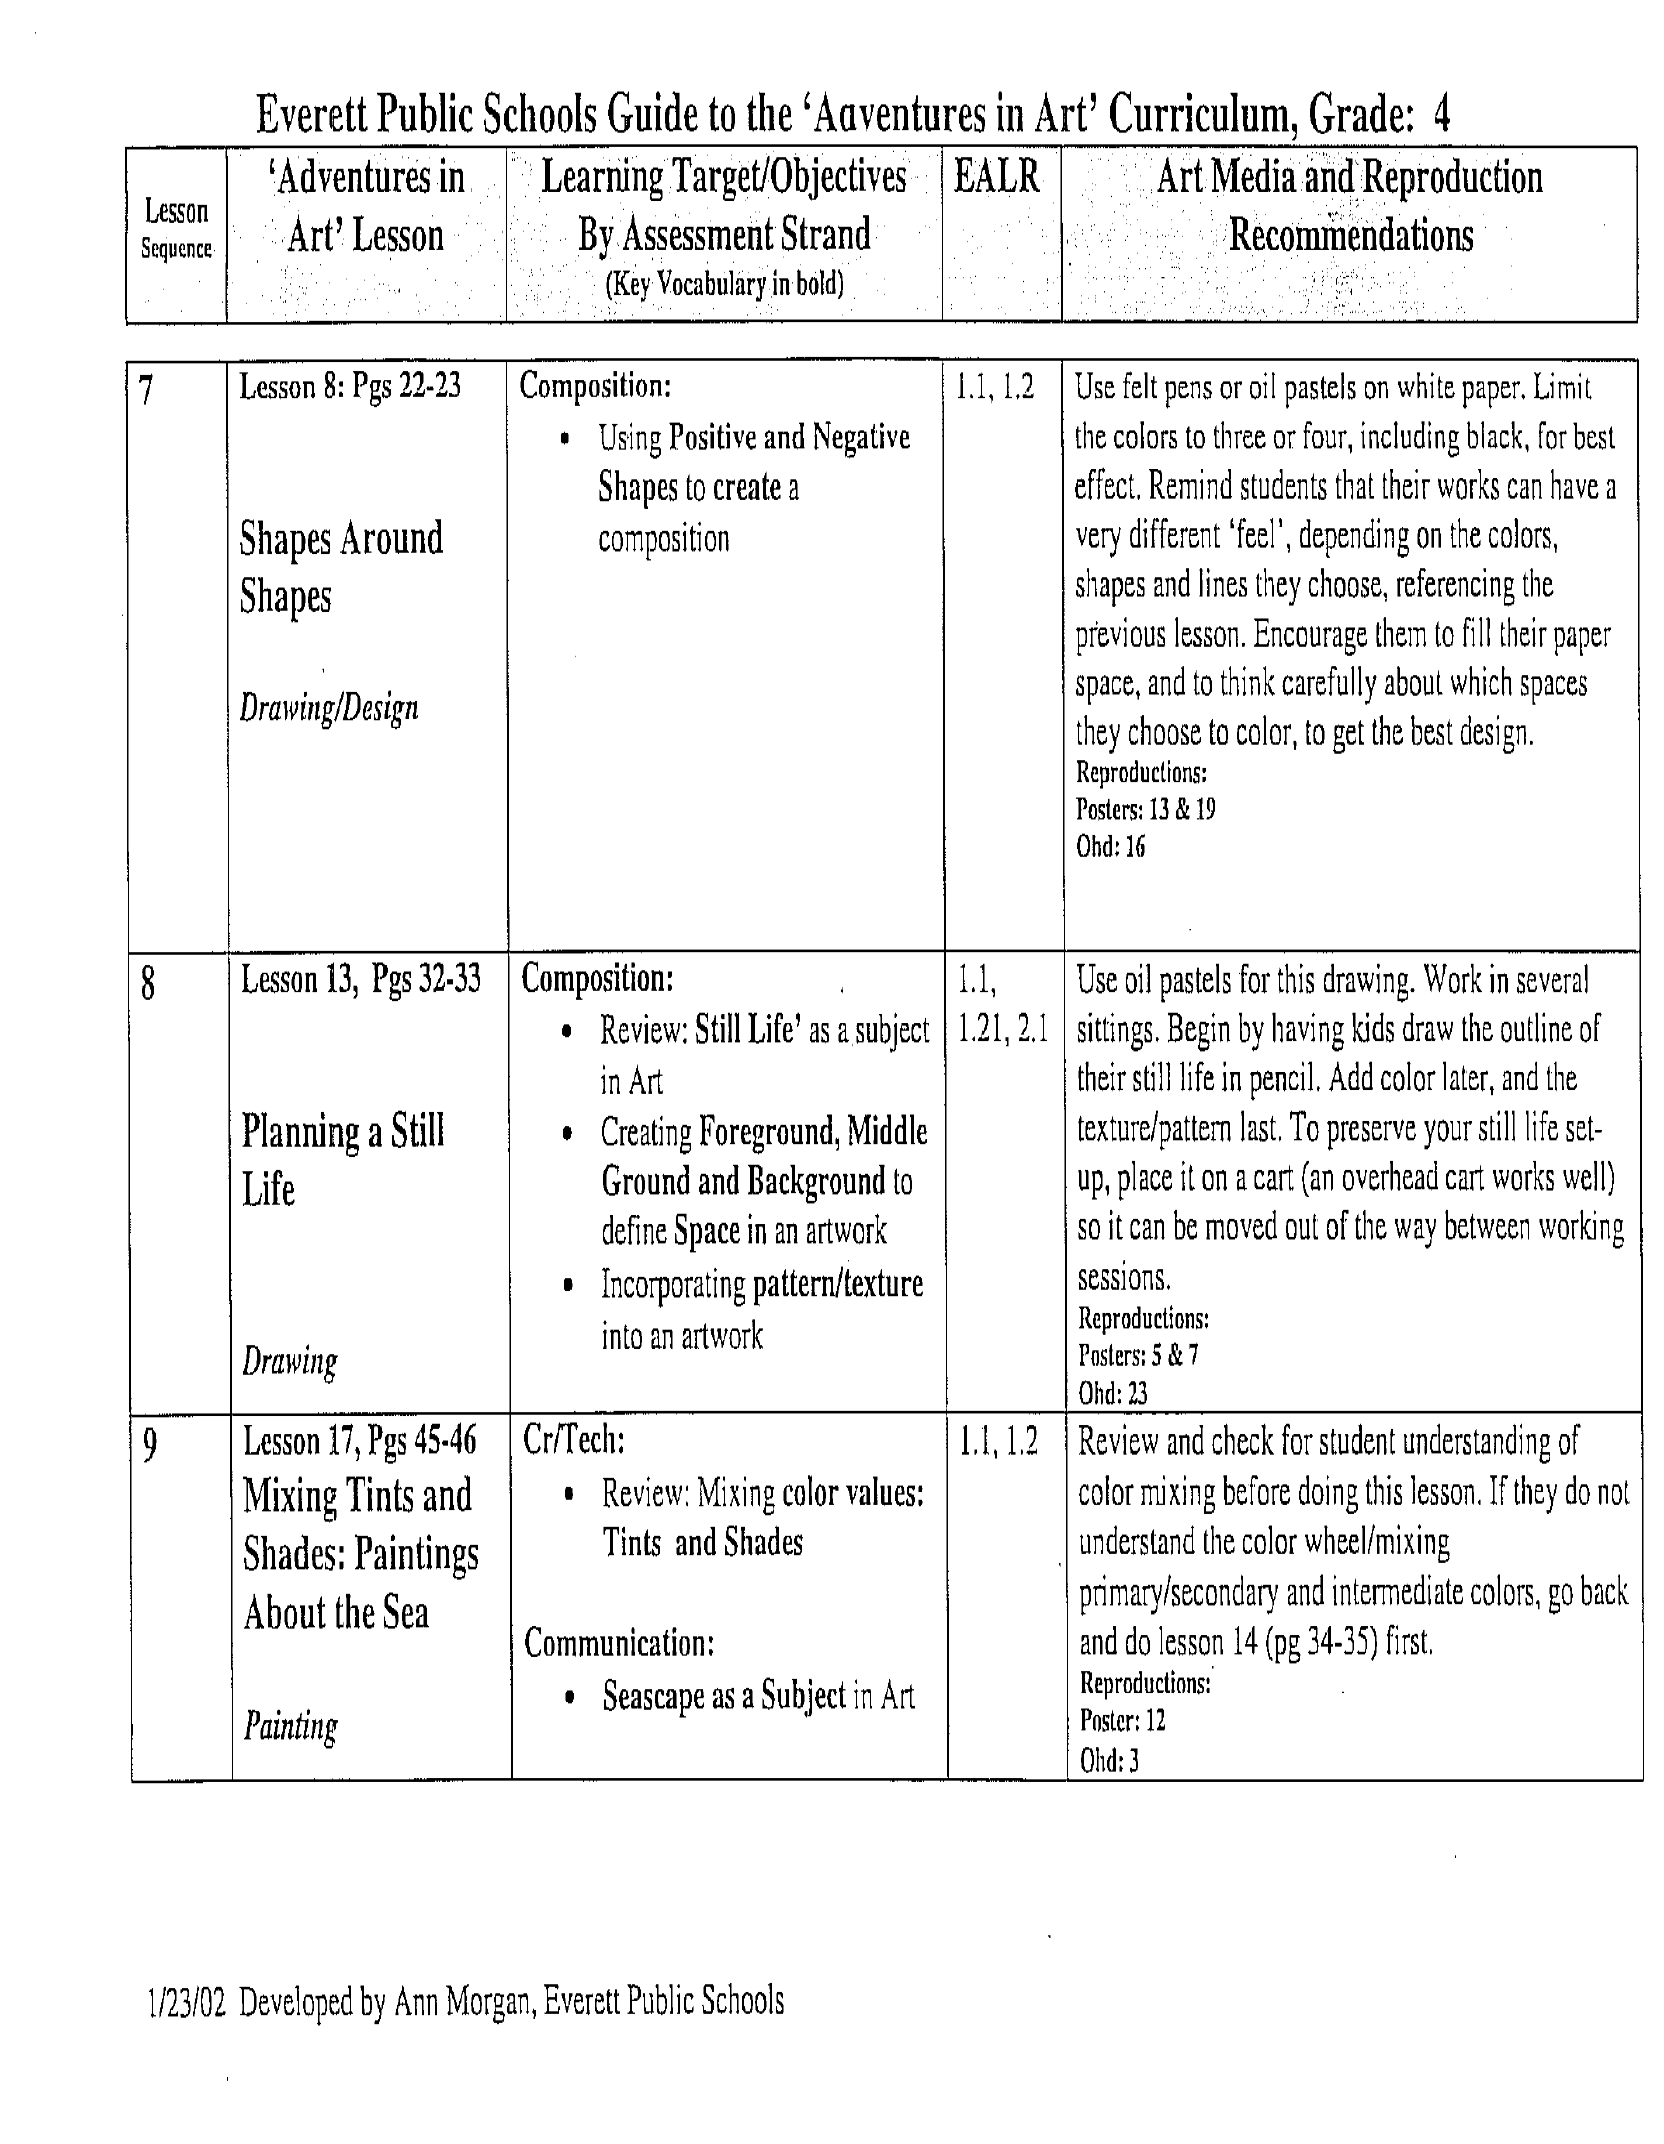
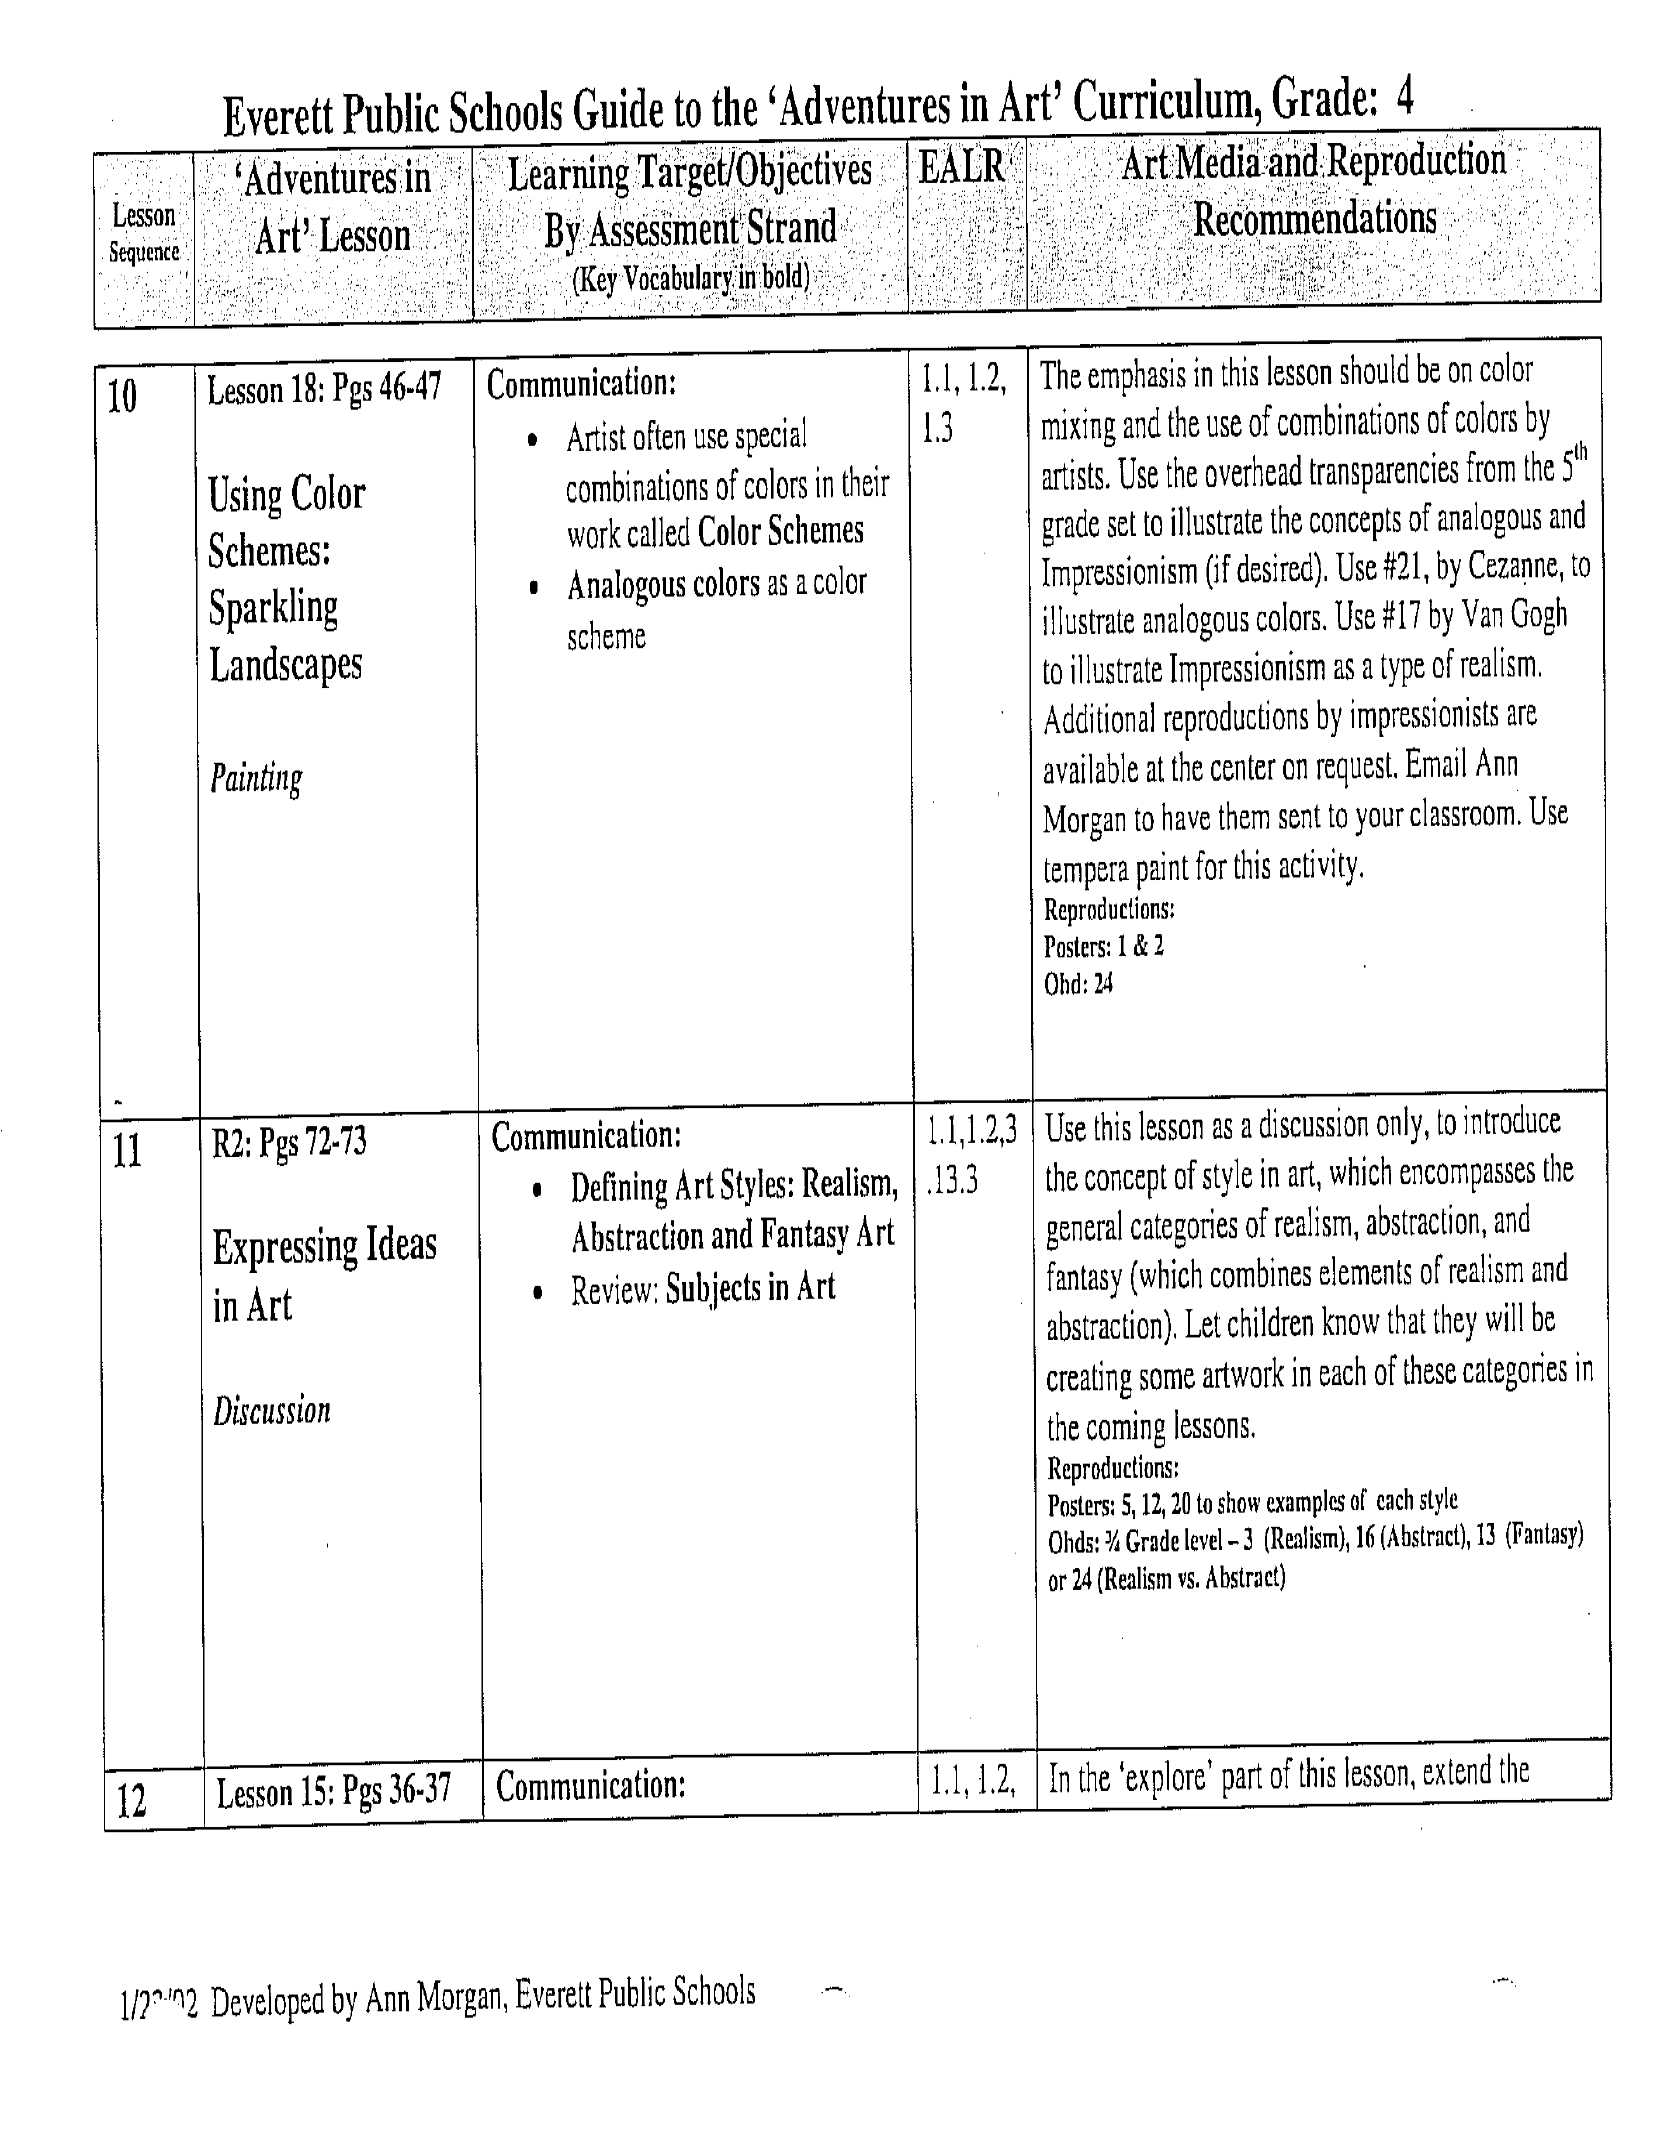
Fourth Grade:
Core Lessons: Make a sketchbook, 4,5,25,6,2,8,13,17,18,R2,15,16,22,26,R1,R4
Supplemental Lessons: 1-3, 9,14,U2,25,40,46,54,55,57,58
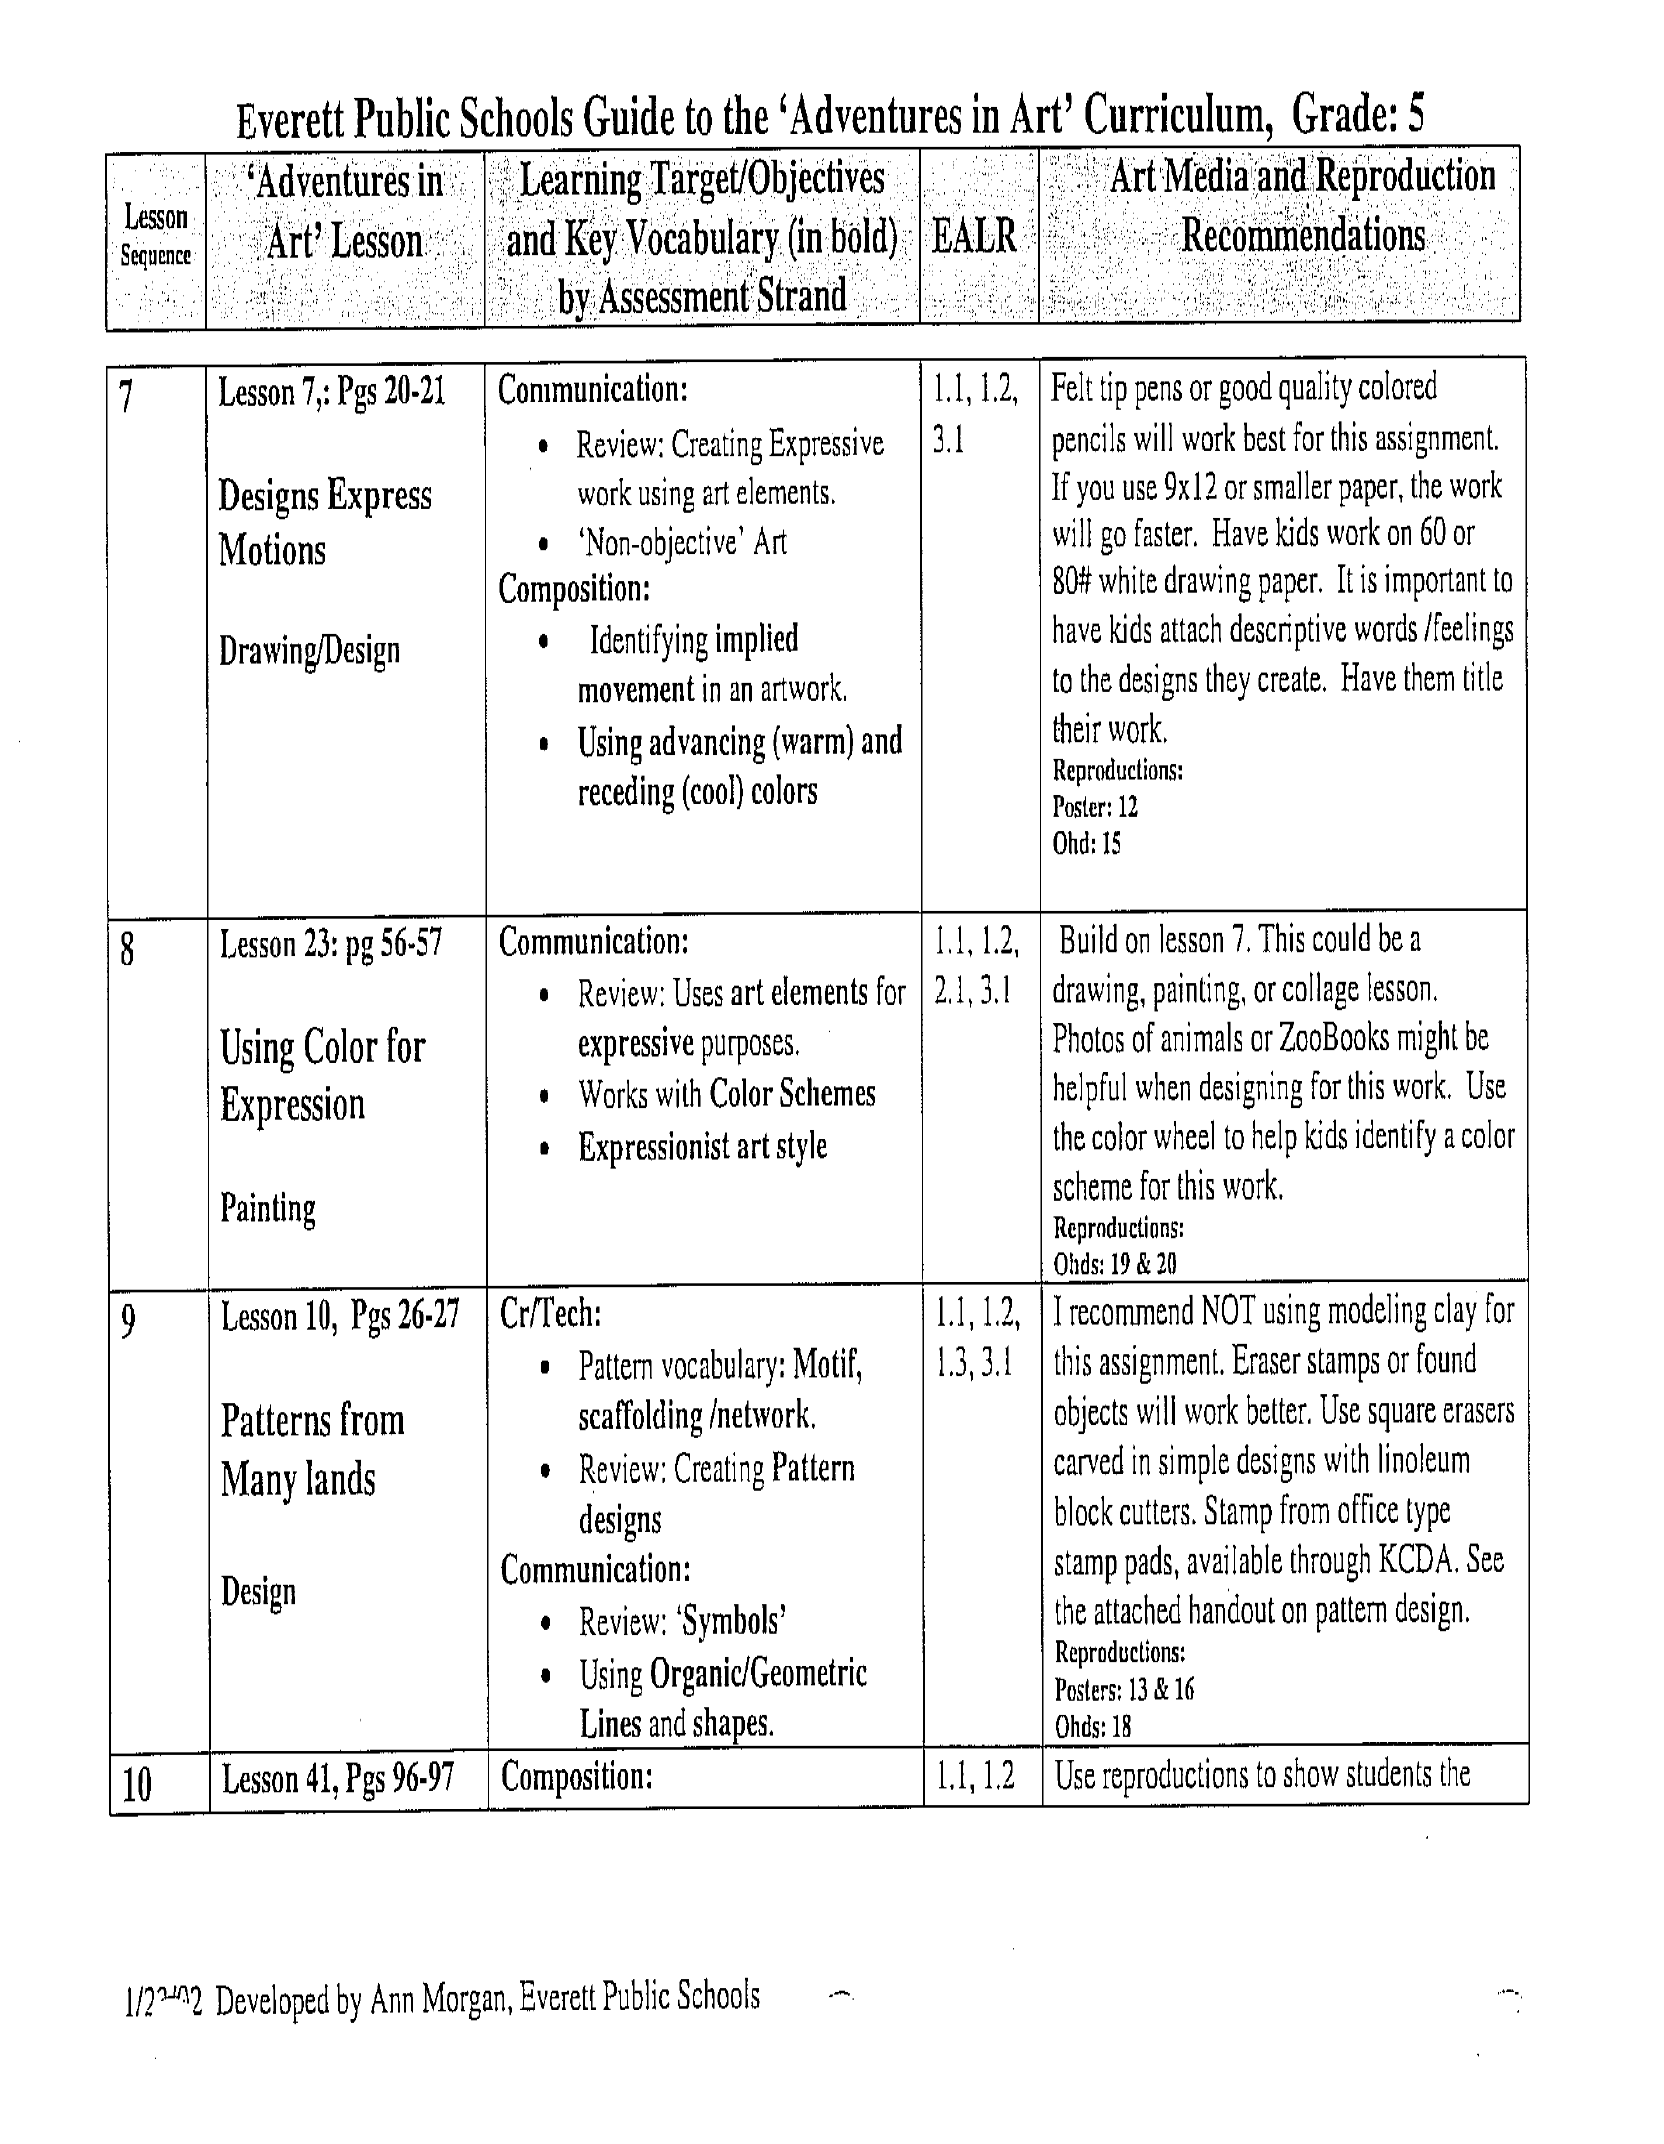
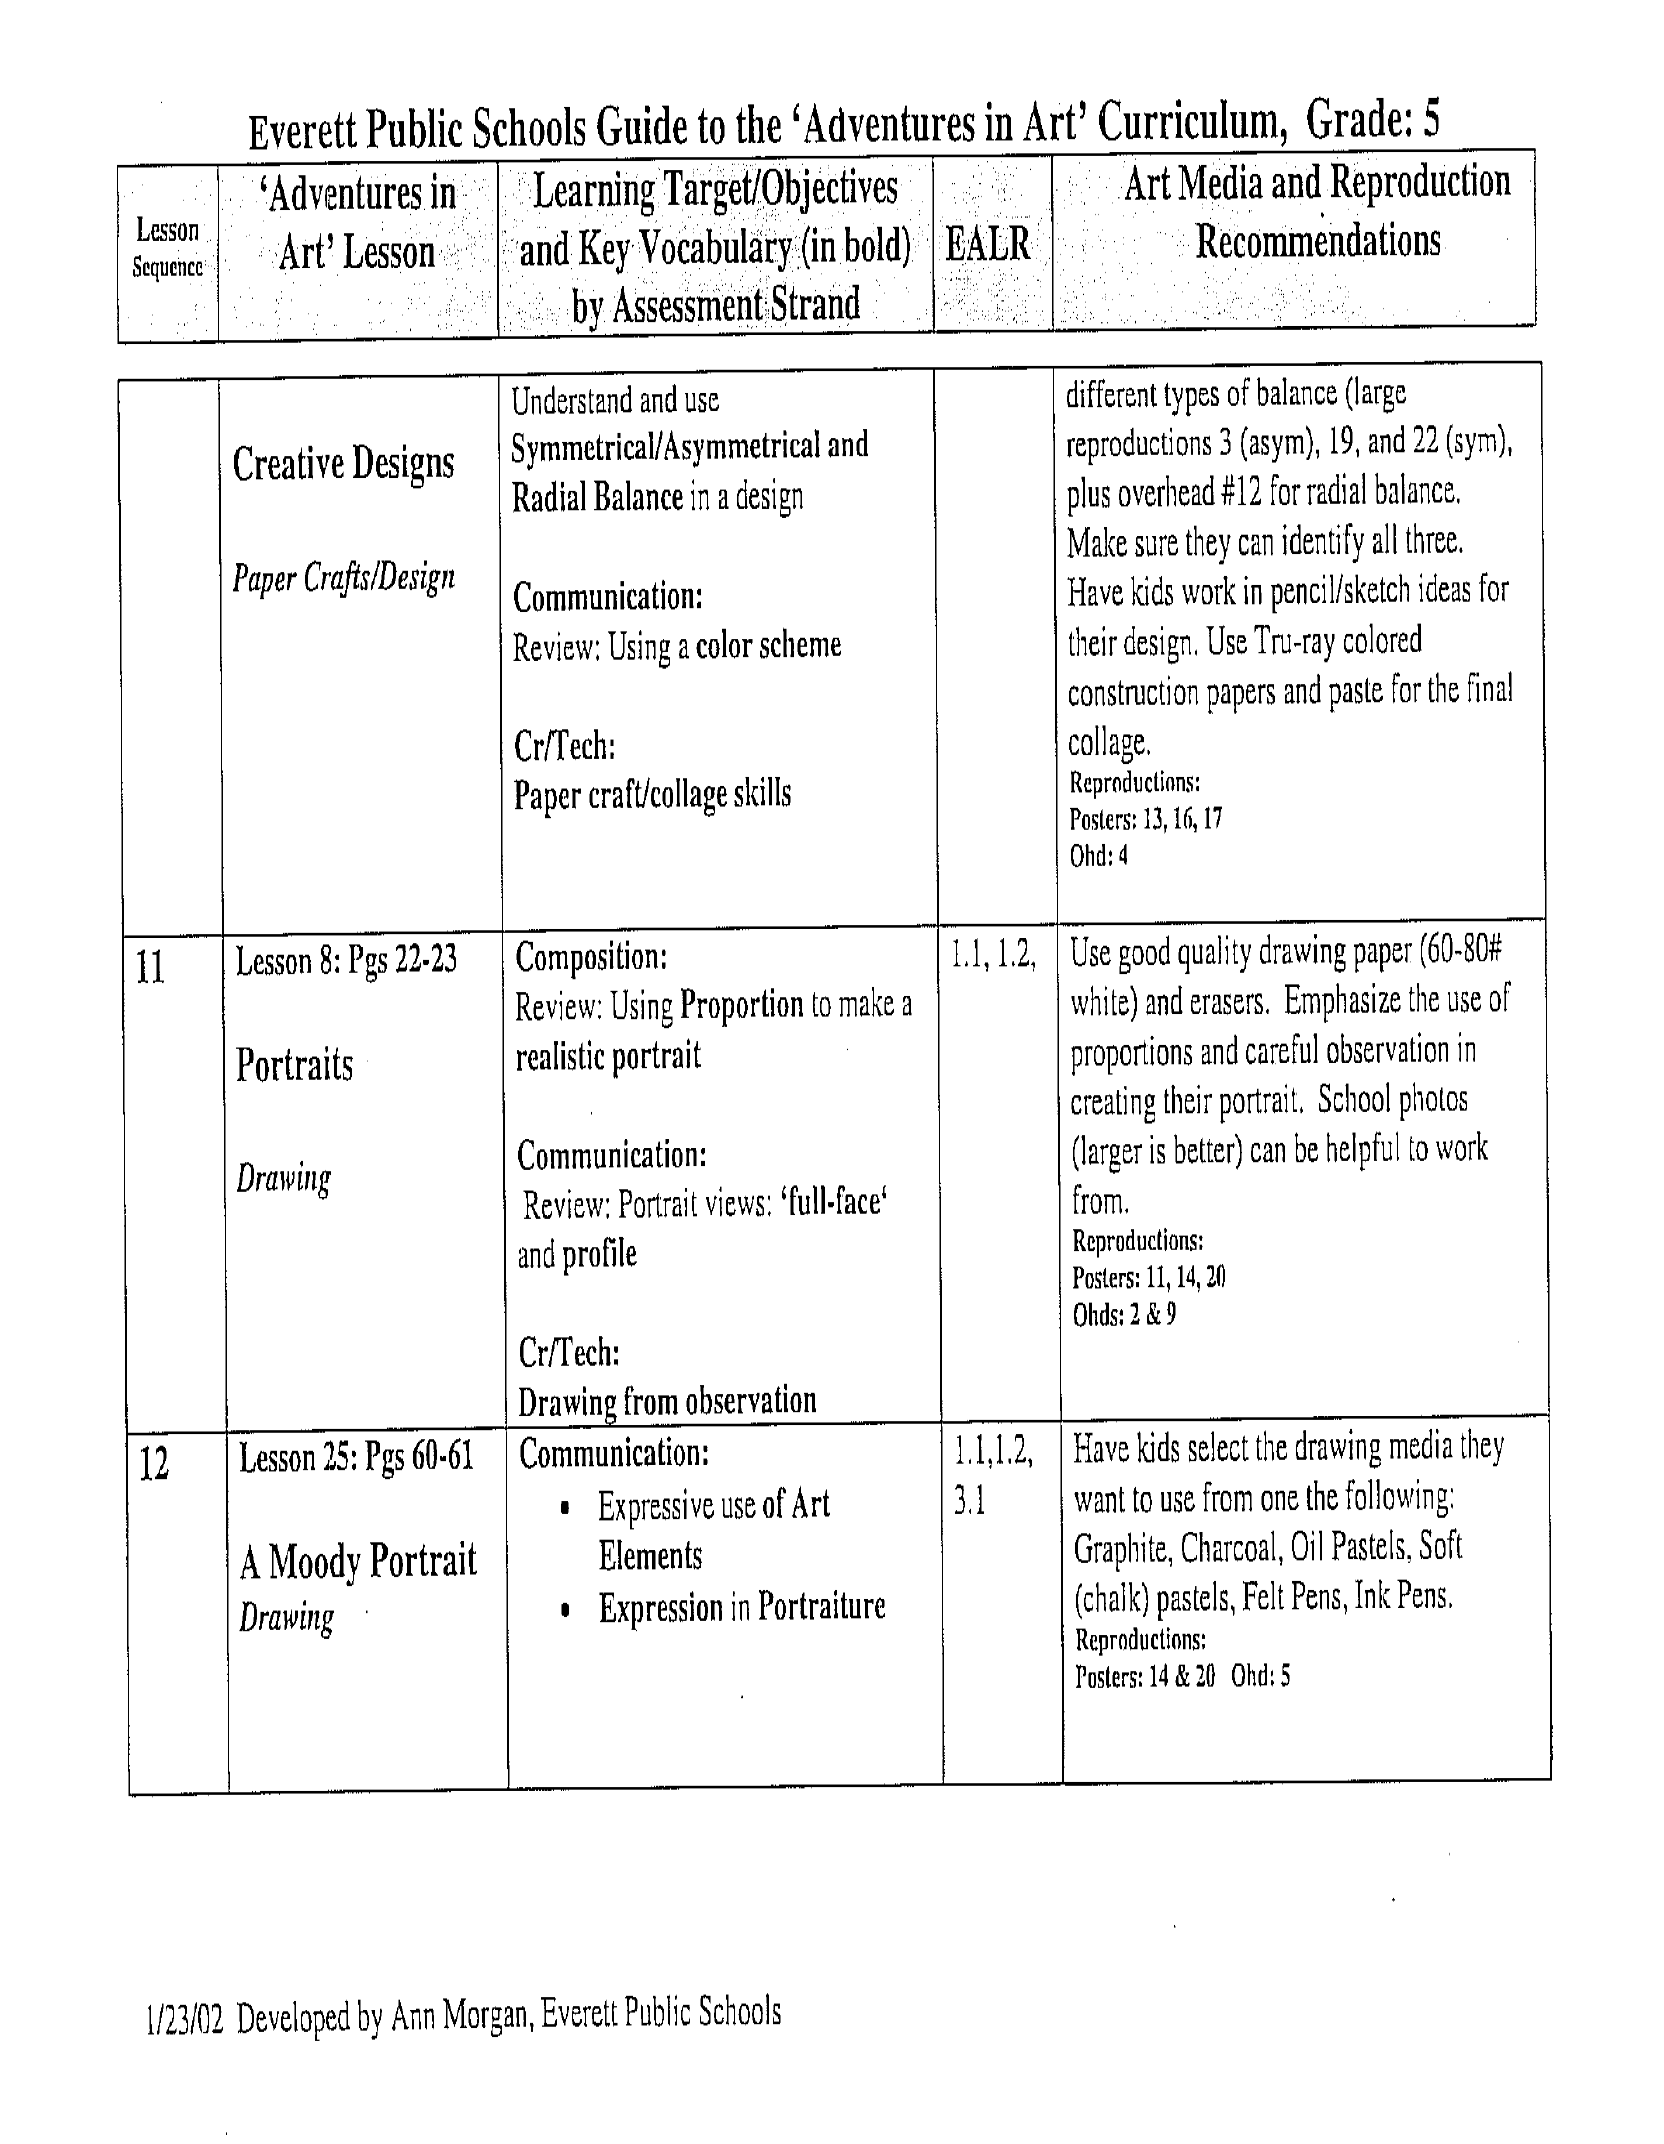
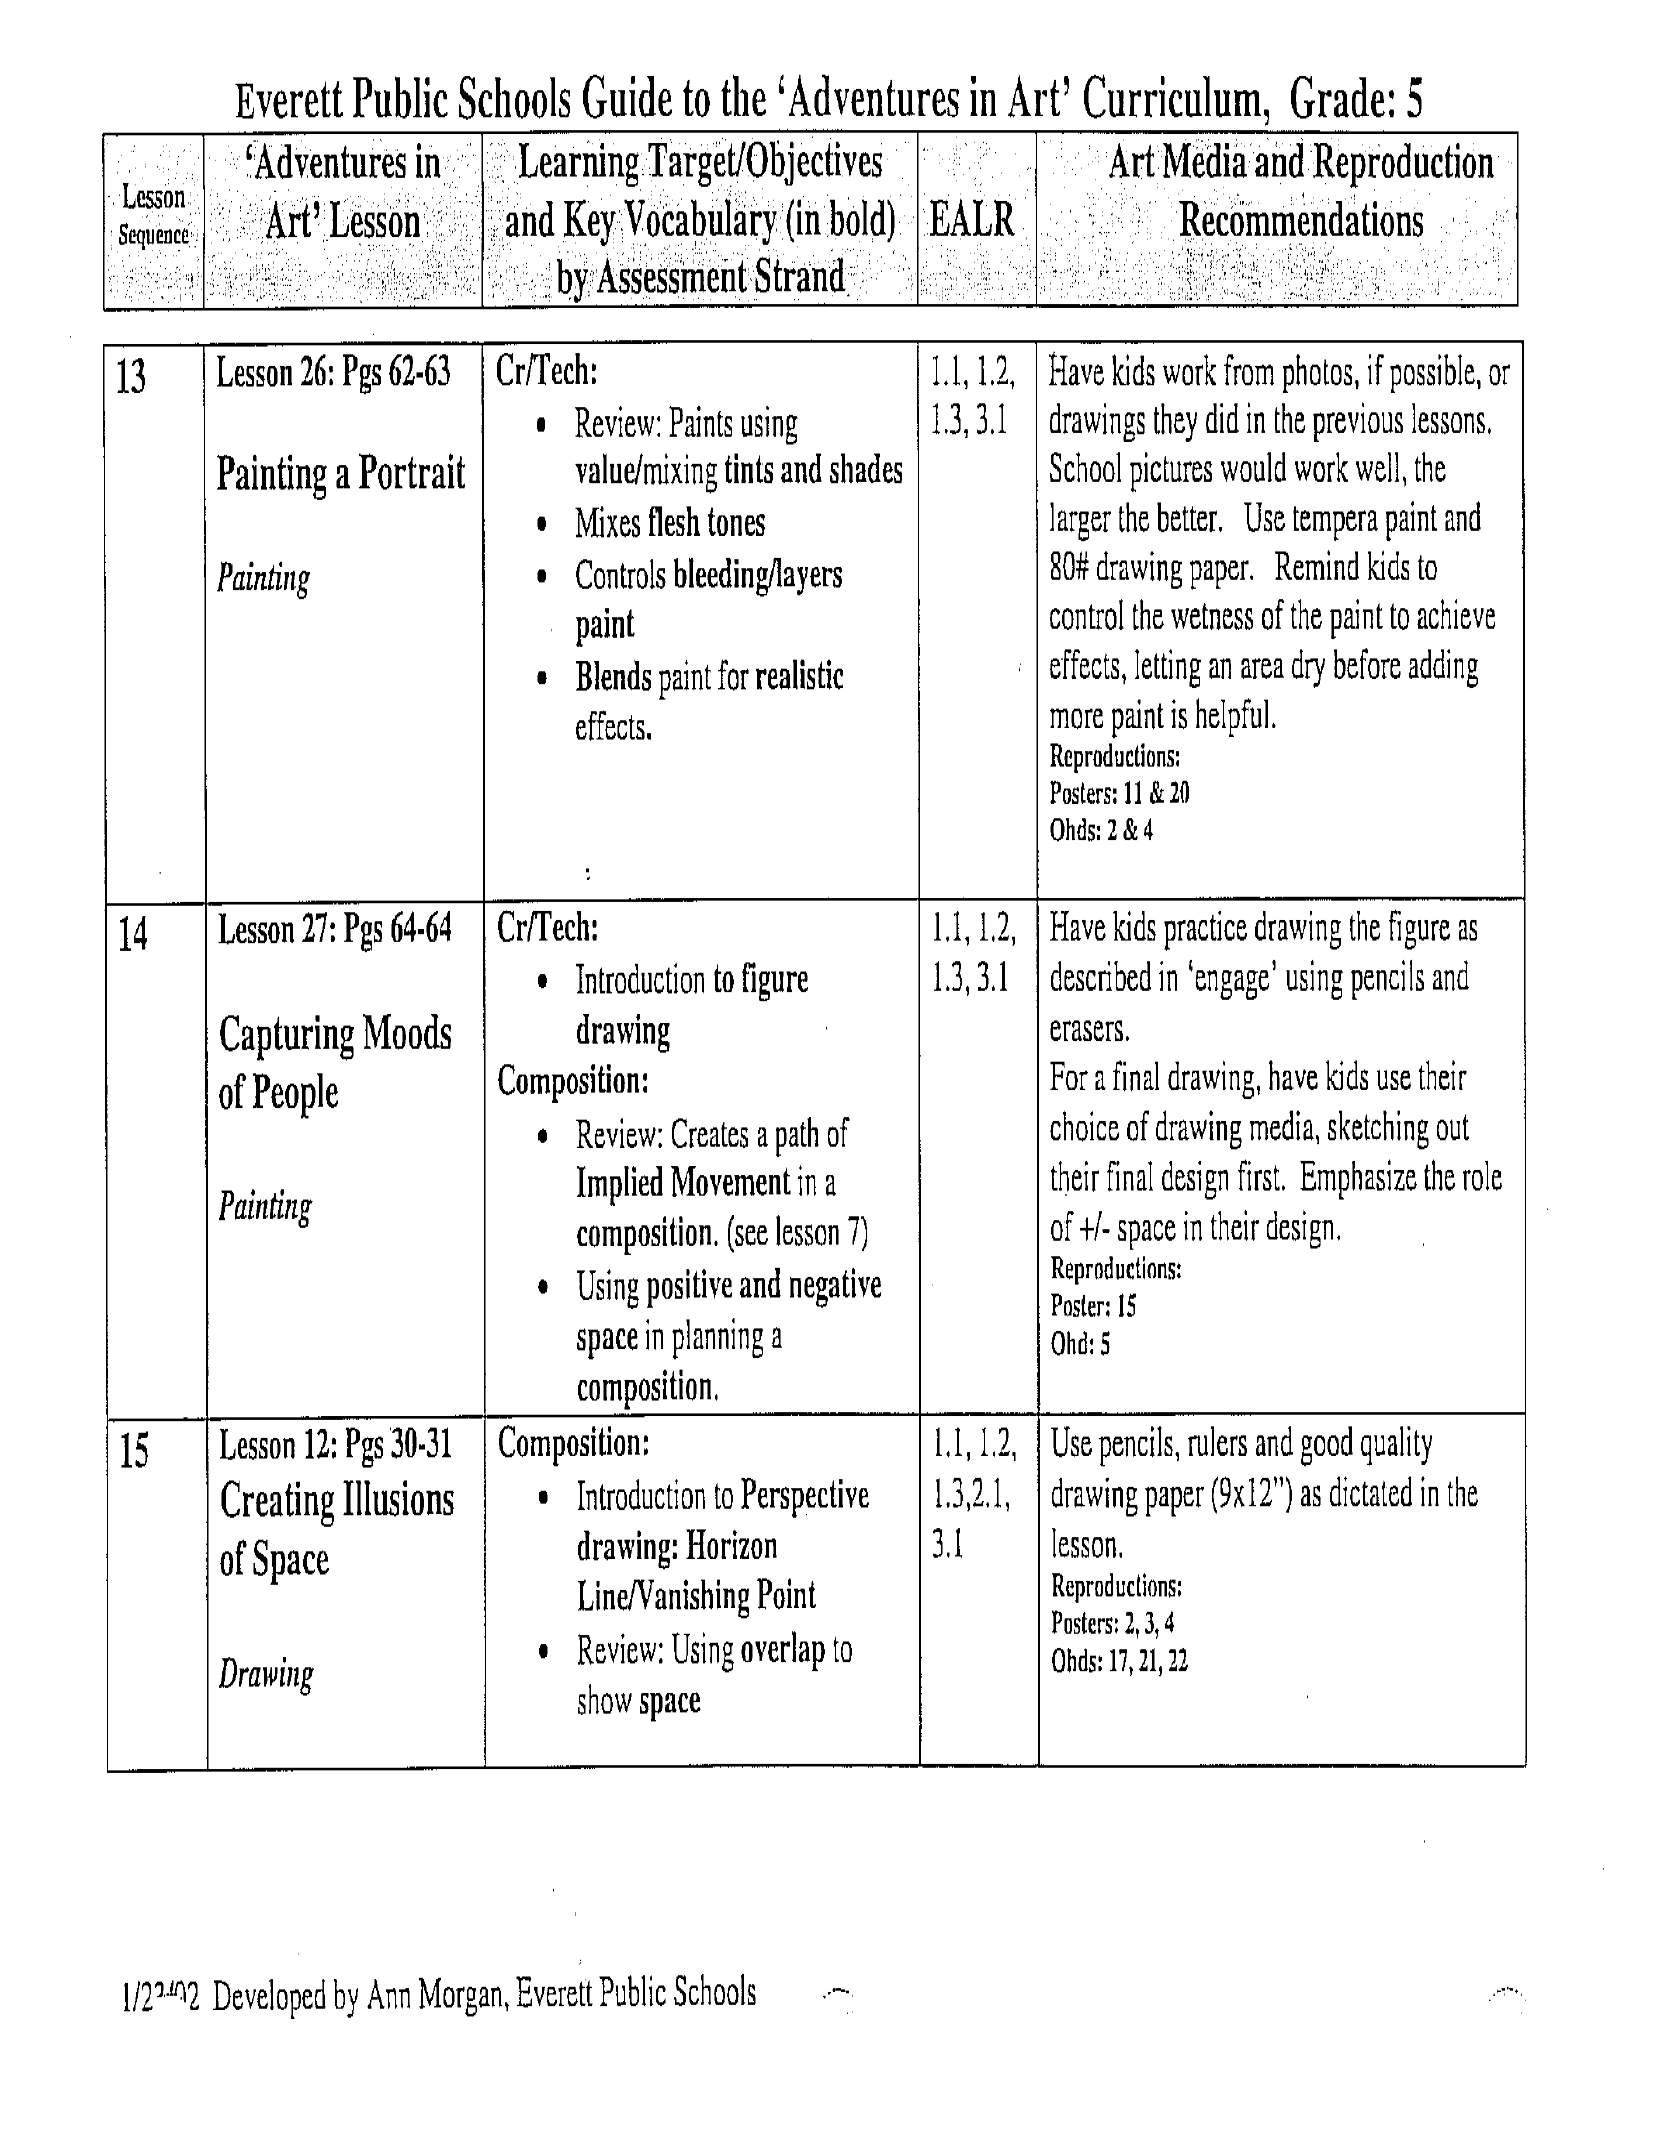
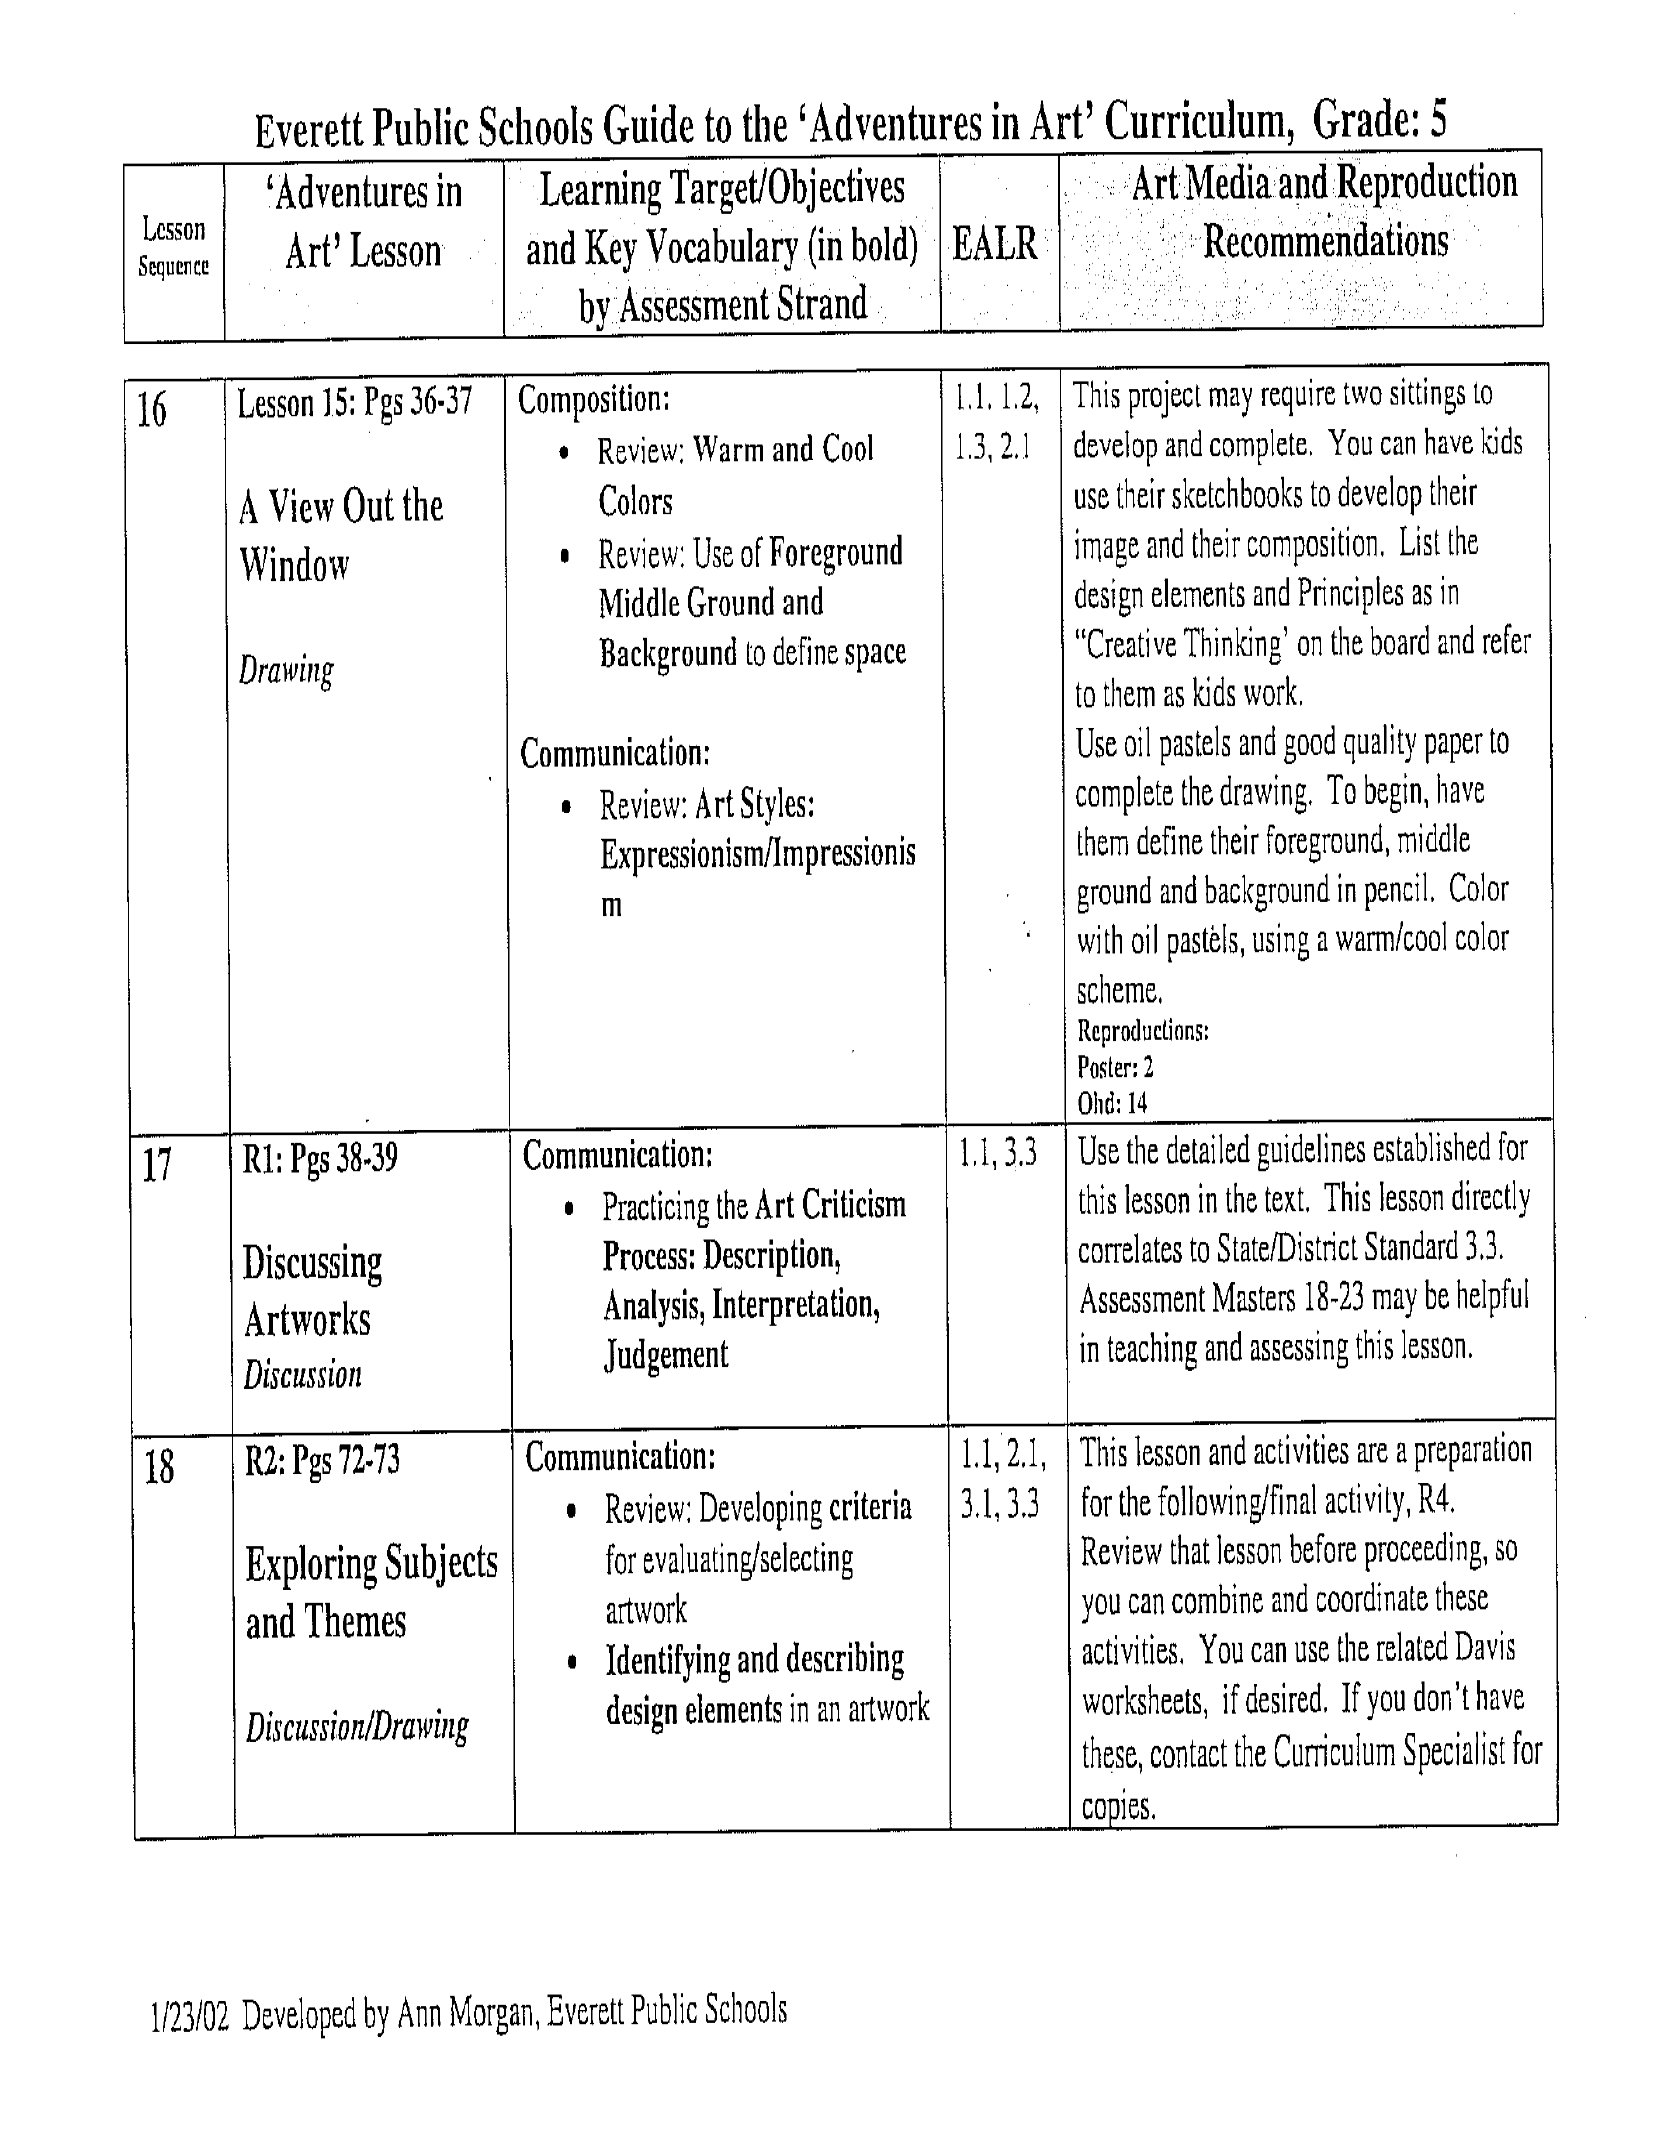
Fifth Grade:
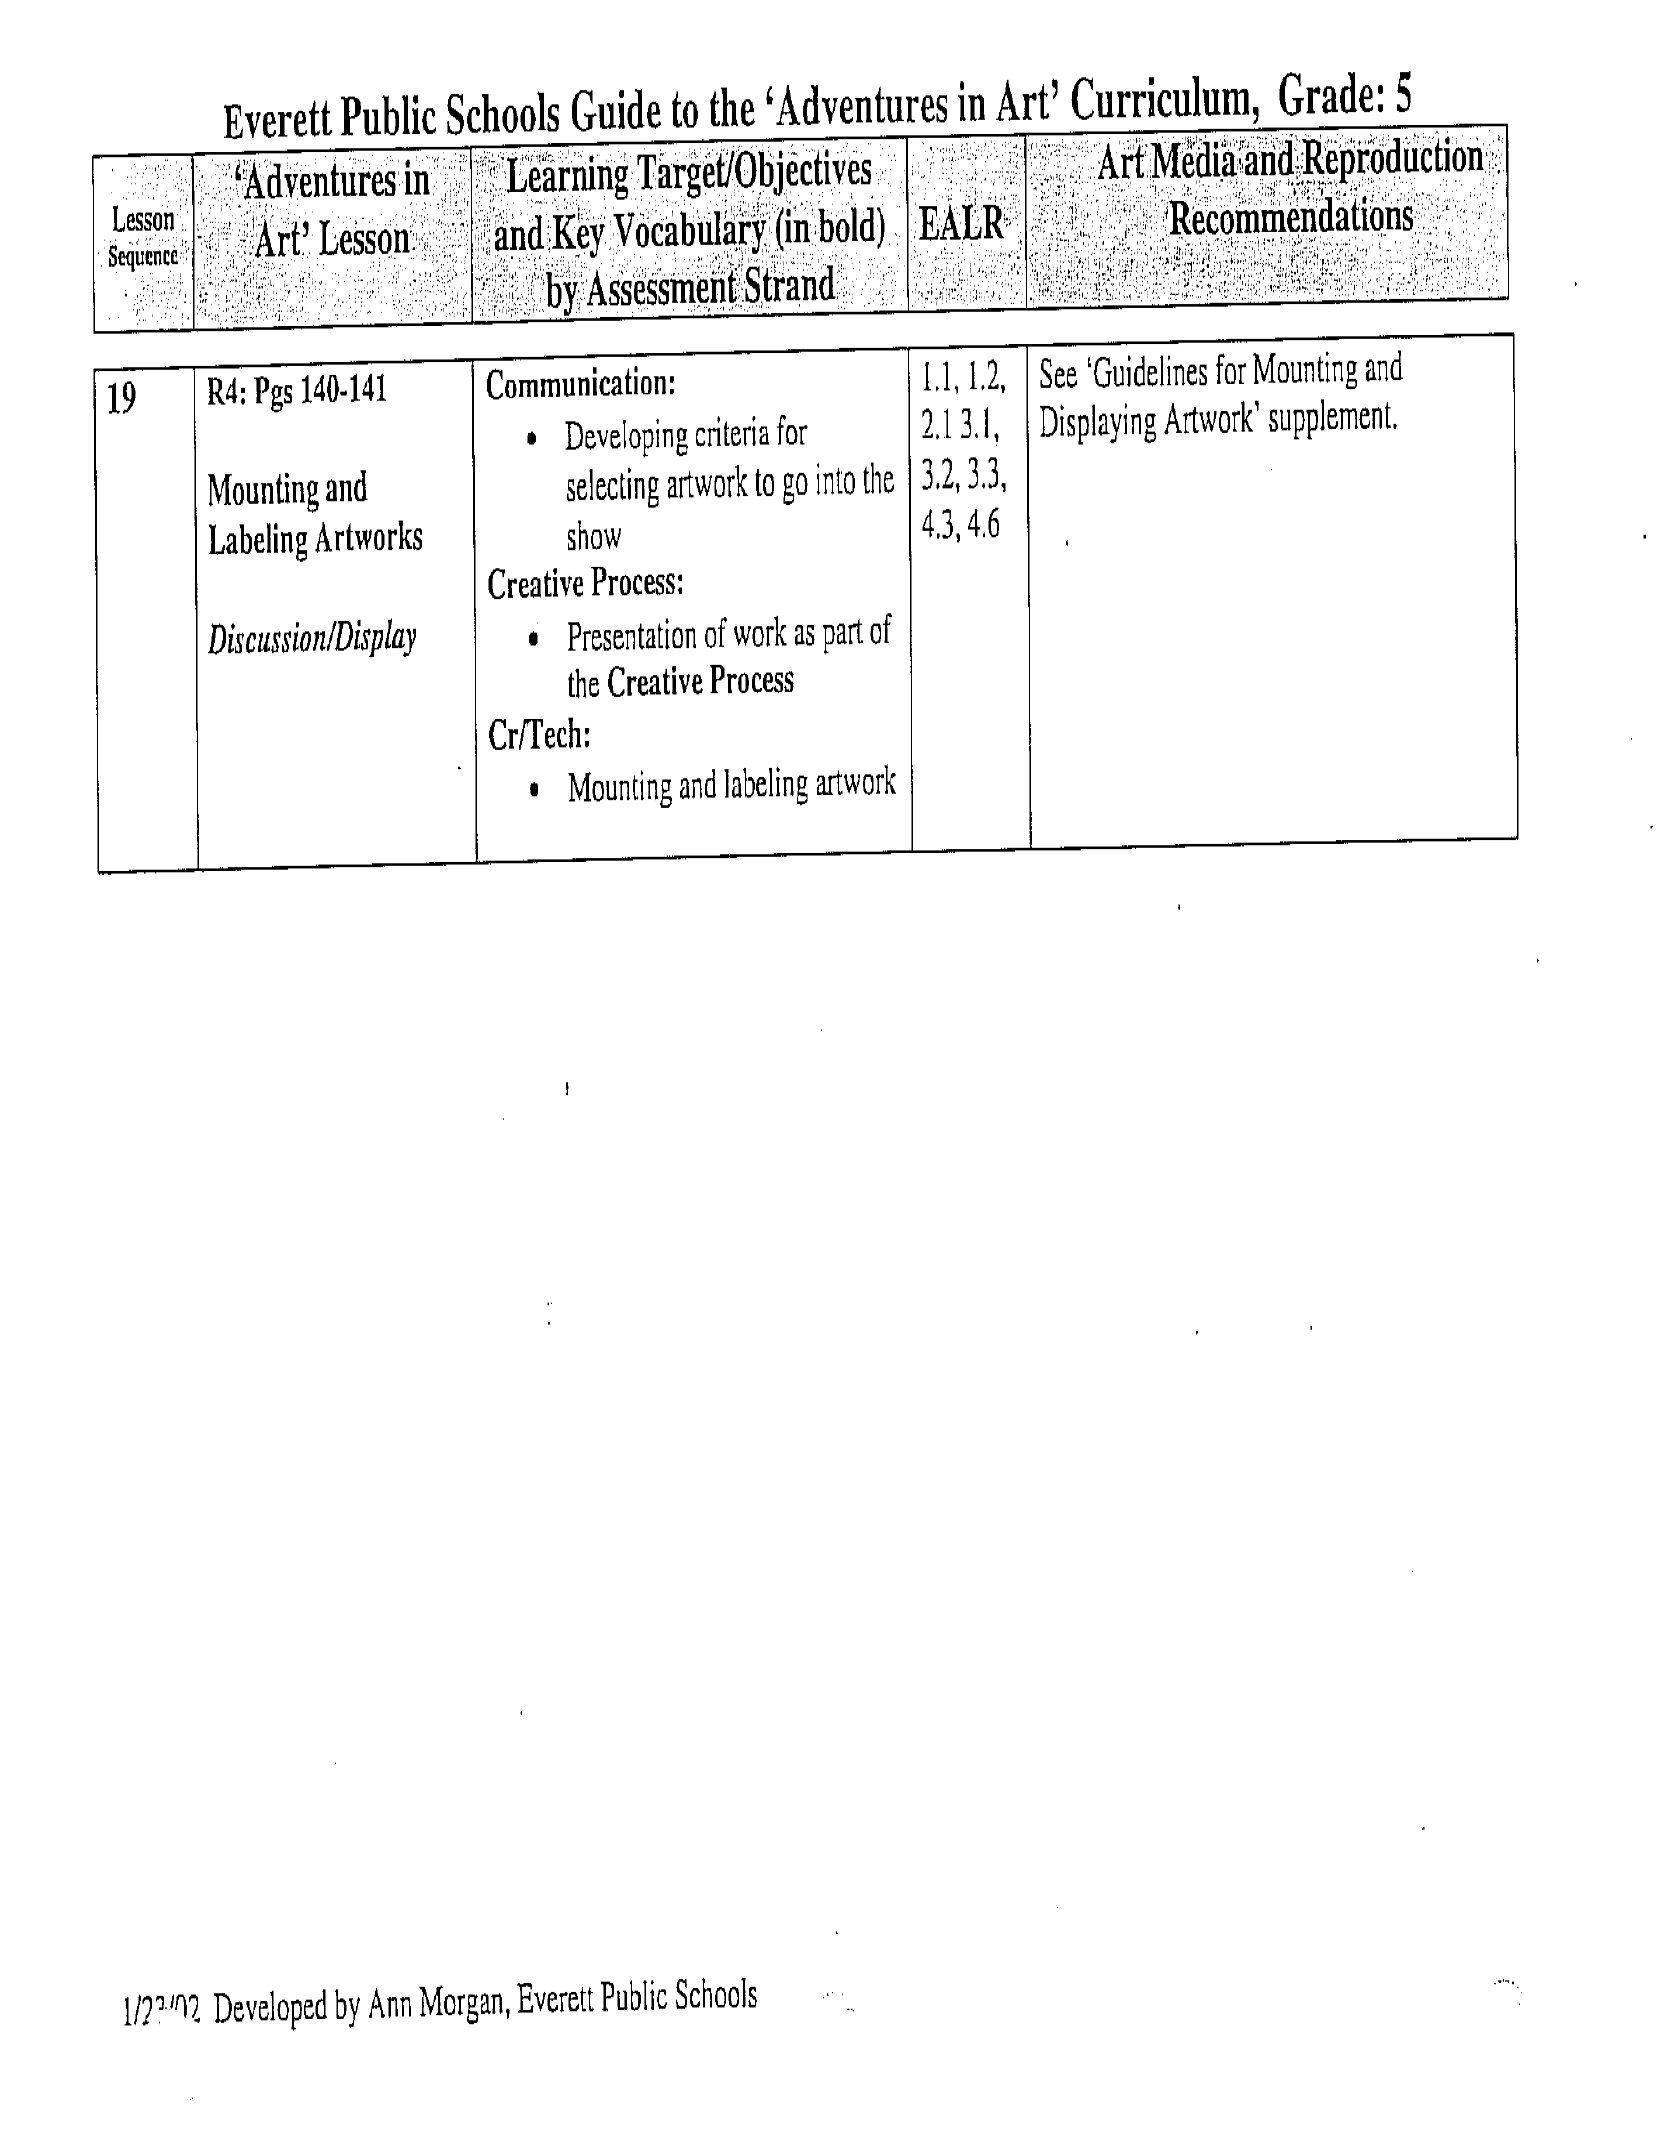
Core Lessons: Make a Sketchbook, 2, 3, 1&22(combined),18,19,7,23,10,41,
8,25,26,27,12,15,R1,R2,R4
Supplemental Lessons: U1,3,10,16,22,28,29,33,36,46,47,54
Visual Art Committee Members:
Ann Morgan, Fine Arts Curriculum Specialist, Janis Knapp, Art
Specialist at Lowell Elementary, Saundra Westvang, 5
th
grade teacher, Mill Creek Elementary, Karen
Rowe, Art Teacher at Jackson HS, Woody Russell, Art Teacher at Evergreen MS, and Sue Gaskin, 1
st
grade teacher at Silver Firs.
- 29 -
Art Docent Program
Everett Public Schools
Adventures in Art:
An Inventory of Materials Purchased
In 1998 the Everett Schools adopted and purchased the following materials to support the elementary
art program district wide.
At that time, each school received the following materials:
2 Kindergarten Kits
I First Grade Big Book
1 2nd Grade Big Book
30 (each) Third, Fourth and Fifth Grade student texts
4 Teacher's editions for each grade: 1st, 2nd, 3rd, 4th and 5th.
3 sets of reproductions for grades 1-3
2 sets of reproductions for grades 4-5
2 sets of overheads for grades 1-2
2 sets of overheads for grades 3-4
1 set of overheads for grade 5
- 30 -
Art Docent Program
Everett Public Schools
Child Development in Art
Pre-School Ages 2-4
While all children grow and develop at different rates, researchers have noted that basic
similarities exist in the art of most young children, even across cultures. The art of children of similar
ages can be a mirror of both their physical and cognitive development.
In early childhood, usually by age 2, children begin exploring mark-making through random
scribbling. As they develop more control and experiment with art tools such as pencils and crayons,
the marks they make become intentional. Gradually, uncontrolled scribbles begin to show repetition
and overlap made by moving a tool in one direction, rather than back and forth.
By age four, most children can name or identify the marks they make, demonstrating the symbolic
thinking that underlies all human imagery.
Kindergarten: Ages 5-6
By ages 5-6, most children are familiar with a limited range of symbols that represent the
world around them, such as a circle for a face or a rectangle for a car. They can use the images they
make to tell stories. The use of simple repeated shapes reflect an increasing dexterity and small motor
control in using tools like paint brushes and markers.
Children of this age typically choose to work in bright colors, and cite emotional reasons for
their choices, associating colors as personal favorites or typifying a particular feeling.
People, usually caregivers like parents or teachers, who are the emotional center of the young child’s
world, are a favorite subject of children at this age.
First Grade, Ages 6-7
As a child grows into the middle childhood years, their world broadens to include many things
beyond home and school. This is reflected in their artwork with an increasingly broad range of
subjects represented. Fine motor skills and control of art tools continue to develop. Children are able
to add more details to their artwork, and depict their subjects with more complexity and an
imaginative use of line, color, and shape.
Although ground lines are starting to appear, there is still no developed concept of space or
how objects exist in relationship to other objects in the picture. Although things often hang in space
with little attention to relative placement, children at this age have a natural sense of design and
composition that make their works visually vibrant and complete.
Second Grade: Ages 7-8
By second grade, children are generally conversant in one or more art mediums, and use them
for a variety of purposes. The stories illustrated at this age include more visual elaboration, reflective
of increasing small motor skill development and control.
There is a beginning interest in drawing things in spatially correct proportions; particularly the
human figure, and first attempts to draw from observation rather than imagination.
By this age children are involved in the complexity of line and color in order to illustrate their
vision, and begin to lose the spontaneity of color and form characteristic of their work at younger ages.
- 31 -
Third Grade: Ages 8-9
Third grade marks a transition point from the imaginative work of early childhood to a more
detailed and realistic approach to art. Artwork at this age will often include both realistic and
imaginative elements, rendered more elaborately than ever before.
Many children at this age will continue to create works that reflect little concept of naturalistic
space, while others will show great sensitivity in rendering what they observe around them with some
accuracy.
By now, children will have experience and some competence with a variety of art media. They
can intentionally choose one best suited to a growing variety of intents or purposes in creating their
work.
Fourth Grade: Ages 9-10
The increasing attention span and expanded world view of the fourth grader gives them an
enlarged range of subjects and an increasing concern for accurately depicting what they see. Many
have achieved a high level of control over one or more art mediums. Working with the human figure
becomes problematic for the fourth grader who wants to draw realistically. Other subjects that are
easier to master may become central to the fourth grader iconography, such as cartoons, animal figures
and stylized alphabets. As peer approval begins to become more important to fourth graders, they
sometimes work to develop expertise in drawing and painting certain subjects multiple times in
stylized ways that are approved by peers.
Fifth Grade: Ages 10-11
By the time children are in fifth grade, most are highly concerned with creating realistic
artworks. At this level of development, children have the longer attention span, hand/eye
coordination, and experience with a variety of art media to develop as realistic artists. With
appropriate instruction, children will learn to closely observe proportional relationships, and include
horizon lines and spatial devices such as overlap and perspective to achieve realistic effects. These are
important criteria for an artwork to be seen as successful at this age by both the fifth grader and his/her
peers.
Many children become discouraged and lose interest in developing their art skills at this age if
their work does not match their standard for realism, or if they have no other training or exposure to
other ways of evaluating the success of their work. Guided instruction is crucial to maintaining the
child’s sense of competence and skill as an artist at this stage of development.
- 32 -
Art Docent Program
Everett Public Schools
The 4 C’s: Kindergarten
Creative Process
:
Brainstorming
Composition:
Pattern Design
Replicates shapes and forms in two and three dimensions
Communication:
Describing an artwork
Identifying line direction (Horizontal/Vertical/ Diagonal)
Identifying line quality/type: Thick/thin, wavy/jagged. dashed, curved, etc
Identifying shapes: Geometric (Circle/Square/Rectangle/Triangle) Organic and Freeform
Distinguishes between shape and form
Identifying Textures: Actual/ Simulated
Color- Identifies primary and secondary colors and distinguishes dark from light colors
Craftsmanship/Technique:
Drawing Skills: Uses Felt pens, Pencils, Oil Pastels, Crayons and Chalk
Mark-making: Uses full arm and small motor, uses the sides and points of tools, to make a variety of
kinds of lines.
Creates shapes from lines
Creates patterns with lines and shapes
Draws geometric shapes
Outlines the shape of an object and replicates it
Creates textures
Painting Skills: Uses tempera paint and watercolor
Creates shapes by finger painting
Holds and strokes brush with control
Rinses brush when changing colors
Paints a variety of lines
Paints selected shapes
Papercraft Skills:
Cuts shapes both with and without a defined line accurately.
Can apply paste and glue paper with control
Printmaking Skills:
Relief Printing with gadgets/ erasers to create patterns
Loads paint to create a clear image
3D/ Clay Skills:
Rolls, pinches and models clay to create coils and and slabs
Create textured surface patterns on clay
Model figures with clay (animals/humans)
- 33 -
Quick Check Form: Kindergarten Visual Arts Curriculum
Big Ideas to Emphasize in Kindergarten Art
?
Artworks/Pictures tell a story/ convey meaning
?
Artists learn to use lots of different kinds of materials and tools to make their
artwork.
?
Artists generate lots of ideas before making their work.
By the end of Kindergarten
Students will know:
?
How to identify the art elements of line,
shape, texture and color
?
The names of the 6 primary/secondary colors
?
How to share and talk about their work
?
That artists generate many ideas before
starting an artwork
?
How to create a pattern design in several art
mediums
Students will be able to do
:
?
Paint with brushes
?
Cut paper with scissors, paste paper to paper
?
Use full arm and small motor movements
with a variety of drawing materials
?
Fill their paper space when creating a picture
?
Create shapes, lines and textures in at least
three different art mediums
?
Describe what they see in an artwork in their
own words.
Adventures in Art Core Lessons for Kindergartners:
Suggested sequence: Unit 2, lesson 1 & 2, Unit 7, all, Unit 3, lesson 1, Unit 9, all, Unit 10, all, Unit
14, all,
Recommended supplemental lessons: Units 1, 12, 15, 18 and 20
Integration Points for Kindergarten Art:
Math
?
Line direction: horizontal, vertical, diagonal
?
Identify shapes: circle, square, rectangle, triangle
?
Pattern creation/ recognition
?
Measurement/ space concepts: smaller/ bigger,
shorter/ longer, whole,/part, half,/quarter
?
Distinguishing
between shape and form
Reading/ Language Arts
?
Developing descriptive language
?
Illustrating story elements: beginning, middle, end
?
Creating pictures to illustrate stories
Social Studies
?
Family drawing
Science
?
Animals 2 x 2
: Art Unit 15 focuses on drawing and
painting animals. Lesson 2, Drawing from
Observation, is very similar in content to the ‘Guiding
the Investigation’ for the animals presented in the Foss
Kit. Observations and words can be recorded as
drawings
in a Science Journal.
Performing Arts:
Patterns through sound, movement
Spatial concepts: Up/down, near/ far, inside/ outside, in
front,/behind, above/ below, over,/under
Art Vocabulary in Kindergarten:
Health & Fitness
Family Drawings (GBS ‘Family Team)
Portraits (GBS My Body is Special)
Art Elements: Line, shape (geometric/ organic/ free-form)
texture, form, color. Primary/secondary color names, dark
colors/ light colors, brushes, crayons, paint, felt pens,
scissors, paste, print, painting, sculpture, drawing, pattern.
- 34 -
- 35 -
- 36 -
- 37 -
- 38 -
- 39 -
- 40 -
Art Docent Program
Everett Public Schools
The 4 C’s: Grade 1 Summary
Creative Process
:
The difference between an original and a copy: 30
Develops original ideas: Should be embedded in all lessons after 30
Composition:
Discussion of composition/arrangement of art elements: 28
Explores common subject matters: Landscape/ portraits: 22, 23, U2
Creates pattern Designs 14
Identifies art elements in works of art:
Color (11/ 12) Shape (3) Texture (33) Line (1/2) Form (27) Value (22) Space (51-53)
Identifies the art principles: Emphasis (28)
Works with different formats: 21
Identifies warm and cool colors: 11
Uses symmetrical balance: 35
Communication:
Describes artworks using art language: 15
Identifies and uses colors expressively: 11
Uses imagery to tell themselves and where they live: 5
Compares two artworks and discusses artist’s choices: U2
Presents work to peers for discussion: Should be embedded in all lessons (60)
Craftsmanship/Technique: Demonstrates and consolidates control over media;
distinguishes one media from another.
Drawing Skills: Uses felt tip pens, pencils, oil & chalk pastels, colored pencils and crayons
Uses expressive lines: 1 &2
Creates textures with lines and shapes: 9
Mark-making skills: Embedded in drawing lessons
Varies pressure with the drawing tool
Works back and forth
Outlines an object
Identifies and uses warm and cool colors: 11
Painting Skills: Uses tempera paint
Mixes secondary colors: 12
Experiments with light and dark colors: 22
Paints with wet-on-wet technique:13
Uses color expressively: 24
Varies brushstrokes and pressure on the brush: 14
Papercraft Skills:
Uses glue appropriately- applying glue to shape to be glued, not the background: 3
Cuts in various directions to create shapes with accuracy: 3/21/33
Tears paper to create shapes: 5
Fold paper into halves, quarters and eighths: 35/27
3D/ Clay Skills:
Models small figures: 39/ 40
- 41 -
Quick Check Form: First Grade Visual Arts Curriculum
Big Ideas to Emphasize in First Grade Art
?
Artworks/Pictures can tell about feelings through colors, shapes lines and
textures.
?
Artists think about how to make their work better while they are making it and
after they are done.
?
The difference between copying and originality in artwork.
By the end of First Grade:
?
Students will know:
?
They can use lines, textures and colors to
show feelings
?
The difference between an original and a copy
?
How to identify the art elements of line,
shape, form, color, texture in their work.
?
That artwork can tell about themselves and
where they live.
?
That artists think about their work and make
deliberate choices to make their work better.
Students will be able to do
:
?
Mix colors in painting
?
Fold paper to create 3 D forms
?
Use brushes with control to create an image
or feeling.
?
To cut and tear paper with some accuracy
?
To generate several ideas to work from
?
Identify different art mediums used.
‘Adventures in Art’ Sequenced Core Lessons for First Grade:
1, 2, 3, 5, U2, 9, 30, 28, 11, 12, 13, 14, 22, 23, 24, 21, 51, 52, 53, 15, 60
Recommended Supplemental lessons: 6 (pattern), 8 (texture rubbings- do before 9) 39&40 (Clay
sculpture/ animals – do between 28 and 11) 4 (Cut Shape Collage, after 5 or before 21) 27 (Folded
paper forms-do before 52)
Integration Points for First Grade Art:
Math
Difference between two and three dimensions: shape vs
form (51-53)
Identifies geometric shapes (51)
Makes patterns (6)
Reading/ Language Arts
Develops descriptive language- talking about art
Revise and Edit- in artwork and in writing
Sequencing by making simple books
Science
New Plants:
Adventures in Art Lessons numbers 1, 2, 4,
8, 9, and 10 relate directly to observing and recording lines,
shapes and textures for use in the Science notebook.
Social Studies
Study of Community/ making models of the community,
school or neighborhood: Ad in Art lessons 21, 51-53
Health & Fitness
My body is extra special (GBS )- Correlate with portraits/
figure drawings
Talk and Listen/ Happy, Sad…(GBS)- Ways artists
communicate feelings in artwork through color, lines, etc
Performing Arts
Expressing feelings through sounds and movement
The role of practice, and having many ideas in
performance.
The role of originality in music, theater and dance.
Technology
Key Art Vocabulary
:
Can draw straight lines w/ mouse using shift key
Can create geometric shapes with shape tools.
Can fill shape with colors using paint bucket tool
Art Elements: Shape, Line, Color, Texture, Form
Emphasis/ Center of Interest, Warm/ Cool , Primary /
Secondary, Light and Dark (tints and shades) Copy/
Original, Landscape/ Portrait,/ Self-Portrait, Details, Format
- 42 -
- 43 -
- 44 -
- 45 -
- 46 -
- 47 -
- 48 -
Art Docent Program
Everett Public Schools
The 4 C’s: Grade 2 Summary
Creative Process
:
Introduce a sketchbook and it’s use to record/ generate images- 15/16*
Keeps a portfolio of work- (embedded) 45, 60
Mounts and displays artwork -60
Reflects on/ discusses the effectiveness of an artwork –embedded 3, 60
Composition:
Depicts realistic space using; ground line, overlap and high/low in composition- 11, 17, 24, 25
Makes full use of the paper space-embedded
Uses still life, portrait/ self-portrait and landscape as a subject- 18, 25,21
Identifies positive and negative space- 8
Identifies and uses the art principles of repetition and emphasis in a composition- 26,27
Communication:
Understands that symbols are used to communicate in various cultures-U3, 26
Uses symbols in an artwork; Lion for courage, etc- U3, 26
Narrative storytelling through images- an emphasis on creating details- 26, 45, 27
Depicts action/motion in work- 2, 20, 27
Uses line/color and brushwork for expressive purposes- 13, 14, 19
Identifies still life, portrait/ self-portrait and landscape as a subject- 18, 25,21
Uses a color wheel/ identifies warm/cool colors and color values (tints an shades)
Craftsmanship/Technique: Demonstrates and consolidates control over all media:
Drawing Skills:
Draws from observation: 1, 16, 21, 25
Draws textures 6/ 27
Layers medias- 6,/14,
Selects appropriate tools- 2/ 21/ 19
Varies lines- 1/ 2/ 14
Painting skills: Uses tempera paint and watercolor
Works with color value- 18
Creates washes-13
Mixes colors –12/ 18
Blending- 13/ 14
Papercraft Skills:
Uses large and small shapes in collage-8/ 26
Simple bookbinding U2
Cuts complex/ freeform shapes-8/ 24/ 26
Optional 3D/ Clay Skills:
Textures clay 33
Makes simple attachments 32
Assembles forms 35/ 36
- 49 -
Quick Check Form: Second Grade Visual Arts Curriculum
Big Ideas to Emphasize in Second Grade Art
?
Artists use sketchbooks as a way to practice and develop their ideas
?
Artists reflect on their work to improve it over time, and keep portfolios of
their work to see their progress.
?
Artists tell stories and show feelings using lines, colors, shapes, and symbols.
By the end of Second Grade:
Students will know:
?
How to use lines and colors expressively
?
Two ways to show realistic space in an
artwork
?
How to identify the art elements of line,
shape, form, color, texture and value and
space in their work.
?
How to use a sketchbook.
?
How to identify a portrait, self-portrait,
landscape and still life as art subjects.
Students will be able to
:
?
Mix secondary colors, tints and shades in
painting
?
Create textures in several art mediums
?
Paint with control.
?
Cut and fold paper with accuracy.
?
Keep a portfolio of their artwork.
?
Form opinions about what makes an artwork
‘good’
?
Draw from observation.
?
Create complex/ freeform shapes.
‘Adventures in Art’ Sequenced Core Lessons for Second Grade:
U2, 16, 1, 2,6,27, 8, 21, 24, 25, 17, 12, 13, 14, 18, 19, U3, 26, 45, 60
Recommended Supplemental lessons: 7 (printed patterns) 30 (drawing flowers) 49 (book illustration)
52 (paper forms) 31 (clay sculpture) 33 (texturing clay sculpture)
Integration Points for Second Grade Art:
Math
Working with proportion/ scale (21/24)
Symmetry / Asymmetry (34 50 60)
Pattern making (7)
3D Forms (52)
Reading/ Language Arts
Develops descriptive language
Uses images to tell/ sequence stories
Develops visual symbols from stories
Notes/ journaling in the sketchbook
Science
Butterflies: Ad in Art lessons 1,8, 12, 16, 27
teach color mixing, symmetrical shape, observational
drawing in a sketchbook and drawing animals.
Social Studies
Multicultural (lesson U3/ 45)
Health & Fitness
How You Think / Visual learning/ Spatial Intelligence
(GBS)
Performing Arts
Translating feelings from music into images
The role of practice & reflection in creative work.
Key Art Vocabulary
:
Technology
Word processing simple statements/ placards to display
with their work.
Creates shapes, lines, colors and textures in simple paint
programs (e.g. Kid Pix/)
Art Elements
: Shape, Line, Color, Texture, Space, Value,
Form
Principles:
Emphasis/ Center of Interest, Repetition,
Movement , Color Wheel, Color value (tints and shades)
Positive and Negative space, Freeform shape, Landscape/
Portrait,/ Self-Portrait,/Still Life Sketchbook. Mounting,
Symbol,
- 50 -
- 51 -
- 52 -
- 53 -
- 54 -
- 55 -
- 56 -
- 57 -
Art Docent Program
Everett Public Schools
The 4 C’s: Grade 3 Summary
Creative Process
:
Uses sketches to plan work and draw from observation U2/ 1/ 8
Introduce the steps of the Creative Process and apply to an art project embedded
Mounts and displays work R4
Composition:
Basic guidelines for composition 11
Applies the art principle of Proportion to portrait/ figure drawing 26/ 23
Identifies and begins to use the Art Principles: Balance, rhythm, repetition 6
Uses overlap to depict space 11
Communication:
Compares and Contrasts two artworks in discussion setting R1 and R2
Develops criteria for judging art R2/ R4
Adapts designs from historical/cultural sources for their work –embedded, using reproductions
Identifies the expressive use of line-/color- 2/ 3/ R1 /18
Craftsmanship/Technique:
Drawing Skills:
Draws from observation and imagination 2/ U2
Draws textures 8
Blends media 14
Selects appropriate tools 14
Uses simple contour line 1, 23
Uses ink 8
Mixes media 14
Painting Skills: Uses tempera paint and watercolor
Creates washes/ Blends colors- 14, 17
Creates edges 14
Expanded color theory: Analogous, color value (tints/ shades)
mixing intermediate /tertiary colors 12/ 13/ 16/ 18
Understands the difference between transparent/opaque paints: 17
Selects brushes for desired effects/ practices and extends use of brushstrokes for additional control: 15
Understands the difference between working wet and dry in painting 14/ 15
Papercraft Skills:
Selects and combines edge treatments in collage (torn/ cut/ decorative. etc) 6
- 58 -
Quick Check Form: Third Grade Visual Arts Curriculum
Big Ideas to Emphasize in Third Grade Art
?
Artists use the color wheel as a way to understand color mixing and develop
color relationships in their artworks.
?
Artists use a creative process that incorporates a sketchbook and a portfolio to
develop original work.
?
Artists carefully observe the world around them to draw what they see.
By the end of Third Grade:
Students will know:
?
How to mix color and plan color schemes,
using a color wheel.
?
To plan the use of space in an artwork, using
the art principles (balance/ repetition/
emphasis)
?
Appropriate set-up/ clean up behavior/
procedures for painting.
?
How to compare and contrast artwork, using
art language
?
How to see proportional relationships
Students will be able to
:
?
Mix intermediate colors and flesh tones.
?
Select brushes appropriate to achieving
intentional effects in painting.
?
Control over paint, scissors, glue.
?
Keep a sketchbook and a portfolio of artwork.
?
Can work wet or dry to achieve different
effects in painting.
?
Draw from observation, using proportional
relationships.
‘Adventures in Art’ Sequenced Core Lessons for Third Grade:
35, U2, 2, 8, 6, 11, 13, 16, 18, 14, 15, 20,17, R1, 1,23, 26,27, R2, R4
Recommended Supplemental lessons: 39 (Shapes in buildings)33 (messages from pictures) 25 (space
and expression) 22(Making a Relief Print) 53, 56, 57, 58 (clay sculpture)
Integration Points for Third Grade Art:
Math
Working with proportion (23, 26, 27)
Symmetry / Asymmetry (34 50 60)
Reading/ Language Arts
Develops descriptive language/ writing
Writes about artwork
Notes/ journaling in the sketchbook
Science
Structures of Life:
Ad in Art Lessons 4, 8, emphasize
seeing and recording shapes and textures fro science
notebooks. Lessons 12 and 13 teach color use.
Social Studies
The importance of rules (use of art tools/ color mixing, etc)
Artwork as a historical document- describing/ analyzing
Art as a reflection of traditions/ cultural practices )
Health & Fitness
Safe use of art tools and materials
The Better to See You With’ (GBS)
Performing Arts
Creative process applied to other arts
Key Art Vocabulary
:
Technology/ Info Literacy
Visually organizes information (word webs/ posters, etc
Inserts graphics into documents
Understands the difference between developing original
work and using copied work in a document.
All Art Elements, plus color terms: intermediate colors,
monochromatic, analogous, tints & shades, color
scheme. Art Principles: Emphasis/ Center of Interest,
Balance (symmetrical/ asymmetrical) Proportion,
Rhythm and Repetition.
Cityscape, Creative Process, wash. blend
- 59 -
- 60 -
- 61 -
- 62 -
- 63 -
- 64 -
- 65 -
- 66 -
- 67 -
- 68 -
Art Docent Program
Everett Public Schools
The 4 C’s: Grade 4 Summary
Creative Process
:
Keeps a Portfolio of work: embedded
Understands and practices all the steps of the Creative Process- embedded
Uses a sketchbook for observational drawing and to plan work: 4, 5, 14, 15
Reflects on the effectiveness of their work and the work of others R2, R1, R
Mounts work for exhibition/ displays work R4
Composition:
Works with positive and negative space 8
Creates emphasis using contrast / color 2, 22
Understands Foreground/Middle ground and Background in landscape/ still life 13, 26
Incorporates pattern elements into their work 13
Depicts space using overlap 13
Communication:
Understands ‘techniques’ are ways of using art tools and materials to create different effects.
Can recognize abstract and realistic styles R2, 15, 16, 14, 26
Recognizes and identifies portrait views 26
Identifies common art subjects 25, 6, 13, 17, 15, 26
Critiques art using a responding model (description, analysis, interpretation, judgement) R1, R2, R4
Craftsmanship/Technique:
Drawing Skills:
Uses Charcoal 5
Develops shading techniques: Sees and records shadows and light 5
Identifies light sources, highlights, core shadows and cast shadows 5
Uses lines to create value (hatching/ cross hatching) 5
Uses proportion to draw realistically 4, 25
Painting Skills: Uses tempera paint and watercolor
Mixes tints, shades, and tones 17
Paints in a particular style 15/ 16, 26
Identifies and uses specific color schemes in an artwork 18, 22
Controls wetness/washes in painting to create an image 13
- 69 -
Quick Check Form: Fourth Grade Visual Arts Curriculum
Big Ideas to Emphasize in Fourth Grade Art
?
Artists use the Creative Process to develop their best and most original work.
?
Artists can work in many different ‘styles’ to communicate different things.
?
Artists develop many different ‘techniques’ to achieve the styles they like.
By the end of Fourth Grade:
Students will know:
?
What an art technique is.
?
How to identify both realistic and abstract
styles of art.
?
How different styles of working require an
artist to develop different techniques.
?
The steps of the creative process, and how it
applies in their own work.
?
How to mix and use all colors, and that artists
often work with color schemes.
Students will be able to
:
?
Analyzing and shading an object to make it
look 3D.
?
Control washes/ wetness in painting to create
a recognizable image.
?
Work in several different styles.
?
Use art language to state their aesthetic
preferences.
?
Communicate ideas and feelings through
images.
?
Use proportion to draw from observation.
‘Adventures in Art’ Sequenced Core Lessons for Fourth Grade:
Recommended sequence: Sketchbook, 4, 5, 25, 6, 2, 8,13,17,18, R2, 15, 16, 22, 26, R1, R4
Recommended Supplemental lessons: 3 (design) U2 (using colors expressively), 29 (scientific illustration), U4 (Art in
traditional cultures) 23 (relief printing) 40 (clay relief) 46 (pinch pot) 54 ,55 & 57 (clay sculpture)
Integration Points for Fourth Grade Art:
Math
Working with proportion/ scale
Symmetrical/ Asymmetrical balance
Flips slides and rotations in design/ pattern designs.
Reading/ Language Arts
Developing descriptive language
Correlating the writing process with the creative process
Compare and contrast artworks (see overheads)
Art Criticism as persuasive writing
Science
Reading the Environment
: Ad in Art lessons 3, 4,5,6, 9
all emphasize observational drawing for recording terrarium
life.
Social Studies
Multicultural /Exploring Native American art/ traditions
Health & Fitness
(based on GBS)
Creating health posters: Healthy food, digestive system,
anti-smoking, etc
Expressing emotions through art
Performing Arts
Translating feelings from music into images
The role of practice & reflection in creative work.
Key Art Vocabulary
:
Technology
Slide Shows with a theme
Using clip art in a design
Use of a digital camera
Cutting a pasting digital images
Researching/ accessing imagery to draw or paint from
Art Elements
and
Principles:
, Positive and Negative
Space, Creative Process, Style, Technique, Realism,
Abstraction, Color Schemes, Analogous colors,
Complementary colors, Foreground, Middle Ground and
Background, Light source/ Highlight,/Core Shadow,/Cast
Shadow, Wash,
- 70 -
- 71 -
- 72 -
- 73 -
- 74 -
- 75 -
- 76 -
- 77 -
Art Docent Program
Everett Public Schools
The 4 C’s: Grade 5 Summary
Creative Process
:
Knows and follows the steps of the creative process to plan compositions-embedded
Composition:
Balance: Symmetrical/ Asymmetrical and Radial 41
Perspective, including vanishing point and horizon line and overlap 12
Analyzes compositions 41 27 7 1
Landscape- Depicts details (FG/MG/ BG) 12, 15
Observational drawing- still life/ portrait 2 18 19/ 8, 25, 26, 27
Identifies Art Styles 7 10 28 15 19
Uses proportion drawing and painting 8 25
Introduction to figure drawing 27
Communication:
Compares and contrasts artworks 15
Understands the use of simple symbol systems in artwork 10 22
Creates expressive work using art elements 7, 22,23, 25, R2
Interprets imagery R1, R2, 25
Identifies common subject matter in artwork – embedded
Craftsmanship/Technique:
Drawing Skills: Uses felt tip pens, Charcoal, Pencils, Oil Pastels, Crayons and Chalk
Refines shading/ texturing techniques 3/ 18/ 19
Draws from observation 2 18 19
Applies principles of perspective drawing 12 18
Practices hatching/stippling techniques to create value 3
Layers color/ works with various color schemes 19, 22, 23
Painting Skills
: Uses tempera paint and watercolor
Paints using value 19, 26
Controls Bleeding 23, 26, 27
- 78 -
Quick Check Form: Fifth Grade Visual Arts Curriculum
Big Ideas to Emphasize in Fifth Grade Art
?
Artists carefully observe the world around them to create realistic images.
?
Artists develop many ways to use art elements in expressing their ideas and
feelings.
?
Deciding what is ‘good art’ and ‘bad art’ is based on a thinking/ responding
process, called ‘art criticism’.
By the end of Fifth Grade:
Students will know:
?
The steps of the creative process and how to
apply them to create original work.
?
Rules and guidelines for organizing
compositions in common art subject matter,
such as still life, landscape, portrait.
?
How to identify several different styles of art.
?
The difference between working realistically
and expressively.
?
How to use a responding process to evaluate
artwork, under teacher direction.
Students will be able to
:
?
Draw and paint from observation.
?
Blend and shade with several art mediums to
show form.
?
Work in several different styles.
?
Use art language to develop criteria for
evaluating artwork.
?
Communicate ideas and feelings through
images.
?
Uses basic principles of perspective to show
space.
‘Adventures in Art’ Sequenced Core Lessons for Fifth Grade:
Recommended sequence: Sketchbook, 2,3,1/22, 18, 19,7,23,10,41,8,25,26,27,12,15, R1, R2, R4.
Recommended Supplemental lessons: 1 (design) 5 (tessellation/design) 29(Historical Mural), 30 (Art
as a Cultural record), 33 (Architectural models in clay) 36 (paper sculpture) 42 (photo collage) 50
(clay sculpture) 54 (Coil pot in clay)
Integration Points for Fifth Grade Art:
Math
Working with proportion/ scale
Symmetrical/ Asymmetrical balance
Flips slides and rotations in design/ pattern designs.
Converging lines (linear perspective)
Reading/ Language Arts
Developing descriptive language/ writing
Correlating the writing process with the creative process
Compare and contrast artworks (see overheads)
Art Criticism as persuasive writing
Science
Motion and Design
: Ad in Art lessons emphasizing
technical drawing/ illustration include 12, 35, 38, 40
Social Studies
Identifying American art/ artists
Depicting American art/ traditions
- 79 -
Health & Fitness
(based on GBS)
Creating health posters: Healthy food, body systems, anti-
smoking, etc
Expressing emotions through art
Performing Arts
Role of balance, repetition and emphasis across art forms.
The role of practice & reflection in creative work.
Key 5
th
Grade Art Vocabulary
:
Technology
Slide Shows with a theme
Creating designs using draw and paint tool bars
Use of a digital camera: Composition/ using a viewfinder
Cutting a pasting digital images
Researching/ accessing imagery to draw or paint from
Creative process (steps), Drawing from observation/
careful observation, Composition, expression/
expressionism, implied movement, warm (advancing )
colors and cool (receding ) colors, color schemes, motif,
scaffolding, radial balance, flesh tones, blending,
perspective, horizon line, vanishing point, Art Criticism,
criteria
- 80 -
- 81 -
- 82 -
- 83 -
- 84 -
- 85 -
- 86 -
- 87 -
- 88 -
Section 4:
Teaching the Visual Arts
- 89 -
Art Docent Program
Everett Public Schools
Art Vocabulary: The Art Elements
The Art Elements are the basic visual building blocks of any artwork.
LINE: A mark left in the path of a moving point.
Horizontal, Vertical and Diagonal
Types: Dotted, zigzag, thick, thin, wavy, curvy, etc.
In drawing:
Contour lines, hatching and cross-hatching, gestural lines
In composition:
Horizon Line-
A horizontal line indicates where the sky and the land meet at the edge of
the horizon in a landscape.
Ground line-
A horizontal line that indicates the plane an object is sitting on, such as a
table or other flat surface.
SHAPE: A closed space made when a line turns to meet itself.
Geometric Shape
: The shape’s area can be determined by mathematical formula, such
as squares, rectangles, circles, etc.
Organic Shape:
A shape with curvy sides and an irregular shape.
Freeform Shape:
A shape that combines organic and geometric elements.
FORM: A shape that is, or appears to be, three-dimensional; having height, width
and depth.
Geometric Form
: A form's area can be determined by mathematical formula, such as
sphere, cone, cube, etc.
Organic Forms
: A form that is irregular and curvy in configuration.
VALUE: The lightness or darkness of a surface.
‘Lights and Darks’
Contrast and Gradation
In color: Lights and darks.
Related vocabulary in drawing:
Highlights, middle values, core shadows, and cast
shadows.
Light Source
Highlight
Middle Values
Cast Shadow
Core shadow
- 90 -
SPACE: The area around, above, below and within an artwork.
‘Near and Far’
Positive space/negative space-
Refers to the visual relationship between the space
occupied by subject matter in an artwork (positive space) and the unoccupied space that
surrounds it (negative space).
To depict three-dimensional space on a two-dimensional picture plane, artists use a
number of devices. Such devices used are Linear Perspective, including
Foreground/Middle Ground/Background, Overlap, Relative size, Placement in the
picture plane (high/low), details/ lack of details. The use of color includes bright/dark
(to make things appear closer) vs. dull/light (to indicate they are farther away).
TEXTURE: A surface that can be seen or felt.
Actual-
A texture that can be seen and felt.
Simulated
- An illusionary texture that can be seen but not felt.
COLOR: The visible spectrum of reflected light, which is classified by a colors
hue, value and intensity.
Hue:
Refers to color families
Primary Colors
: Red (Magenta), Blue (Cyan or Turquoise) & Yellow
Secondary Colors
: Made by mixing two primaries to make Orange, Green and
Violet
Tertiary/ Intermediate Colors
: A combination of a primary and secondary color,
such as yellow-green.
Value
:
Refers to the lightness or darkness of a color.
Adding black to a color makes ‘shades or dark values’ of
a color
. Adding white
makes ‘tints, or light values’ of a color
. Mixing both black and white to a color
results in a ‘
tone’
.
Intensity:
Refers to the brightness or dullness of a color.
Color intensity is dulled by mixing a color with it’s complement (the color across
from it on the color wheel).
Complementary Colors:
Colors that are across from each other on the color wheel.
Complementary pairs are Red/Green, Blue/Orange and Yellow/Violet. Mixing
complements together make neutral colors, like browns and grays.
Warm colors-
Warm colors are colors like fire: Red, orange and yellow.
Cool colors
- Cool colors are colors like ice or the forests: Blue, green and violet.
- 91 -
Art Docent Program
Everett Public Schools
Art Vocabulary: The Art Principles
The Art Principals are Basic guidelines for organizing the Art Elements to create a
unified design.
?
Balance:
The arrangement of elements in an artwork to create a sense of visual
stability. There are two types of Balance
: Symmetrical
(Formal) and
Asymmetrical
(informal).
?
Proportion:
Refers to the relationship of the parts of an artwork to the whole, or
one part to another in size, location or amount. Artists sometimes exaggerate
proportions of a subject in order to emphasize its importance to the meaning of the
work.
?
Emphasis/Focal Point:
An area of contrast in an artwork that immediately attracts
the eye. It functions as a doorway into an artwork for the eye of the viewer.
Sometimes this is called ‘Dominance’.
?
Movement:
The use of art elements to create a sense of visual flow in the design.
Movement creates a visual pathway that draws the eye smoothly through the
artwork.
?
Rhythm:
The use of art elements to create a repeating pattern of visual interest that
jumps the viewer’s eye through the artwork.
?
Variety:
The use of art elements to create differences in an artwork that add visual
interest. Without some variety, the artwork is too boring to create any visual
interest. Too much variety makes it too chaotic to see.
?
Repetition:
The repeated use of art element(s) to enhance the unity in an artwork.
Too much repetition can make an artwork boring. Repetition must be balanced with
variety to create a strong design.
?
Unity:
A successful combination of art elements to create a sense of wholeness and
visual completion in an artwork.
- 92 -
Art Docent Program
Everett Public Schools
Teaching Paper Arts
Teaching Visual Arts with paper allows students to create a wide
variety of projects. Techniques to focus on are:
?
2-Dimensional Paper Cutting
o Geometric Shapes
o Organic Shapes
o Layering
o Overlapping
o Positive and Negative Space
o Revealing Lines
o Hole-punching
o Weaving
?
3-Dimensional Sculpting
o Folding and Cutting
o Rolling
o Bending and Creasing
o Looping
o Pleating
o Curling
o Spiraling
o Fringing
o Scoring
o Creating Masks
- 93 -
Paper Tools and Recommendations
Paper Type
Best Art Uses
Tissue Paper
Collage
Paper Mache
Paper Cuts: Snowflakes, Chinese/Mexican paper
cuts
Newsprint
Protective layers for artwork – particularly pastels.
Masking/covering surfaces when gluing, painting,
etc.
Short term notes, sketches
Origami Paper
Origami
Collage
Copy Paper: Text
weight
Sketching
Pen and ink
Book making
Kraft Paper
Any dry art medium that requires a darker ground:
printmaking, drawing, etc.
While (Sulfite)
Drawing Paper
Drawing/erasing with pencils, felt pens, colored
pencils, pastels or crayons.
Watercolor/Tempera (80#only).
Construction Paper
Collage
All glued and pasted projects
Butcher Paper
Murals, backgrounds, and group projects, such as
paper quilts.
Copy Paper: Card Stock
Weight
Paper Sculpture
Book covers
Tag Board
Book covers
Portfolios
Dividers
Railroad Board
Portfolios
Mounding Artwork
Chip Board
Book covers
Portfolios
Packaging
Supports/armatures for sculpture
Mat Board
Mounting or Matting Artwork
Supports/armatures for sculpture
Book covers
- 94 -
Art Docent Program
Everett Public Schools
Teaching Drawing
Students can first develop drawing skills around drawing basic
shapes.
Two-Dimensional Shapes:
?
Geometric Shapes – Square, Triangle, Circle
?
Organic Shapes
Three Dimensional Shapes:
?
Cube
?
Cone
?
Sphere
Shading Techniques:
?
Hatching
?
Cross-Hatching
?
Blending
?
Stippling
?
Contouring and Outlining
?
Looping
- 95 -
Drawing Tools and Recommended Uses
Tool
Types
Uses
Tips
Graphite
Pencils
Pencils are rated by hardness or
softness of the graphite (lead)
they contain.
?
‘Hard’ graphite leads
gives a light line, and the
lead itself if durable, keeps
its point when sharpened,
and is slow to wear down.
Hard leads range from 2H to
7H (hardest).
?
‘Soft’ graphite leads
are
most often used by artists.
Soft lead pencils give a very
dark line, tend to break
more easily and ward down
quickly – particularly the
points. Soft leads range
from 2B to 9B (softest).
?
Artists often use a range of
graphite pencils depending on
the desired effect or technique.
?
Artists use soft graphite for
shading and creating dark
values.
?
Standard 2B pencils work fine
for quick sketches or linear
types of work
?
A heavy weight of paper
is best for this kind of
work.
?
Because the points wear
down quickly on soft
lead, use a hand held
pencil sharpener or a
sandpaper block for
sharpening points.
Charcoal
Charcoal
comes in several
forms: Vine charcoal and
compressed charcoal being the
most common.
?
Compressed charcoal is the
best to use with young
students.
?
Compressed charcoal gives inky
blacks which can be blended to
make a gradation of values on
white drawing paper.
?
Give each child ½ a stick
and use fingertips, an
eraser or small scrap of
drawing paper to blend.
?
Each child should have a
damp paper to wipe their
fingers on while they
work.
?
Kneaded erasers are best
for erasing and blending.
Charcoal will be difficult
to remove from erasers
after use.
Ink
?
Fine points black ink pens
(such as roller ball or
precise point) are
particularly good for adding
details and texture.
?
Black “sharpies
” are also
good tools for teaching
drawing.
?
Ink pens and sharpies can be
used over paint or watercolor to
add details, textures or re-define
shapes after painting.
Liquid
‘India’ Ink
?
Liquid ‘India’ Ink
is a good
medium for exploring types of
line qualities and learning to
control pens/tools.
?
Have children use ink win
spill-proof bottles and on
trays to catch spills or
drips.
?
Have children wear paint
shirts when using liquid
ink.
Erasers
Erasers are an essential tool
when learning to draw.
?
White vinyl erasers are
the most effective.
- 96 -
Tool
Types
Uses
Tips
Colored
Pencils
?
Colored pencils are a
versatile, non-messy and
easily controlled art medium
for the classroom.
?
Quality is directly related to
cost of pencil sets – the best
quality is Prismacolor
pencils.
?
Colors can be layered, blended
and textured.
?
Encourage students to
sharpen colored pencils
with a hand-held sharpener
instead of a mechanical
sharpener to help the
pencils last longer.
Felt Tip
Pens
?
Felt Tip pens render rich
and brilliant color with
minimum effort or mess.
?
They allow for a variety of line
qualities and effects.
?
Unlike pencils, they cannot be
readily layers, changed or
erased.
?
Some types (such as Vis-à-vis
pens) can be used with a water
wash to create watercolor-like
effects.
?
Non-permanent types are
recommended for use by
children.
Oil Pastels
Oil pastels are a great alternative
to crayons for brilliant color.
?
Layer and blend to produce
softened edges and brilliant
fields of color and texture.
?
One layer can cover another
like paint.
?
Combines effectively with
graphite.
?
Use over paintings or drawings
to re-define shapes, forms and
colors.
?
Use as a color resist under
water based paints.
?
Start their oil pastel drawing
with a pencil sketch, and then
apply the pastel over the top.
?
Use fingers or a scrap of paper
to rub and smear the pigment
when blending.
?
Scratch through with a pencil
or pen point when layering to
reveal the color underneath or
to add texture.
?
Use heavy weight drawing
paper or construction
paper as a background.
?
To get a cleanly defined
edge, lay a piece of
newsprint down along the
edge to be defined and
then color over it onto the
artwork.
?
Keeping Clean:
have
students keep damp paper
towels at their seat to keep
their fingers clean as they
work.
?
Keep protective sheets of
newsprint under student
work and on top of it to
protect desks, sleeves and
the work itself from
smears.
Soft
(Chalk)
Pastels
Soft Pastels are an opaque art
medium.
?
Quality is directly
related to price.
?
Use on colored papers to
achieve softly blended textural
effects with a chalky, matte-
like quality.
?
Begin drawing with a pencil
sketch.
?
Lay down one or two layers of
blended colors and finish with a
layer of textured effects.
?
Encourage students not to
overwork the pastel by
blending it too much.
?
Use on top of dried paint to
refine work with additions of
color and texture.
?
Follow same “
Keeping
Clean
” guidelines as
above.
?
Use heavy weight drawing
paper or construction
paper.
- 97 -
Art Docent Program
Everett Public Schools
Teaching Painting:
Getting Started
Learning to paint with water-based paints is all about controlling the wetness of the
paper to get different painting effects.
Wetness can be controlled by:
?
Using different kinds/sizes of brush, which apply varying amounts of water applied at any one
time.
?
Learning to load the brush with paint in different ways.
?
Blotting paper with tissues or paper towels (tissues work best-keep them on hand).
?
Using papers with varying absorbencies as a support (for instance: rice paper vs. water color
paper).
?
Controlling Bleeding: If one patch of web color touches another wet area, they will bleed
together and blend. Careful control of wet areas, and planning which colors will combine and
where they will touch is important in using this technique.
?
Applying materials to the surface of the painting to seal off areas/mix with or absorb paint,
such as course salt, clear wax crayons, rubber cement, etc.
All of these are examples of ‘techniques’ artists use to achieve different visual effects. Technique is
directly related to an artist’s style or characteristic way of working. Artists choose to create different
visual effects for expressive purposes, and the techniques they use are a direct outgrowth of their
artistic/expressive purpose.
Steps in Creating a Painting:
1. Decide the direction of the paper (horizontal or vertical).
2. Lay-out basic shapes and composition with a light color of paint using a #10 or #12 brush.
3. Lay in large areas of color.
4. Add details, patterns, and textures by over-painting.
5. Use a #1 or #2 detail brush to add highlights and small details.
- 98 -
Art Docent Program
Everett Public Schools
Teaching Painting:
Color Mixing and Color Theory
Always check to see if you have color blind students, or partially color blind students (red/green color
blindness is the most common) in your class before doing color mixing exercises. Assign these
students sympathetic partners who can help them to identify and mix colors.
?
Supports:
Always use white paper as a background when student are learning to mix their
colors and making color wheels. The colors will show truer on a white background.
?
Brushes:
Us a #6 or #7 round brush for these exercises.
?
Using Tempera:
Using tempera paint for color mixing exercises has advantages over
watercolor paint. With tempera, students can easily correct mistakes by re-mixing the color
and painting over the mistake. When using tempera, use the primary colors that designers use
for color mixing, rather than the traditional red, blue and yellow to get clearer, brighter
secondary and intermediate colors. Designer primary colors are: magenta for ed, cyan (labeled
as turquoise) for blue, and the traditional yellow.
Recommended Procedures for Teaching Color Mixing:
?
Provide a color wheel or color examples so students can visually match the colors they are
mixing.
?
Partner students to conserve materials and ease clean-up. Use one paint palette per pair of
students while allowing every student to have their own brush, paper and rinse container.
?
If students are creating color wheels, have the label the wheel with the color name in each
section before starting to mix the paints.
?
Teach students to mix their lightest colors first (such as yellow) and add darker colors to the
lighter color in little ‘dabs’ until the correct color is achieved. For instance, when mixing tints
by adding white, have students add the color to the white. When mixing shades by adding
black, have students add the black to the color.
?
Provide generously sized water containers for rinsing brushes between colors. One quart
plastic yogurt or cheese containers work well for this. Change rinse water often so that colors
stay clear and bright.
Color Theory:
?
Primary Colors – basic required colors (red, yellow and blue).
?
Secondary Colors – two primary colors mixed (orange, green, and purple).
?
Neutral Colors – black, grey and white
?
Value – light and dark of color.
o Tint when white is added.
o Tone when grey is added.
o Shade when black is added.
?
Intensity – brightness or dullness of color
- 99 -
The Color Wheel
- 100 -
Painting Materials and Recommended Uses
Tool
Types
Uses
Tips
Paint
Tempera (poster paint)
?
Opaque
Watercolor
?
Transparent
Both are water based.
?
Tempera - Can paint over
mistake with addition layer of
paint.
?
Watercolor - Each layer of
paint will show through the
one on top of it.
?
Easy to clean up.
Palettes
Always use white palettes.
Used to mix colors before applying
them to a painting.
?
Styrofoam butcher trays
make great palettes.
?
Styrofoam egg cartons cut
in half make great paint
dispensers.
Brushes
The basic brush is a #7 round
brush.
?
#10 round brushes for basic
work.
?
0-#2 round brushes for detail
work.
?
Flat brushes for washes and
covering large areas.
Supports
The surface an artist paints on
(paper, canvas, board, etc.)
?
White drawing paper is most
common.
?
Heavier (80#) weight is
recommended.
?
Watercolor paper is very
expensive and should be
reserved for special project
only if used at all.
- 101 -
Art Docent Program
Everett Public Schools
Teaching Painting:
Classroom Management and Clean-up Strategies
Organizing Your Classroom for Painting:
To avoid long and chaotic clean-ups, be proactive in organizing your class for ‘paint days.’
?
Think about the traffic patterns in your classroom and figure out the best way for students to
access supplies, water for hand-washing and desk clean-up, and trash cans.
?
Be sure you have enough trash cans and towels available in strategic areas for faster and easier
clean-up.
?
Cover surface areas with butcher paper or newspaper in areas where paint will be distributed or
used.
?
Paint bottles should stay in a designated area rather than passed around the classroom. Plan to
give out paint to a small group of students at a time.
?
Assign designated ‘helpers’ to pass out paper, brushes, etc.
?
Assign designated ‘helpers’ who will take used palettes, brushes and water containers to the
sinks for cleaning at the end of the lesson.
?
Create a designated area for students to get brushes, palettes and water.
?
Determine what kinds of clean-up jobs will be needed, and assign them to students on a
rotating basis before painting starts.
Supplies:
For painting lessons, have two students share a container (like an egg carton cut in half) of the basic
paint colors you are using. In addition, each student will need:
?
A brush or brushes.
?
A palette for mixing their colors.
?
A water container (preferably 16 oz. or more)
?
Paper
Cleaning up:
The teacher’s role during clean-up is to supervise students doing the clean-up. Organize your
classroom so students have clear roles and responsibilities during clean-up, and then monitor
procedures to make sure they are done efficiently and students are on task. A well organized clean-up
procedure can be done in 5-10 minutes.
Clothing and Paint Stains:
To avoid paint stains on clothing, always have students wear paint shirts and have their sleeves rolled
up. Paint will sometimes stain, but usually not, if stain remover is applied to the stain immediately. It
is recommended to have a ‘stain stick’ handy to apply to paint stains before the students leave class.
Drying Student Work:
To avoid paint running and dripping, student work should be stored flat until dry. The most efficient
way to deal with 30 wet paintings is to put them on a drying rack. A drying rack is a wheeled wire
rack with 30-60 shelves an inch or so apart for drying wet papers. They are space efficient, and can be
wheeled out of the way when projects are finished. Ideally, every school should have a drying rack to
- 102 -
share among classrooms. If you don’t have a drying rack, placing projects on newspaper along the
walls in hallways or in the classroom is also a good way to get paintings out of the way while drying.
Keeping surfaces clean to minimize clean-up:
Cover surfaces where paint will be used with butcher paper or newspapers. Have a large trash can
handy in strategic areas for papers to be thrown out during clean-up. Teachers who do art projects
often can create re-usable desk covers by laminating sheets of heavy paper.
One Sink (or no sink at all) & 30 Students…How to Cope???
An organized painting set-up and clear clean-up procedures can make this situation workable. The
trick to an organized clean-up is to avoid the chaos of having multiple students crowding the sink
areas all at once. Some organizational suggestions:
?
When working without a sink, you will need one or two extra empty buckets available to dump
waste water from bush rinse containers.
?
Assign Sink Clean-up Helpers
. Only designated sink clean-up helpers are allows in the ‘sink’
area during clean-up. The sink helpers’ job is to clean dirty dishes (palettes/water containers)
at the sinks, and to wash/rinse them clean. A thrift store dish rack is helpful so that containers
can be stacked to air-dry. If you don’t have a sink, use buckets on a cart that can be wheeled to
a sink are for final clean-up.
?
Hand-Washing Station
. Designate a place for hand-washing. Most kids will want to use the
sink to wash their hands. You can either send them to the bathrooms, or have a ‘hand-washing
bucket/tub’ set up, with soap, towels and waste basket at one station in the classroom.
?
Surface Clean-up Helpers and Cleaning Station
. Have another station set up with a bucket
and sponges for wiping off tables and cleaning floors. Before painting, demonstrate how to
use a sponge (rinse and squeeze out excess water before wiping). Designated on student
responsible for surface clean-up in each area of the classroom on a rotating basis.
- 103 -
Art Docent Program
Everett Public Schools
Teaching Clay
Time:
Allow plenty of lead time for clay projects, especially if they are being produced for a special
occasion. Give yourself at least 3-4 weeks from start to your estimated completion date.
Class Time on Projects:
Work time on clay projects should be limited. Primary children in particular, tend to overwork their
clay and ruin their projects as a result.
Grades K-2
Projects should be done in one sitting, ranging from 15-
40 minutes of work time.
Take their projects as the finish without allowing time
for further refinement to prevent overworking the clay.
Provide water sparingly, if at all.
Grades 3-5
Can work for extended periods or days.
Carefully cover clay overnight to prevent drying.
Drying Time:
As children completed their projects, set them aside to dry gradually under plastic sheets or bags.
?
Slower draying time will result in less cracking and breakage.
?
Clay projects with attachments should be wrapped tightly for 24 hours, and then dried out
gradually to minimize cracking and breakage.
?
Make sure that no clay project is more than three quarters to one inch think in any one place.
Since unfired clay (greenware) is very fragile before firing, store projects for drying directly on the
cart used to wheel them to the kiln in an area where they will not be disturbed. The less handling
greenware undergoes, the more likely it will stay in tack and unbroken before firing.
Glazing:
When projects are finished, they should be ‘bisque-fired’ in the kiln before glazing. This will help
prepare the clay surface to accept the glaze and minimize further explosions/breakage during glaze
firing. Glaze is most easily applied by children with small sponges/pieces of sponge. Take care that
glaze is kept off the bottom of the pot or any surface that will contact the kiln. Glaze that touches the
kiln or kiln shelves will fuse to them during firing.
- 104 -
Teaching Clay
Back to top
Sequencing Experiences with Clay in the Elementary Classroom
Suggested
Grade Level
Pinch/Modeling and
Sculptural
Constructions
Slab
Constructions
Coil
Constructions
Skills/Techniques
Kindergarten
Animal sculptures –
emphasis on simple
forms such as turtles,
bears, birds, pigs, etc.
Pinch pots.
Cookie cutter
projects:
Wind
Chimes/Pendants
with stamped textural
designs.
Rolling coil ‘snakes’
creating coasters,
spook rests or
flowers.
Basic manipulations:
rolling slabs and balls,
pinching, poking,
rolling, pulling and
pressing.
Texturing clay by
stamping, drawing,
poking, etc.
1
st
Grade
Same as above.
Group sculptures – farms,
zoos, etc.
Tiles with textured or
painted decorations
(leaves/shells).
Wall hung pockets.
Small bowl with one
or two stacked coils.
Making textured
beads
Texturing, blending and
making clay additions to
form.
Cutting out clay shapes
with a tool.
Controlling coil shape
and size.
2
nd
Grade
Animal sculptures with
more extended forms and
using additive features.
Combining slab and coil
techniques in sculpture.
Slab vases – rolled
around a cardboard
tube.
Slab constructed
animal forms.
Attaching handles to
coiled constructions.
Simple coiled
animals molded over
paper tubes.
Rolling a slab between
two flat sticks.
Using water to smooth
sides and edges.
Making attachments,
varying coil shapes.
3
rd
Grade
Additive sculpture using
a variety of construction
methods.
Joining pinch post to
make sculptural forms.
Hump/drape molded
slab bowls with
applied textures and
added foot attached.
Coiled forms created
in a mold/bowl.
Adding features and
attachments with
slurry/slip. Controlling
moisture in the clay.
4
th
Grade
Subtractive sculpture –
relief projects.
Clay masks, fish or
figures based on slab
vase form,
attachments made
with slurry and slip.
Coil pot made by
blending coils
together – up to 4” in
height.
Blending coils, making
attachment with
slip./slurry.
Planning constructions
and construction
methods.
Controlling moisture.
5
th
Grade
Using additive and
subtractive methods.
Smoothing and finishing
surfaces, incorporating a
variety of textures.
Clay
boxes/containers
Adding coil
attachments of
twisted or braided
clay.
Planned construction of
complex forms using a
variety of methods.
Controlling moisture.
- 105 -
Recommended Tools and Tips
Tool
Types
Uses
Low-fire Clay
Terra Cotta (fires brown)
Wolf Creek (first white)
Washable Desk Cover
Canvas
Sheeting
Laminated paper
Keeps desk clean.
Clay Modeling Tools
Can also use:
Craft sticks
Pencils
Safe kitchen cutlery
Old Combs
Scoring
Texturing
Piercing
Smoothing
Making attachments.
Sponge
Small pieces of sponge
Large Sponges for Clean-up
Applying glaze or slurry
Other found Objects
Some examples:
Legos
Forks
Feathers
Pieces of Rubber sole form a shoe
Adding texture
Rolling Pins
Can also use:
Plastic Pipe
Wooden Curtain Rods
Rolling
String or Wire
Cutting clay from the block
Sinks or Buckets
Washing and Cleaning-up
Glaze
Low-fire glazes labeled for cone
range 06-04 for brighter colors
- 106 -
- 107 -
- 108 -
- 109 -
- 110 -
- 111 -
- 112 -
- 113 -
Art Docent Program
Everett Public Schools
Western Art History Chronology :
Period and Movements
Greece
Archaic Period
800-500 BC
Classical
500-350 BC
Hellenistic
350 BC-100 AD
Rome
100 BC – 450 AD
Early Christian
200 AD – 500 AD
Byzantine
500-1450
Early Medieval (Dark Ages
)
500 – 100
Romanesque
1000 – 1200
Gothic
1150 – 1500
Renaissance
1400 – 1600
Baroque
1600 – 1770
Nineteenth Century
Neo- Classicism
1770 – 1820
Romanticism
1790 – 1850
Realism
1830 – 1870
Impressionism
1870 – 1900
Post-Impressionism
1880 – 1910
Twentieth Century
Fauvism
1905 – 1910
Cubism
1907 – 1920
Expressionism
1905 – 1930
Surrealism
1930 – 1940
Abstract Expressionism
after 1940
Period names as ‘Romanesque’ ‘Gothic’ or ‘Renaissance’ are nothing more than
convenient labels. Each period covers a span of time within which art was dominated
by a distinctive style. Naturally, these periods did not begin or end suddenly. Old
styles gradually faded, new ones came into being slowly; the old and the new
overlapped. The development was often so gradual and so continuous that no one
notices it at the time; however, looking back, we can clearly distinguish between the
different period styles
.
- 114 -
TWENTIETH CENTURY WESTERN ART MOVEMENTS
The following are the most prominent and most often categorized movements of painting
between 1875 and today in America and Europe:
Impressionism
Pisarro
Monet
Post Impressionism
Seurat
Cezanne --------------------------------}
Gauguin, Van Gogh
}
Fauvism
Matisse
}
Roualt
}
Vlaminck, Derain, Dufy
} Expressionism
German Expressionism
Kirschner
}
Kokoschka, Kollwitz
}
Kandinsky ---------------------------- }
Cubism
Picasso, Braque
Futurism
Boccioni
Dadaism
Duchamp
Ernst
Surrealism
Dali
Magritte
Miro
Abstract
Pollock, Motherwell
Expressionism
De Kooning
Pop
Warhol
Lichtenstein
Op
Poons
Riley
Kinetics
Len Lye
Rickey / Tinguley
- 115 -
Western Art Periods and Movements
Period
Description
Key Artists
RENAISSANCE
1400-1600
?
Artists saw classical antiquity as peak era of mans’ creative genius interrupted by barbaric
invasion of Roman Empire.
?
Authenticity in clothing, draping, architecture and perfection of body.
FLORENTINE
1400
Early Renaissance,
Italian/Southern
?
Exact imitation of nature with “return to classics.”
?
Open window perspective, precise surface detail and texture.
Ghirlandaio
Uccello
FLEMISH
1400
Netherlands/North
?
Overly detailed realism, airy vastness of landscape, perspective.
?
Honest expression in faces.
Metsys
Van Eyck
HIGH
RENAISSANCE
1450-1500
Central and
Northern Italy
?
Artist as sovereign genius not devoted to craftsman.
?
3-D bodies made visible not by outlines but incidence of light (chiarocurro).
?
Emotional continuity of gestures/faces.
?
Dramatic, sculpturally solid, ample yet intimate, glowing light.
Da Vinci
Michelangelo
LATE
RENAISSANCE/
”MANNERISM”
1500-1600
?
Mannering works after high renaissance geniuses.
?
Anticlassical elegance.
BAROQUE
1600-1750
Rome
?
Final, irregular phase of Renaissance. New Style of worldly splendor born in Catholic
Church who wanted to make Rome the richest, prettiest city in the world.
?
Dynamic, moving bodies burst framework and draw viewer in.
?
Theatrically brilliant light.
?
Massive scale appealing to sense of touch. Emphasis on the dramatic moment.
?
Artist’s embraced it as a movement against Mannerism’s lack of emotion.
Hals
Hogarth
Rembrandt
early Gainsborought
Goya
Lorrain
La Tour
Canaletto
ROCOCO
Mid-1700
French
?
Less Cumbersome than Baroque and more refined, sometimes called “miniature Baroque.”
?
Intimate in scale and manual. Playful decoration, floating grace of forms, spontaneous feel.
Fragonard
Watteau
- 116 -
Period
Description
Key Artists
NEO-
CLASSICISM and
ROMANTICISM
1750 – 1850
England
?
Emphasis on feelings and imagination. A nostalgia for the past. A kind of romantic
revival of classic antiquity.
?
A desire to feel emotions intensely and tear down bars to “return to nature.”
?
Nature becomes sublime, picturesque, unbounded and ever-changing.
?
Taken from the term “Romances” for romance novels popular at the time which were
daring adventures that stirred emotions and imagination.
England
– Constable,
Turner
Spanish
– Goya
French
– Cezanne,
Daurmier, David,
Delacroix, Millet
American
– Bingham,
Sully
REALISM
1830 – 1870
?
Solid and matter-of-fact delivery.
?
Expressing heroism of modern life.
?
Artist relies on own direct experience and cannot paint things he has not seen (such as
angels).
?
Belief in everyday life as worthy subject for art. Refutes “ideal” art.
Early Manet (“art for
art’s sake”)
Currier and Ives
Edward Curtis
EXPRESSIONIS
M 1874-1900
?
Luminous and flickering color patches.
?
Color, not line seems to make the forms.
?
Non-neutral, hazy backgrounds. Interplay of reality and reflections.
?
“Slice of Life” subject matter.
?
Not “reality” per se, but the artist’s impression of the reality he sees.
?
Usually painted outside capturing the impressions of the moment. Dabs of color, often
straight from the tube. Color as light.
?
Manet’s “Luncheon on the Grass” started the movement, but Manet did not associate
himself with Impressionists.
French
– Degas, Monet,
Morinot, Renoir,
Cezanne.
American
– Homer,
Whistler
English
– Turner
POST-
IMPRESSIONISM
1880-1910
?
Renewed concern with problems of form; more formal concepts of art and emphasis on
subject matter.
?
Groups of artists who passed through Impressionism but became dissatisfied with
limitations of style. Not anti-Impressionism, more like late Impressionism.
?
Shadows are treated like shapes in their own right, solid and clearly bounded.
?
Balance of 2-D with 3-D.
Cezanne
Gaugin
Rousseau
Seurat
Toulouise-Latrec
Van Gogh
- 117 -
Period
Description
Key Artists
EXPRESSIONIS
M 1905-1930
?
Stresses artist’s emotional attitude toward himself and the world.
?
Concern with human community.
?
Free expression of the artist rather than representation of the reality of the subject.
?
Exaggeration and distortion of line and color.
FAUVISM
French
Flat, vivid color planes and heavily outlined, primitive feeling in distorted forms. (Came from
the French word for “beast,” a critic’s interpretation of the art.
Matisse
Rouault
BRUCKE
German
From the German word meaning “bridge.”
Kokoschka
BLUE RIDER
German
Rich, unnatural colors
Marc
Kandinsky
FANTASY
1920
Explores realm of imagination, irrationalism.
Dali’s surrealism
AB: ACT
1907
?
Stresses formal structure of the work; concern with structure of reality, analyzing and
simplifying obscured reality.
?
Generalized and universal as opposed to concrete and realistic.
Kandinsky
Miro
Mondrian
CUBISM
1907-1920
?
Prevalence of sharp edges and angles.
?
Natural forms replaced by geometric shapes.
Picasso
Braque
Demuth
FUTURISM
?
Rejects past, exalts beauty of the machine.
?
Mechanized, angularized subjects.
Stella
Duchamp
ABSTRACT
EXPRESSIONIS
M\
after 1940
?
Something general rather than specific.
?
Created images by manipulating paint.
Tobey
Davis
DADAISM
All-purpose word for ”non-art, non-sense.” Duchamp pulled the word from a French
dictionary haphazardly (it means hobbyhorse).
- 118 -
American Schools of Art
Period
Description
Key Artists
PRIMITIVE
Mid-1800s
?
Artisan rather than artist.
?
Naive yet innate decorative sense.
?
Some itinerant portrait painters how disappeared with advent of camera.
Hicks
HUDSON RIVER
SCHOOL
1850-1890
?
Romantic, majestic views of American landscapes.
?
Rooted in Impressionism
Bierstadt
19
TH
CENTURY
WESTERN ART
?
Western life portrayed as worthy subject matter for artist.
?
Depictions of cowboys, Indians, and settling of the west.
Remington
Russell
ASH CAN
SCHOOL
1890-1910
?
Named by critic who did not like their work.
?
Also called “The 8” after eight Philadelphia artists who founded it.
?
Formed to champion native themes as worthy of subject matter.
?
Spontaneous depictions sketched like “newspaper artist”
?
Depicted life “as she is led.”
?
Appreciated qualities of light used by Impressionists.
Bellows
AMERICAN
SCENE
1930-1945
?
Social Realism/Urban Realism
?
Reflected character of American people, especially working class.
Davis
Evergood
Hopper
Hassam’s cityscapes
PRECISIONISTS
?
Depicted rural and small town life realistically in form and content
Wyeth
Rockwell
POP
1950-1960
?
Reaction again abstract expressionism.
?
Portrayal of aggressively contemporary objects taken from media.
?
Art comes down to earth and back to manner
- 119 -
Section 5:
Resources and Forms
- 120 -
Art Docent Program
Everett Public Schools
Training Opportunities
The Arts Council of Snohomish County provides a yearly training
opportunity for all Art Docents in Snohomish County. These
trainings usually are presented in the fall, and are hands on. Art
Docents leave the training with lesson ideas and can use the
opportunity to meet other art docents.
For further training information, please visit the Arts Council of
Snohomish County website at
http://www.artscouncilofsnoco.org/education/teacher.htm
.
- 121 -
Art Docent Program
Everett Public Schools
Art Docent /Teacher Planning Form
Docent Names(s)/ Phone
:
_______________________________________________________________________
Docent Coordinator:
_____________________________________________________
Phone/ email:
__________________________________________________________
Teacher name:
__________________________________________________________
Phone/email:
___________________________________________________________
Classroom display space available for prints/ student artwork? Yes____ No_____
PRESENTATION SCHEDULE:
OCTOBER:
Print to be presented:______________________________________________________
Optional art activity follow-up: _____________________________________________
Date of Presentation: ______________________________________ Time:__________
NOVEMBER:
Print to be presented:______________________________________________________
Optional art activity follow-up: _____________________________________________
Date of Presentation: ______________________________________ Time:__________
DECEMBER:
Print to be presented:______________________________________________________
Optional art activity follow-up: _____________________________________________
Date of Presentation: ______________________________________ Time:__________
JANUARY:
Print to be presented:______________________________________________________
Optional art activity follow-up: _____________________________________________
Date of Presentation: ______________________________________ Time:__________
- 122 -
FEBRUARY:
Print to be presented:______________________________________________________
Optional art activity follow-up: _____________________________________________
Date of Presentation: ______________________________________ Time:__________
MARCH:
Print to be presented:______________________________________________________
Optional art activity follow-up: _____________________________________________
Date of Presentation: ______________________________________ Time:__________
APRIL:
Print to be presented:______________________________________________________
Optional art activity follow-up: _____________________________________________
Date of Presentation: ______________________________________ Time:__________
MAY:
Print to be presented:______________________________________________________
Optional art activity follow-up: _____________________________________________
Date of Presentation: ______________________________________ Time:__________
Notes:
District Art Docent Program Coordinator: Allison Larsen
(425) 385-4063 / email: alarsen@everettsd.org
- 123 -
- 124 -
- 125 -
Art Docent Program
Everett Public Schools
Online Resources
Arts Council of Snohomish County
http://www.artscouncilofsnoco.org/
Provides training opportunities for art docents, art trunks, field trips to the gallery and support materials for
visual arts education.
Seattle Art Museum
http://www.seattleartmuseum.org/Learn/SchoolTeacher/online_resources.asp
Provides trainings, art trunks, online visual arts lessons, field trips, and support materials for visual arts
education.
Metropolitan Museum of Art Heilbrunn Timeline of Art History
http://www.metmuseum.org/toah/hd/anat/ho_17.50.16.htm
An online encyclopedia that provides information about Art History by World Region, Timeline, Thematic Essay
and Works of Art. An excellent source for images.
Smithsonian American Art Museum
http://americanart.si.edu/exhibitions/online/
Provides information about American Artists and has online exhibits of art works
.
The Getty
http://www.getty.edu/education/
Provides lessons plans and teacher resources.
Wikimedia Commons
http://commons.wikimedia.org/wiki/Main_Page
Provides public domain images of works of art.
Davis Publications
http://www.davisart.com/Portal/Home/HomeDefault.aspx
Provides support for our currently adopted Adventures in Arts curriculum.
Smithsonian Cooper-Hewitt National Design Museum
http://www.educatorresourcecenter.org/view_lesson_plans.aspx
Provides Lesson Plan ideas in design for every grade level.
PBS American Masters Series
http://www.pbs.org/wnet/americanmasters/category/episodes/by-topic/visual-arts/
Provides information about American masters of many genres, including the visual arts.
National Gallery of Art
http://www.nga.gov/onlinetours/index.shtm
Provides online tours including images of famous American Art.
Back to top