Moodle Instruction Sheets
For personal assistance contact LauriBeth Hull
lhull@everettsd.org
425.385.4208
Setting up the class 1
Setting up groups 2
Enrolling students 3
Working with the interface 5
Working with the Calendar 6
Assignments 8
Book Review database 9
Forums 10
Journal activities 11
Tests 12
Wikis & Glossary 14
Back to top
Setting up your Moodle class
Contact LauriBeth Hull to establish your class on Moodle
Establish your settings
Log into your class
Click Settings in the Administration section
The Category, Full name, Short name and if applicable Course ID fields have already been set for you. Contact LauriBeth Hull before making any changes to these.
Type a Summary if you desire. This is a brief description of the class.
Format has been set to Topic
Select from Number of weeks/topics how many topic areas you want to appear in your course.
Select the options desired in the fields offered in this section.
Question mark icon  gives explanation of each field.
Enrollment Section – leave at default unless you want to specify a start and end date for the class.
Enrollment Expiry Notification – leave at default unless you specified an end date for the class.
Groups – Recommend setting for individual activities rather than whole course, unless you plan to put multiple classes in one online course.
No groups - there are no sub groups, everyone is part of one big community
Separate groups - each group can only see their own group, others are invisible
Visible groups - each group works in their own group, but can also see other groups
Availability
Select Availability
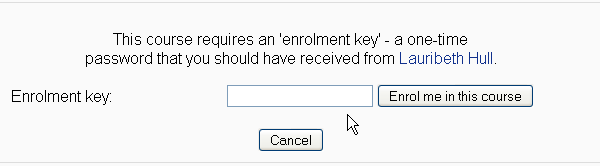
Set Enrollment key
Set Guest Access – Select either Do not allow guests or Allow guests who have key
Language – leave at default unless you teach a foreign language.
Role renaming – leave at default unless you have a specific reason to display a different name for a role.
Click Save changes
Back to top
Setting up Groups in Moodle
Log into your class
Click Groups in the Administration section
Two ways to create Groups:
Auto Create Groups
Click Auto Create Groups
Click Show Advanced
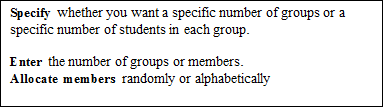
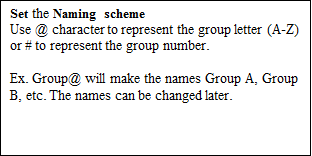
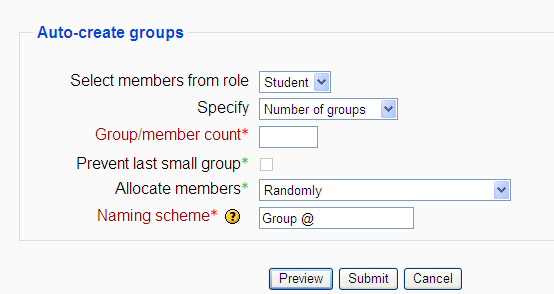
Click Preview to see the groups or Submit to apply the groups.
Manually Create Group
Click Create Group
Type in Name of the group
Type in Description of group (optional)
Enrollment Key - if you define a *group* enrolment key then not only will entering that key let the user into the course, but it will also automatically make them a member of this group.
Click Save Changes
Edit group settings by Selecting the group then click on Edit group settings
Edit group membership by Selecting the group then click on Add/Remove users – class list will appear and you can adjust group membership.
Back to top
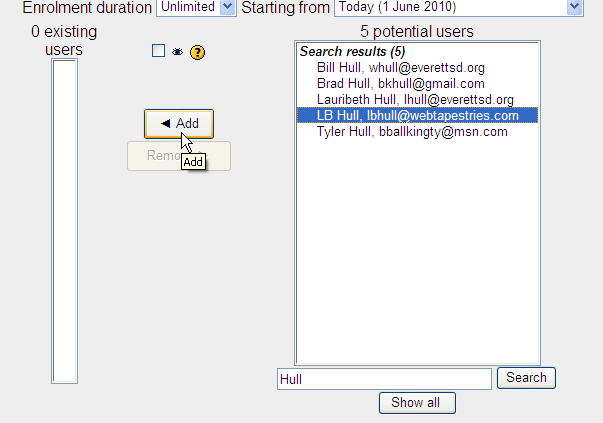
Enrolling Students in Moodle
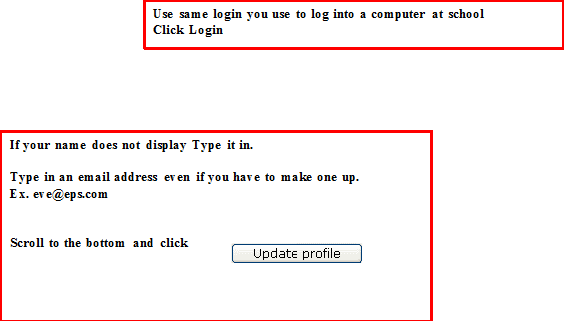
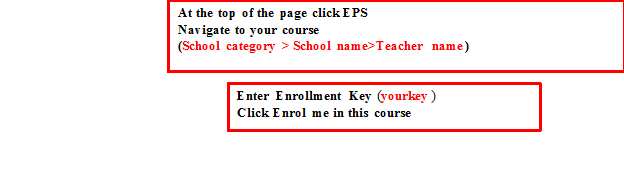
It is highly recommended that students self enroll in their online class. The second page shows the traditional getting started instructions. Email LauriBeth Hull to get an electronic copy to modify for your own class.
However, as the teachers you can enroll and unenroll students.
Click on Assign Roles in the Administration section.
Click on Students

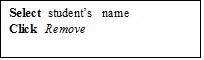
To unenroll a student:

Note: It is recommended that middle school teachers change their enrollment key once all students have enrolled. See instructions on Setting up a Moodle class.
Getting to Your Online Class
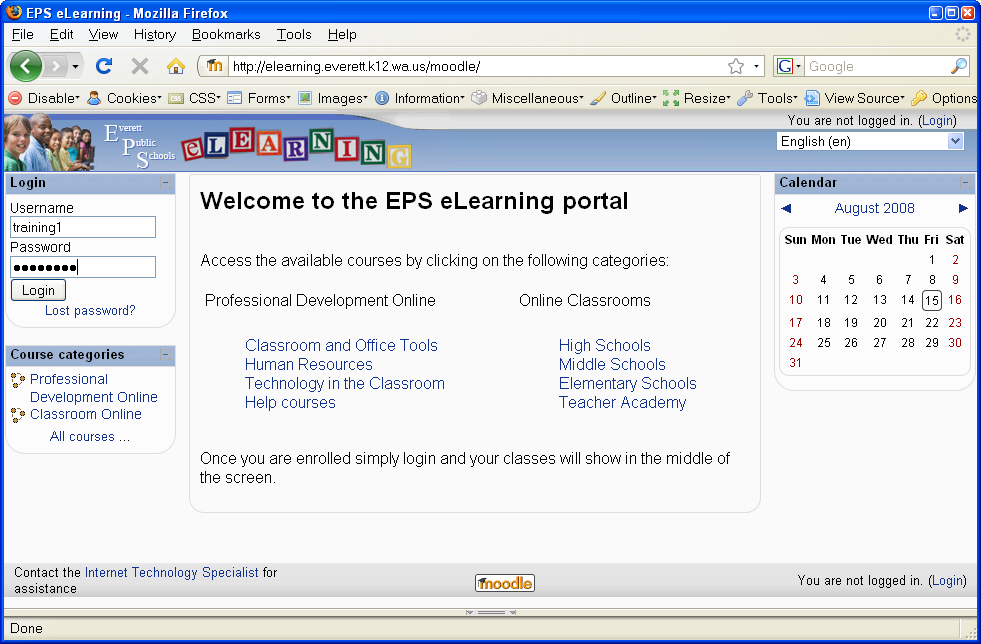
Open an Internet Browser (IE, Firefox, etc.)
Go to
http://elearning.everett.k12.wa.us/moodle /
Know – School, Teacher, Course, Enrollment Key and your Computer Login.


Back to top
Working with the Moodle Interface
Log into your class
Click Turn Editing On (top right button)
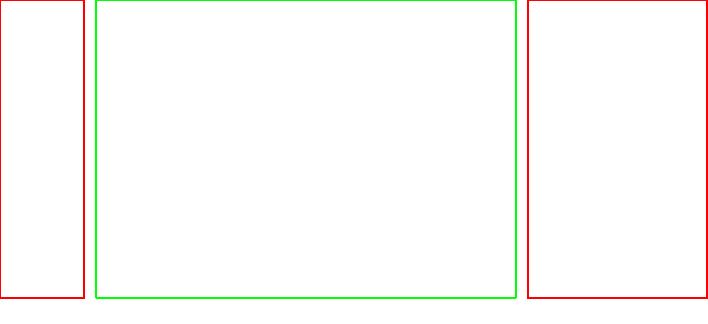
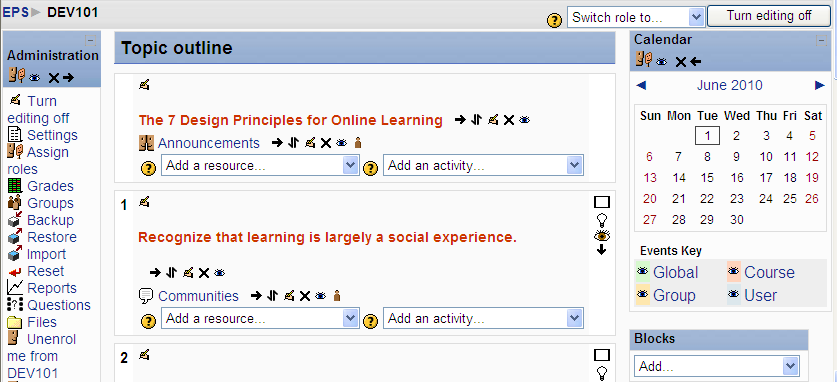
Blocks are outlined in red. To add blocks to the page Click on the drop box in the Block section.

These tools are in each block. 
Assign roles hide(show ) delete move
When you delete a block it becomes part of the Block section’s list and can be added again.
The Topic area is outlined in Green. The tools below are available in the topic area.

 Show only this topic ( show all topics)
Highlight this topic as the current topic
Show or hide  the topic from students
Move the topic
Add a resource or activity by using the drop box.
The Question mark icon gives explanation the available resources or activities.


These tools  allow you to work with a resource or activity after it has been added to the course.
Indent move edit delete hide(show  )
)
Back to top
Moodle Calendar
The Calendar allows instructors to post due dates for assignments and other activities as helpful reminders for their students, and also allows students to post private deadline reminders, events notices, etc.
Click on the Month at the top of the calendar tool to go to the editable version of the calendar.

Click on the New Event button (at the top, right of the Month screen).
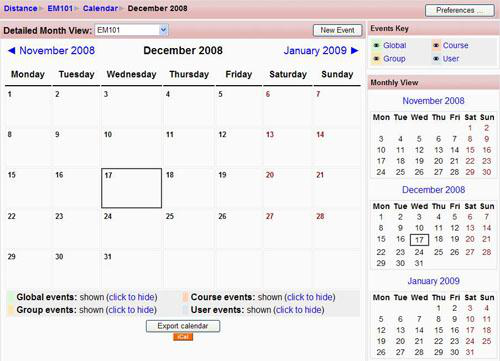

Select Course Event and click OK
Give your event a name, and type a description of it if needed.
In the Date section, choose the date on which the event will take place.
In the Duration section, choose how long the event will take place (for example, if your event starts on July 30th,and is a two-day workshop, your duration would be until July 31st.)
In the Repeats section, you can choose to repeat your event weekly. For example if you have a weekly quiz, you could post one reminder and set it to appear at the same time on the same day every week. When finished, click on the Save changes button. Your new entry will now appear in your calendar.
There are 4 categories of calendar events that you may encounter in your Moodle course(s).
Site event: an event posted by a Moodle course administrator that is visible in all Moodle courses. This may be used to inform all Moodle users about a maintenance issue, or a power outage.
Course event: an event posted by an instructor. It generally something specific to the course (for example, an assignment deadline) and is visible to all students in that course.
Group event: an event posted by an instructor that is only visible to the members of one group in a specific course.
User event: an event that can be posted by a student and that is visible only to the student who posted the event. Think of it as a personal reminder…
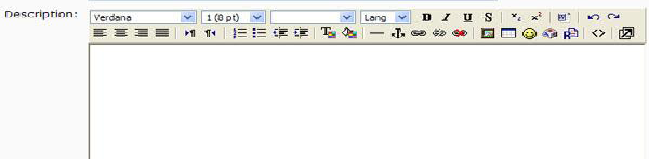
Add a link to an activity or a file
Click in the Description area
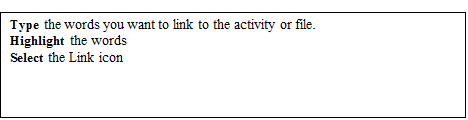
If you want to link to an activity you would need to copy the URL for the activity. You get that by right clicking on the activity link and selecting property.
If you want to link to a file you can upload it ahead of time or at the time you create the link.
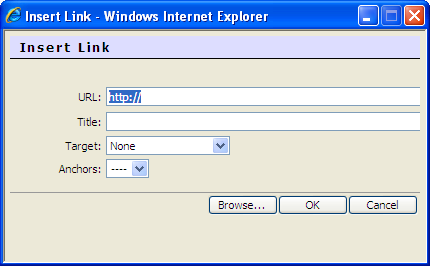

Paste in URL or

Click Browse
Click on the file you want for the link and then click OK.
Click Save Changes
Test your link
Back to top
Setting up Moodle Assignments
Click Turn Editing On
Select the type of assignment you want from Add an Activity drop box
Upload a single file - This could be a Word document, spreadsheet or anything in digital format. After students upload their files, the teacher will be able to open the submission and use the Moodle interface to assign a grade and offer comments as feedback.
Advanced uploading of files - options include: multiple file submission, allowing students to type a message alongside their submission & returning a file as feedback.
Online text - students type directly into Moodle, teachers can provide inline feedback.
Offline Activity - teachers provide a description and due date for an assignment outside of Moodle. A grade & feedback can be recorded in Moodle.
Type in the Assignment name
Type in Description
Select Grade option
Select date for availability and due date.
Select whether to prevent late submissions.
Select the options desired in the fields offered. Question mark icon gives explanation of each field.
Click Save and Display or Save and return to course
Note: It is possible to create iterative assignments - where the piece of work is graded by the teacher, re-edited by the student, re-graded and so on using either the single file or the online text and setting 'Allow resubmitting' to 'Yes' in the assignment settings.
Back to top
Creating a Book Review Database
Click Turn Editing On
Select Database from Add an Activity drop box
Type in database name (Book Reviews)
Type in Introduction
Set the fields for the activity
Keep availability disabled
Leave the rest set on default unless you choose otherwise.
Allow Comments – Choosing yes means students can comment on entries..
Require Approval - Should entries be approved by a teacher before they are viewable to students? Usually I don’t worry with this, but you may want to do it this way.
Ratings – Drop the rating box and select 5.
Click Save and Display

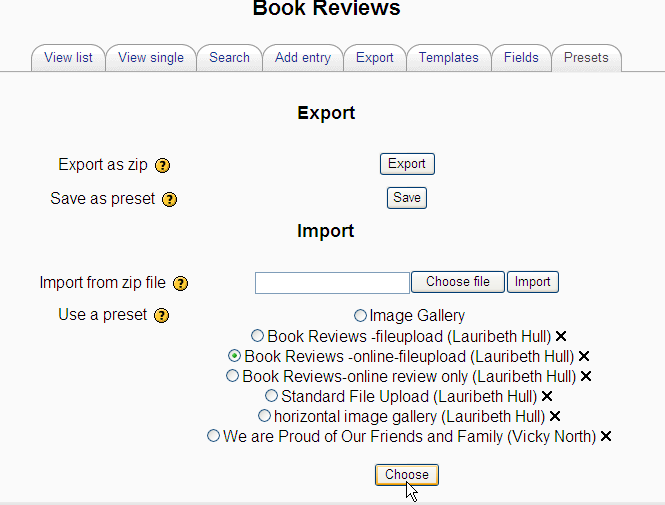
Select Overwrite current settings and click Continue.
The database is now ready to use. You can make your own modifications.
Back to top
Setting up a Moodle Forum
Click Turn Editing On
Select Forum from Add an Activity drop box
Type in the Forum name
Select the type of forum
A single simple discussion - is just a single topic, all on one page. Useful for short, focused discussions.
Standard forum for general use - is an open forum where any one can start a new topic at any time. This is the best general-purpose forum.
Each person posts one discussion - Each person can post exactly one new discussion topic (everyone can reply to them though). This is useful when you want each student to start a discussion about, say, their reflections on the week's topic, and everyone else responds to these.
Q And A Forum - The Q & A forum requires students to post their perspectives before viewing other students' postings. After the initial posting, students can view and respond to others' postings. This feature allows equal initial posting opportunity among all students, thus encouraging original and independent thinking.
Type in the Forum introduction
Select the subscription status
When a person is subscribed to a forum it means that they will be sent email copies of every post in that forum (posts are sent about 30 minutes after the post was first written).
“No” means people can usually choose whether or not they want to be subscribed to each forum.
“Yes, forever” means all course users will be subscribed automatically, even those that enrol at a later time. They cannot unsubscribe.
“Yes, initially” means all current and future course users will be subscribed initially but they can unsubscribe themselves at any time.
“Subscriptions not allowed” means no one can subscribe. This is recommended when many students do not have email accounts.
Select Read tracking status - If 'read tracking' for forums is enabled, users can track read and unread messages in forums and discussions.
Select Maximum attachment size – Control the size of attachments or if attachments are allowed.
You can also set grading or rating fields, Block users from posting after a given number of posts in a given period and set up the forum so that it is a group activity where a limited number of students participate in the forum together.
Click Save and Display or Save and return to course
Back to top
Activities that can be used for Journaling
Online text Assignment
Select
Online text
Assignment from the Add... dropdown list.
This requires the students to write their task in Moodle (using the Moodle editor, not MS Word). This type is suitable for most common writing tasks (as long as students are informed that they should avoid copying and pasting to the editor) and the inline commenting is a convenient option (provided the teacher likes to check and grade work on-line).
Complete the required fields. Assignment name and Description
Complete the optional fields as you desire. Use the ? icons if you need help determining what setting fits with your assignment.
Individual Wiki
Select Wiki from the Add... dropdown list.
Complete the form fields:
Wiki Name: Type the Wiki name.
Wiki Summary: Add the Wiki summary or instructions.
Type: Student
HTML Mode: HTML only
Group Mode: No groups
Click Save and display
Journal
Select Journal from the Add... dropdown list.
Complete the Adding a new journal form:
Journal Name: Type the journal name.
Journal Question: Add the journal question.
Grade: Decide if the journal will be graded.
Days available: Specify how long the journal will be available. Always open means that the journal will always be available. The other options mean that students
will no longer be able to edit their journal entry after the specified time has elapsed.
Click Save and display
Back to top
Creating Tests on Moodle
Creating a new quiz is a two-step process.
| 1.
| Create the quiz activity and set its options which specify the rules for interacting with the quiz. |
| 2.
| Edit the quiz to add questions to it. |

Quiz activity:
Click Turn editing on
Select Quiz from Add an Activity drop box
Type in quiz name
Type in instructions for taking the quiz
Set attributes in the following sections
| o
| Open and close date for the quiz
|
| o
| Time limit
|
| o
| Questions per page
|
| o
| Shuffle questions
|
| o
| Shuffle answers
|
| o
| Attempts allowed
|
| o
| Allow new attempt to contain the results of the previous attempt
|
| o
| Allow students to have multiple attempts on a question before moving on
|
| o
| Grading method for multiple attempts (highest, average, first, last)
|
| o
| Apply penalties if using adaptive mode
|
| o
| How many digits will be shown after the decimal point
|
| §
Review options section - what information students will be shown when they review their past attempts at this, and during the attempt in adaptive mode.
|
| §
Security section - provides more security for quizzes (making copying and cheating more difficult)
|
| §
Common Module settings
|
| §
Overall feedback - shown to a student after they have completed an attempt at the quiz. The text that is shown can depend on the grade the student got.
|
| Example: |
| Grade boundary: 100% |
| Feedback: "Well done" |
Grade boundary: 40% Feedback: "Please study this week's work again"
Click Save and display
Creating Questions for the Quiz:

You have a default category for your course. You can create a question bank here. You can create sub categories, and import questions from a vendor or another teacher.
To add a sub category click categories link.
Scroll down to Add Category box
Make sure Parent is set to the default for your course
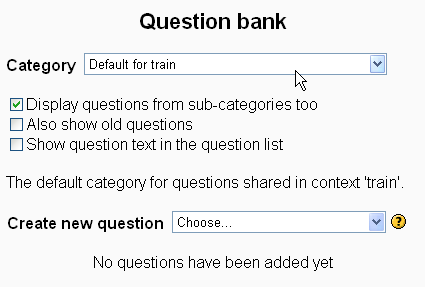
Type in a Name for the sub category
Click Add category
Click on Question link
Select your sub category from the Category dropdown
Select your question method in Create new question drop down.
Example: Multiple choice question
Give question a name
Type in the question
Set default grade and penalty factor
Select One or multiple answers
Select whether to shuffle the answers
Select numbering system (a,b,c/ 1,2,3 /no numbering)
Enter choices and grade for that choice (must equal 100%)
Enter feedback for specific choices
Enter general feedback
Click Save changes
Once you have your bank of questions click Quiz link.
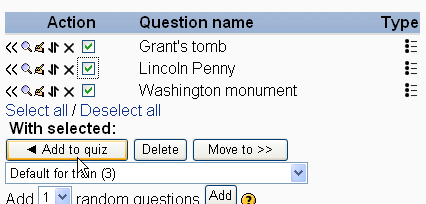
Select the questions you want to put in the quiz
Click Add to quiz
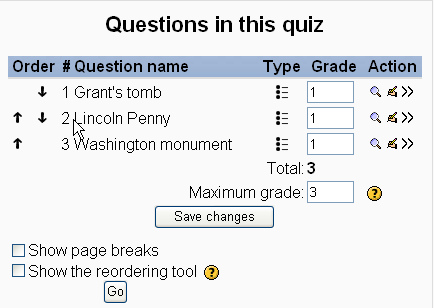
You can reorder, edit question, set grade.
If you make a change click Save changes
Click Preview tab to see the quiz.
Once students have taken the quiz you can see the results.
You can do any manual grading necessary (essay questions)
Item analysis is available
Back to top
Setting up a Moodle Wiki
The Moodle Wiki module enables participants to work together on web pages to add, expand and change the content. Old versions are never deleted and can be restored.
Click Turn Editing On
Select Wiki from Add an Activity drop box
Type in the Wiki name
Type in the description
Select the type of wiki – this combined with the setting of groups provides 9 possibilities:
| | No Groups
| Separate Groups
| Visible Groups
|
Teacher
| There is only one wiki which only the teacher can edit. Students can view the contents.
| There is one wiki for every group which just the teacher can edit. Students can view the wiki of their group only.
| There is one wiki for every group which just the teacher can edit. Students can view the wikis for all groups.
|
Groups
| There is only one wiki. The teacher and all students can view and edit this wiki.
| There is one wiki per group. Students can view and edit the wiki of their own group only.
| There is one wiki per group. Students can change the wiki of their own group only. They can view the wikis for all groups.
|
Student
| Every student has their own wiki which only they and their teacher can view and edit.
| Every student has their own wiki, which only they and their teacher can edit. Students can view the wikis of other students in their group.
| Every student has their own wiki, which only they and their teacher can edit. Students can view the wikis of all other students in the course.
|
Leave the remainder of the fields at default in this section unless you are used to working with Wikis.
Optional -the initial page name will be the wiki name, unless you select a page in the 'initial page' field. You can upload a text file that you point to as the initial page.
Set the remainder fields or leave at default
Click Save and Display or Save and return to course
Back to top
Setting up a Moodle Glossary
This activity allows participants to create and maintain a list of definitions, like a dictionary. The entries can be searched or browsed in many different format. The glossary also allows teachers to export entries from one glossary to another (the main one) within the same course. Finally, it is possible to automatically create links to these entries from throughout the course.
Click Turn Editing On
Select Glossary from Add an Activity drop box
Type in the Glossary name
Type in the description
Select options from the fields. Question mark icon gives explanation of field alternatives.
Click Save and Display or Save and return to course
Back to top
1